The Oracle CX Sales Cloud application has an all new mobile app that is now two months old and as with all new releases we are still learning some of the new functionality and development features now available to developers and users. In this post we will review three tips that we think will help developers when customizing the app and in turn help deliver a better product for Clients using the mobile app.
Below is a list of some of the powerful new features now available with the new CX Mobile app
1. New Offline data access capability
2. All new Development Interface
3. Ability to Navigate the app using Voice
4. All new User Interface that’s more intuitive and secure
5. Analytics Reports are now available within the Mobile App
In the earlier versions the mobile app development interface was integrated with the App composer, this provided less flexibility in designing and developing the app. However the new Mobile app has an independent development interface that has a drag and drop Interface designer and is much more developer friendly and robust. Below are three tips for the new Mobile App that will help developers deliver a better product to clients.
1. Using the Sandbox with the Mobile App
With the Old Mobile app, to review the configuration changes on the mobile app we had to make the configuration changes, publish the sandbox and then review the changes using the Mobile app. All that changes with the new app. The new mobile provides us the feature that allows us to test the mobile app configuration within the confines of the sandbox without publishing the sandbox. This feature comes in handy when deploying specific changes directly to the production environment, we can now test the changes in the sandbox on the mobile app and then deploy the changes.
To access this feature, once the configuration changes are complete in the Mobile App composer within a sandbox in the app composer. Login to the Mobile app using the same login that was used to create the sandbox for the configuration changes. After you login to the mobile app click on the “Sandbox” Icon on the Side bar on the left as below:
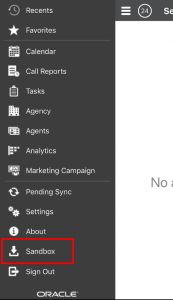
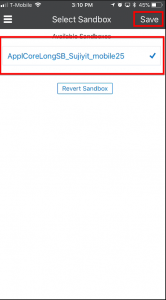
This should take you to the next screen that will show you the open sandbox available to this user. Click on the sandbox and you will see the check box appear to the right as below. Click on Save to save the changes and exit and apply this sandbox to the mobile app.
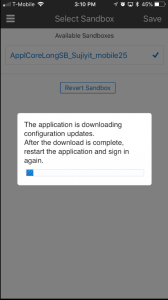
The mobile app downloads the sandbox as in the screenshot below. Once the download is complete, you can login to the mobile app and into the sandbox. we can then test the changes made to the mobile app in the sandbox on the Mobile phone before publishing the changes to the environment.
2. Customizing the Object Names
The new CX Mobile app also gives us the ability to rename Objects that appear on the Mobile app. This can be configured by accessing the New Mobile Application setup Interface on the app composer within a sandbox. On the mobile interface click on the “l18N” Icon on the side bar on the left as in the screenshot below:
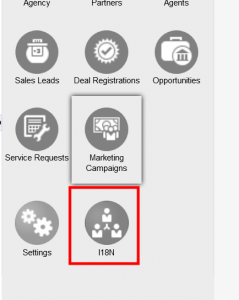
This takes us to the Internationalization page as below. Choose the language and then the Object that you want to rename in the Mobile app. In the next field key in the new name for the object, In this case I have renamed the “Opportunity” object to “Marketing Leads”. Once you have made the change save the changes by clicking on the green “Save” button on the upper right hand corner. The changes will reflect in the Mobile phone app once the sandbox is published.

3. Avoiding XML Binding Errors
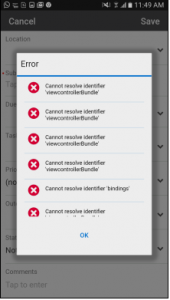
The mobile app layouts from the earlier version of the mobile app are transferred to the new mobile app development interface and when the sales Cloud patch is applied, so we sometimes get XML Binding errors when accessing these layouts on the Mobile Phone. It is always better to recreate the layouts in the new version PB7 or later to avoid these errors and get a clean start to the newer version of the app and avoid the errors.


Excellent article, very well written and too the point!