Introduction:
In general, the ETL (Extraction, Transformation and Loading) process is being implemented through ETL tools such as Datastage, Informatica, AbInitio, SSIS, and Talend to load data into the data warehouse.
The same process can also be accomplished through programming such as Apache Spark to load the data into the database. Let’s see how it is being done.
In our PoC, we have provided the step by step process of loading AWS Redshift using Spark, from the source file.
Pre-requisites:
-
- Install and configure Hadoop and Apache Spark
- Create an account in AWS and configure Redshift DB, refer to the below link to configure (http://docs.aws.amazon.com/redshift/latest/gsg/getting-started.html)
Step by Step process:
Step1: Establish the connection to the PySpark tool using the command pyspark
Step2: Establish the connection between Spark and Redshift using the module Psycopg2 as in the screen shot below
Step 3: Below is the screen shot for the source sample data (Initial load).
Step 4: Below is the code to process SCD type 2
import datetime
import psycopg2
format=”%y_%m_%d”
TODAY=datetime.date.today()
add = datetime.timedelta(days = 1)
YESTERDAY = datetime.date.today() – add
dd=datetime.date.strftime(TODAY,format)
value_list_match=[]
value_list_nochange=[]
value_list=[]
List_record_with_columns=[]
List_record=[]
List_Sep=[]
List_Seq_UPD=[]
conn=psycopg2.connect(dbname= ‘********’, host=’***********************************.redshift.amazonaws.com’,
port= ‘****’, user= ‘******’, password= ‘**********’) #Redshift Connection
cursor = conn.cursor()
file = open(“/home/vinoth/workspace/spark/INC_FILE_” + str(dd) +”.txt”)
Lines=file.readlines()
for a in Lines:
Line=a.split(‘\n’)
List_Test=list(Line)
List_record_with_columns.append(List_Test)
#print List_record_with_columns
num_of_records=len(List_record_with_columns)-1
#print num_of_records
for i in range(1,num_of_records+1,1):
a=List_record_with_columns[i]
List_record.append(List_record_with_columns[i])
file.close()
#print Dict1
Q_Fetch=”Select SEQ,ID,NAME,DESIGNATION,START_DATE,END_DATE FROM STG_EMPLOYEE WHERE FLAG=’Y'”
Initial_Check=”select count(*) from STG_EMPLOYEE”
cursor.execute(Initial_Check)
ora_row_count = cursor.fetchone()
#For initial Load
if ora_row_count[0] == 0:
for j in range (0,len(List_record),1):
value_list.append(j)
c=List_record[j]
d=c[0]
e=d.split(‘,’)
Insert_Q=”Insert into STG_EMPLOYEE(ID,NAME,DESIGNATION,START_DATE,END_DATE,FLAG) values (“+ str(e[0]) + “,” + “‘”+str(e[1])+”‘” + “,” +”‘”+ str(e[2])+”‘” + “,”+”CURRENT_DATE,NULL,’Y’ )”
cursor.execute(Insert_Q)
cursor.execute(“COMMIT;”)
else:
cursor.execute(Q_Fetch)
for k in cursor:
for j in range (0,len(List_record),1):
value_list.append(j)
c=List_record[j]
d=c[0]
e=d.split(‘,’)
if int(e[0]) == int(k[1]):
value_list_match.append(j)
if (str(e[1]) == str(k[2])) & (str(e[2]) == str(k[3])):
value_list_nochange.append(j)
over_all_value=set(value_list)
Match_values=set(value_list_match)
No_change_values=set(value_list_nochange)
UPDATE_INDEX=list(set(value_list_match).difference(set(value_list_nochange)))
INSERT_INDEX=list(set(value_list).difference(set(value_list_nochange)))
#To Update records
if ora_row_count[0] <> 0:
for ii in UPDATE_INDEX:
c=List_record[ii]
d=c[0]
e=d.split(‘,’)
#print e[0],e[1],e[2]
Q_Fetch_SEQ=”Select SEQ FROM STG_EMPLOYEE WHERE ID =” + str(e[0]) + ” and FLAG=’Y’ and end_date is null”
cursor.execute(Q_Fetch_SEQ)
ora_seq_fetch = cursor.fetchone()
Q_update=”Update STG_EMPLOYEE set Flag=’N’, end_date=CURRENT_DATE-1 where SEQ=” + str(ora_seq_fetch[0])
#print Q_update
cursor.execute(Q_update)
cursor.execute(“COMMIT;”)
#New record and update record to be inserted
if ora_row_count[0] <> 0:
for j in INSERT_INDEX:
c=List_record[j]
d=c[0]
e=d.split(‘,’)
Insert_Q = “insert into STG_EMPLOYEE(ID,NAME,DESIGNATION,START_DATE,END_DATE,FLAG) values (“+ str(e[0]) + “,” + “‘”+str(e[1])+”‘” + “,” +”‘”+ str(e[2])+”‘” + “,”+”CURRENT_DATE,NULL,’Y’ )”
cursor.execute(Insert_Q)
cursor.execute(“COMMIT;”)
print “<<<<<<< Final Report >>>>>>>>”
print “*”*50
print “Total Records From the file – ” + str(len(over_all_value))
print “Number of Records Inserted – ” + str(len(INSERT_INDEX))
print “Number of Records Updated – ” + str(len(UPDATE_INDEX))
print “*”*50
print “<<<<<<< FINISHED SUCCESSFULLY >>>>>>>>”
Step 5: Using the Spark-Submit command we will process the data
Since it is the initial load, we need to make sure the target table does not have any records. We can check as in below
$ spark-submit <file path>
(Note: Spark-submit is the command to run and schedule a Python file & a Scala file. If we are writing the program in Scala, then we need to create a jar file and a class file for that. To create a jar file, sbt (simple built-in tool) will be used)
This will load the data into Redshift. Below is the snapshot for initial load
Step 6: Below is the screen shot for the source sample data for the Incremental load
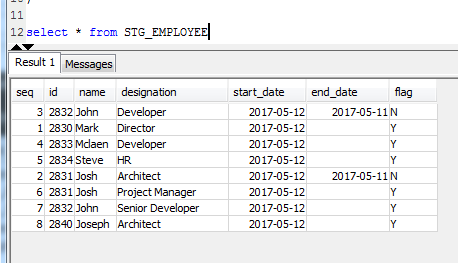
Step 7: We need to run the same command given in step 5, so the result will be like the snapshots below,
The Incremental data which got loaded to the Redshift


Excellent post for quick start. It would be great if some resources can be provided i.e. creating source table + sample data and then load into HDFS / Hive etc.
Thanks for your help.