
Jenkins is a well known and frequently used Continuous Integration tool. With wide community support, Jenkins has a very large set of plugins available to accomplish almost anything you need.
In this post, I will use the Job-DSL plugin to build a delivery pipeline which is a very common use case for a team following CI/CD practices.
While most organization prefer to use Jenkins as the overall orchestrator in the workflow, some organizations may use Jenkins for the complete lifecycle. These decisions depend on the availability of existing tools in your organization or on affordability. For example, you may use Jenkins to build an artifact then trigger Bamboo or UrbanCode for the deployment process as well as a security scan process like WhiteHat. Some of these tools may not be available in your organization and one can very well use scripting as an alternative for these tasks.
Even with Jenkins you have options to create Jobs manually or automate through Job-DSL, but both the devops and developer need to contribute to automation. The DevOps team needs to have some understanding of how the development process works and the developer needs to have some understanding of how Devops will join the pieces together to build an automation workflow.
The Job-DSL plugin in Jenkins allows you to automate job creation and configuration which makes it easy to maintain hundreds of jobs more than manually, which would not be fun for sure. The Job-DSL plugin uses groovy for scripting, which means both the Developer and the Devops team should have groovy knowledge.
Delivery Pipeline or Pipeline is often interpreted differently by various people and in some ways, everybody is right as there is no standard definition or rule for it. A Pipeline which works for one group may or may not work in same way for another. Most of the time a Pipeline will include stages/steps such as Build Automation, Test Automation, Security Checks (for e.g. WhiteHat scan), Deployment Automation (for e.g. Bamboo, Urbancode, scripting), Quality Checks (for e.g. SonarQube), Approval (for e.g. manual approval to deploy in UAT, Preprod or Prod environment), Notification, or Group Chat notification (for e.g. Slack, Hipchat).
Sample Application Delivery Pipeline
Let’s discuss one sample application delivery pipeline. In this sample app, assume that our pipeline consists of the following steps.
Build -> Automated Test -> Dev Deploy -> QA Approval -> QA Deploy
The Seed Job is the one which will be creating other Jenkins job automatically but the seed job itself will be configured manually. The Seed Job will read the DSL script, parse those and create appropriate Job configurations in Jenkins.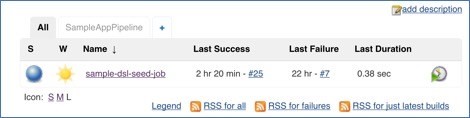
After the seed job runs successfully, we will have a job created for our sample app.
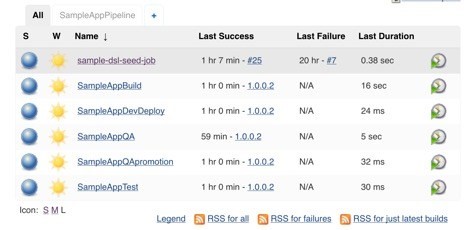
The Seed job will create the following set of jobs which will eventually be part of the pipeline. The Seed job will also create a Jenkins pipeline view.
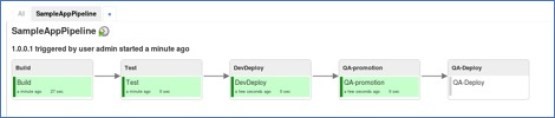
Pipeline View: Using this view you can visualize your delivery pipeline and see at which steps failure occurred.

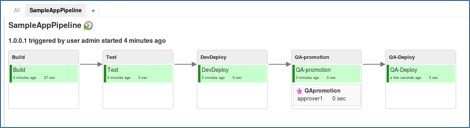
After the first build started, the pipeline will look like below:

Build: This job includes the configuration for the building project, job triggers, scm location, jdk version to use, maven goals, artifact upload to repo like Artifactory, and email notification.
Test: This job can call test suites and decide to call a downstream job or not.
Dev Deploy: Simple job with a trigger to the Promotion Job if the deployment was successful.
This job can call the script to perform a deployment or use tools like Bamboo or Urbancode.
Usually a Dev deploy doesn’t need promotion, but we can add that step if required.
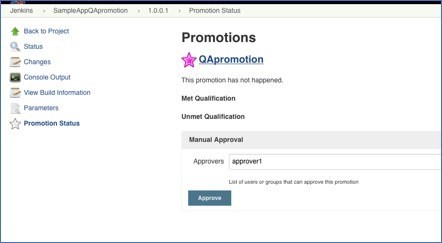
QA Promotion: This job includes a send email notification to the person/group responsible for approval. The email contains a link for promotion and an optional comment for approval notes. The Pipeline before approval:
The Promotion Email link can look like this: http://localhost:8080/job/SampleAppQApromotion/1/promotion/
Once the approver clicks on the link, the approval screen will come as below.
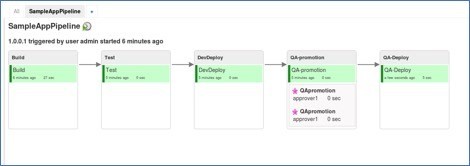
Once approved, the deploy job will run and the pipeline may look like below.
If you are a Jenkins Admin or have global privileges, you will see Force Execution Option as below.
After Re-execute Promotion
Jenkins Admin will see the Force Promotion option

In Pipeline, the star icon will show that a particular build is promoted and by which user.

QA Deploy: QA environment deployment job. This job can call a script to perform a deployment or use tools like Bamboo or Urbancode.
We can chain multiple Promotion Jobs and Deploy jobs to accomplish the need for another environment, for e.g. UAT Promotion -> UAT Deploy ->PreProd Promotion -> PreProd Deploy -> Prod Promotion -> Prod Deploy
Not every organization/team has fully automated test suites, in some cases it may be a combination of automated and manual testing. In such cases, we may introduce promotion steps anywhere in the pipeline to let the individual decide to promote or not.
Hi,
Can you provide the configuration for the sample you described above? and what plugins you used to achieve the result?
Thanks
Srava
Hi Susheel,
Can you let me know how to create QA Promotion job and the promotion link