Custom SQLs work differently than logical and physical SQLs. Instead of going through the OBTI subject areas and the Fusion PVOs in the RPD physical layer, custom SQLs are used to create custom data models in BI Publisher to extract ERP Cloud data directly from the Fusion database tables. The built-in Data Sync Oracle BI Connector does not support direct data extraction from BI Publisher reports, but the good news is that BIP reports are available as Web Services. With little Java coding effort, a specific Web Service client can be created to run and download BI Publisher reports as csv data files for Data Sync mappings to consume.
Use these five steps to extract ERP Cloud data from OTBI through custom SQLs and BI Publisher reports.
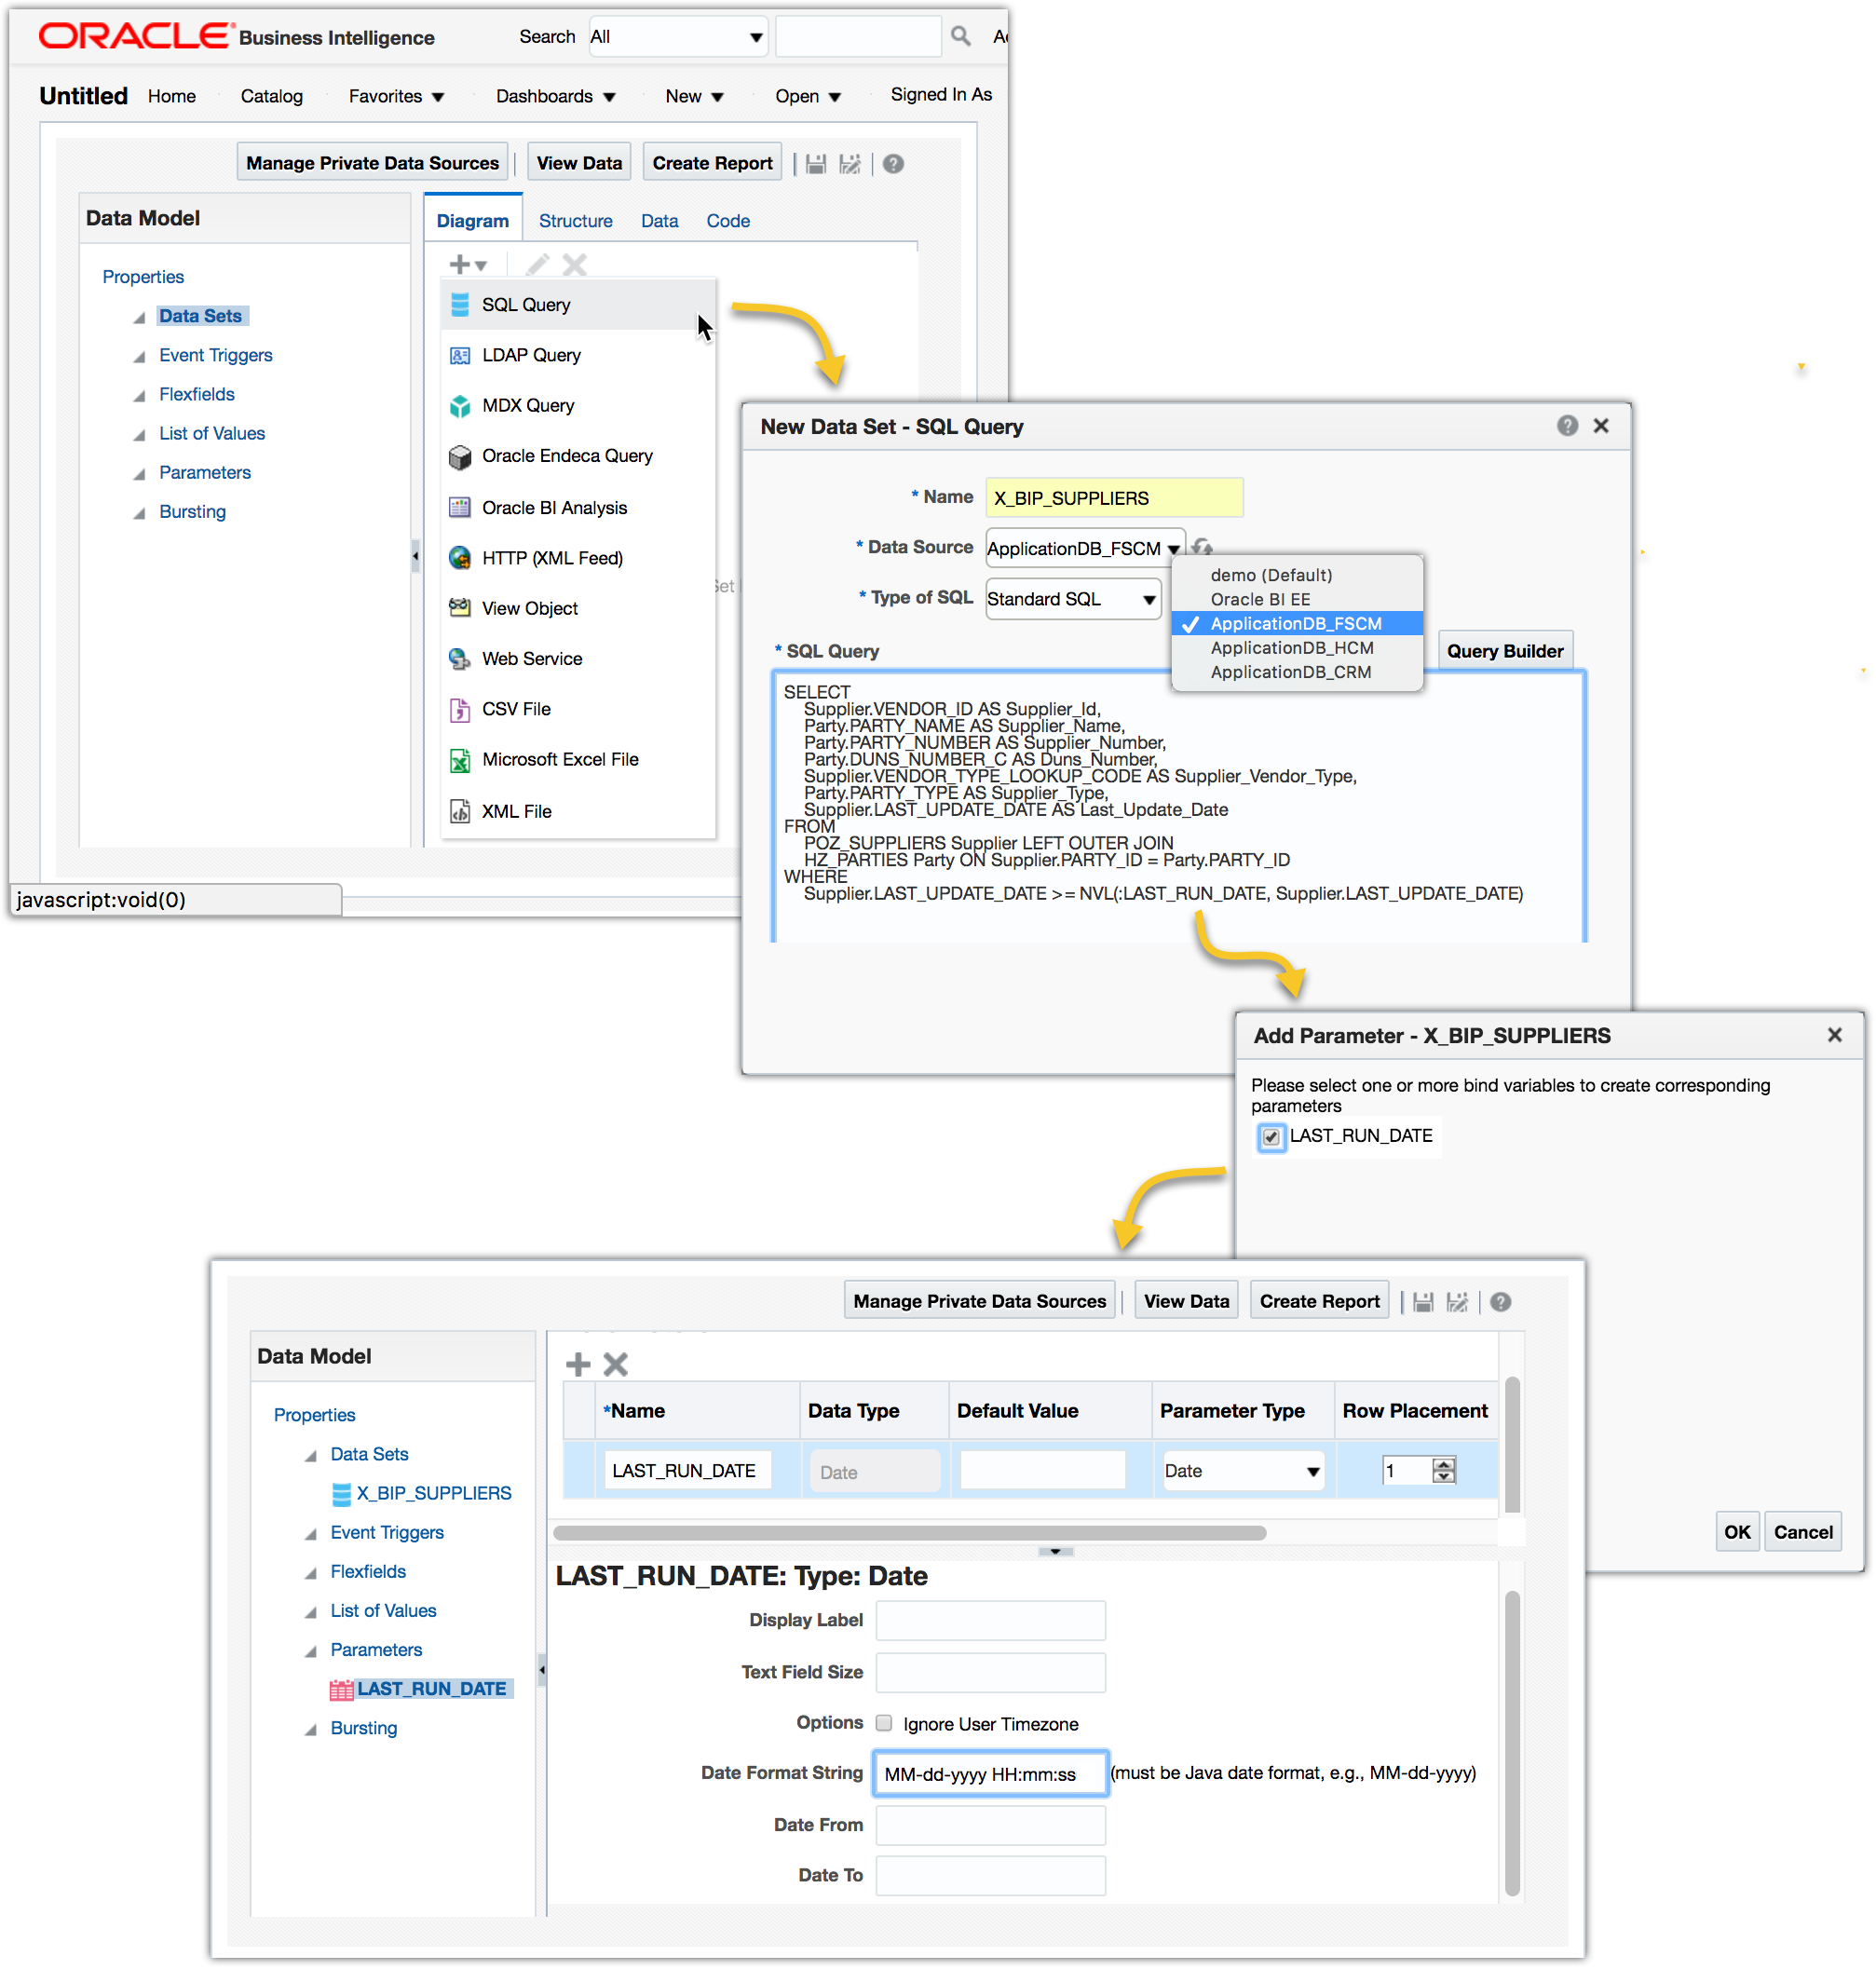
1. Create custom data models
Log in to OTBI Analytics, use the dropdown menu New->Data Model to create custom data models. The Fusion databases are prefixed with ApplicationDB_*.
For example, the following custom SQL will create a custom data model for Suppliers. Add the parameter LAST_RUN_DATE when is prompted and set the Date Format String to MM-dd-yyyy HH:mm:ss.
SELECT
    Supplier.VENDOR_ID AS Supplier_Id,
    Party.PARTY_NAME AS Supplier_Name,
    Party.PARTY_NUMBER AS Supplier_Number,
    Party.DUNS_NUMBER_C AS Duns_Number,
    Supplier.VENDOR_TYPE_LOOKUP_CODE AS Supplier_Vendor_Type,
    Party.PARTY_TYPE AS Supplier_Type,
    Supplier.LAST_UPDATE_DATE AS Last_Update_Date
FROM
    POZ_SUPPLIERS Supplier LEFT OUTER JOIN
    HZ_PARTIES Party ON Supplier.PARTY_ID = Party.PARTY_ID
WHERE
    Supplier.LAST_UPDATE_DATE >= NVL(:LAST_RUN_DATE, Supplier.LAST_UPDATE_DATE)
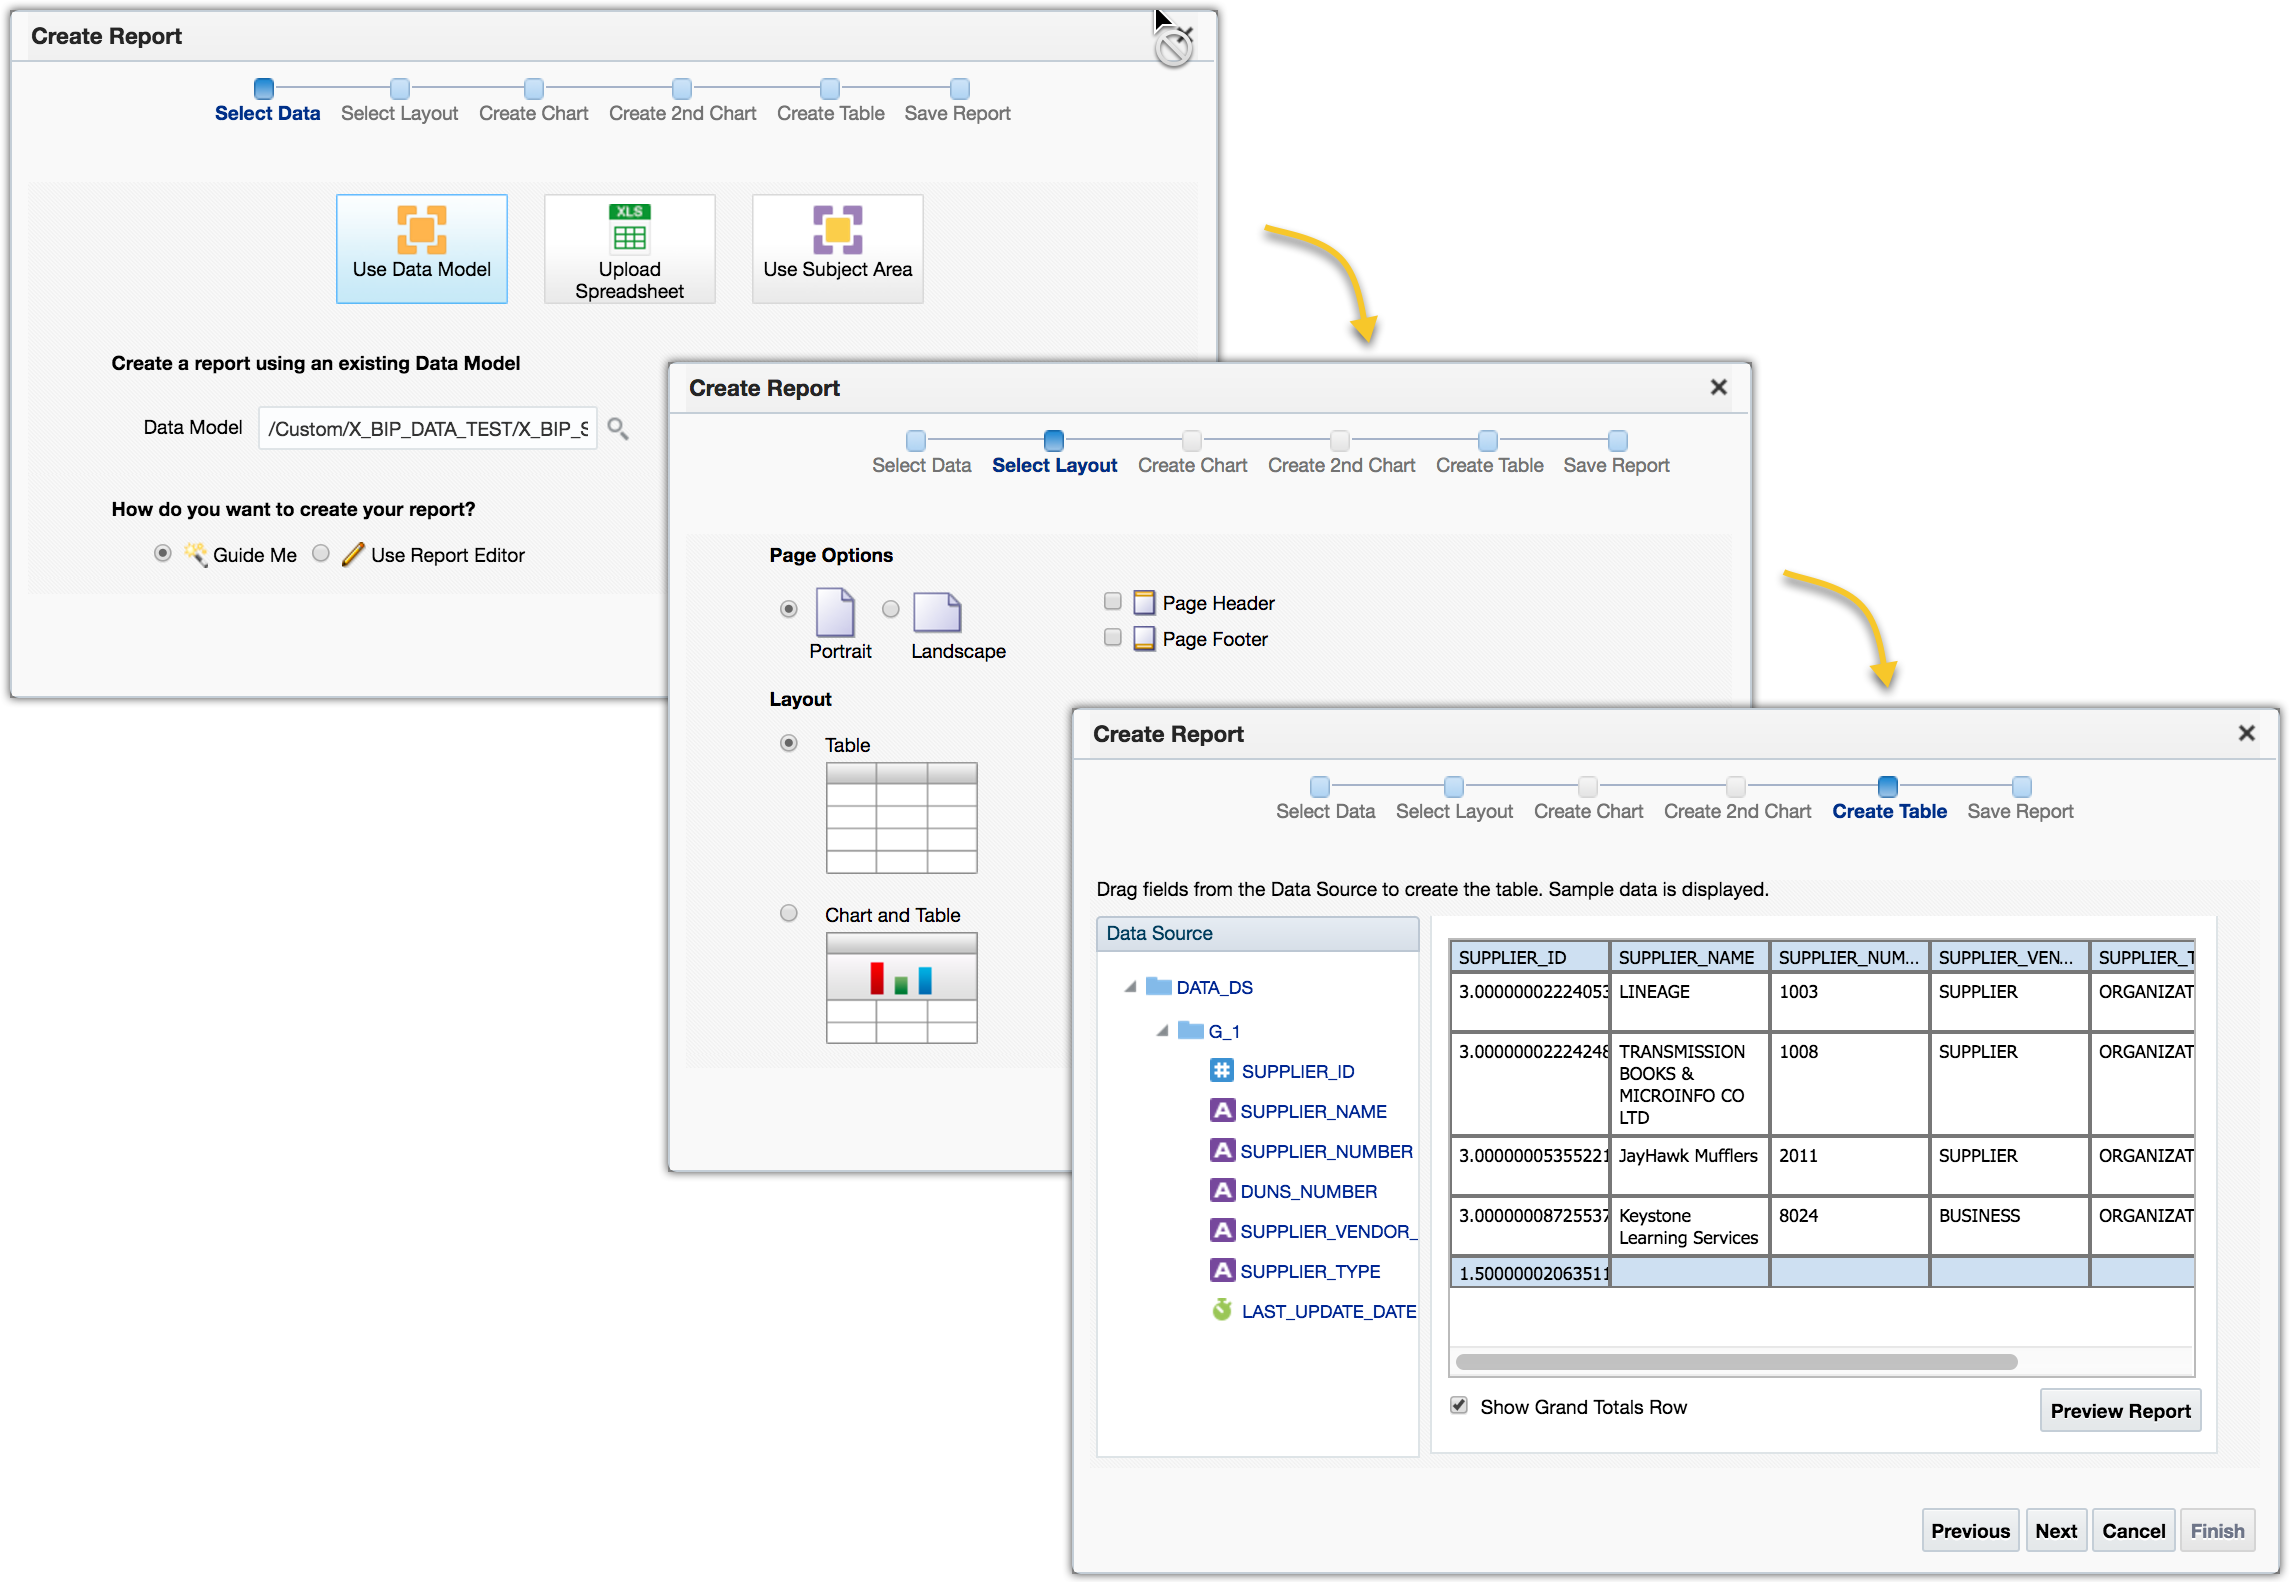
2. Create BI Publisher reports
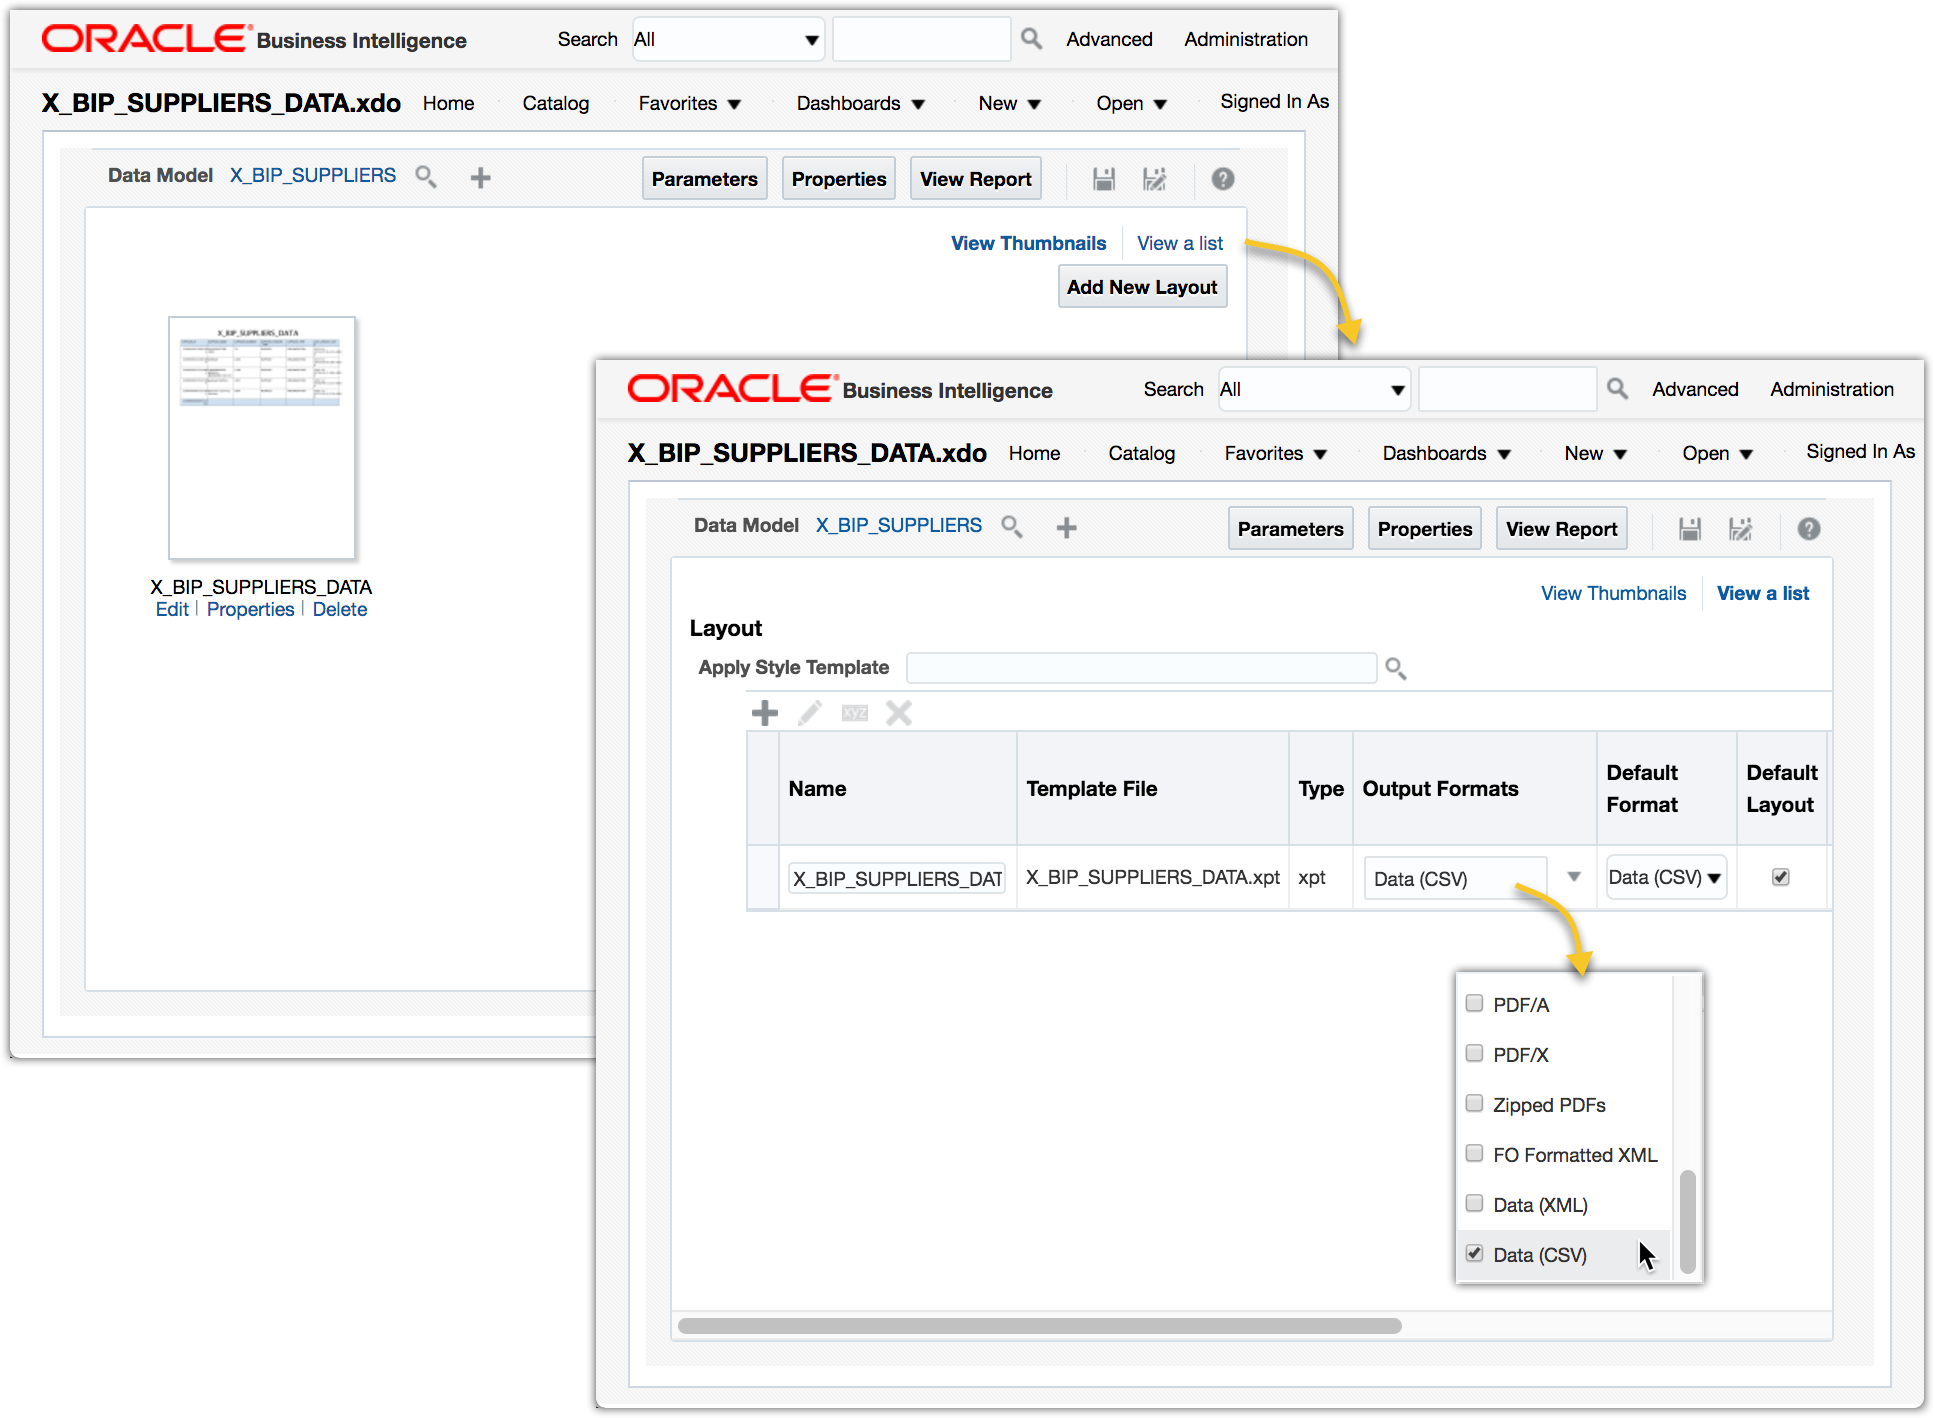
Continue with the step 1 above to create a BI Publisher report using the new data model. Choose the table layout and include all data columns for the report.
Edit the report to set the report output format to use Data (CSV) only. Click View a list to make the changes.

3. Create a simple Java WebService client
In order for Data Sync to be able to load the data from BI Publisher reports, a WebService call is needed to run and extract the report data to a flat file. One of the many options is to use the wsdl2java utility in Apache Axis2 to generate the WebService stubs Java code, then create a very simple Java WebService client on top of the stubs to perform three tasks: (1) send a SOAP request to OTBI to run the BI Publisher report; (2) download the report output data file; (3) create a dummy signal file used by Data Sync for load automation.
The sample code illustrates a Java client using XMLBeans generated by wsdl2java utility.
public class BipWSClient {

    public static void main(java.lang.String args[]){
        try{

            // 1. create the SOAP request

            String reportAbsolutePath = "/Custom/X_BIP_DATA_TEST/X_BIP_SUPPLIERS_DATA.xdo";
            String userID = "OTBI.USER";
            String password = "password";
            String attributeFormat = "csv";
            boolean byPassCache = true;

            String reportDataFile = "./X_BIP_SUPPLIERS_DATA.csv";
            String signalFile = "./X_BIP_SUPPLIERS_DATA_CompleteSignal.txt";

            // use the stubs & xmlbeans generated by wsdl2java

            ReportServiceStub stub = new ReportServiceStub("https://otbi.bi.us2.oraclecloud.com/xmlpserver/services/v2/ReportService");

            RunReportDocument doc = RunReportDocument.Factory.newInstance();
            RunReportDocument.RunReport req = doc.addNewRunReport();

            ReportRequest reportRequest = req.addNewReportRequest();
            reportRequest.setAttributeFormat(attributeFormat);
            reportRequest.setReportAbsolutePath(reportAbsolutePath);
            reportRequest.setByPassCache(byPassCache);

            // handle the LAST_RUN_DATE report parameter

            File lastReportData = new File(reportDataFile);
            if (lastReportData.exists()) {
                Date lastRunDate = new Date(lastReportData.lastModified());
                SimpleDateFormat dateFormat = new SimpleDateFormat("MM-dd-yyyy HH:mm:ss");
                String lastRunDateString = dateFormat.format(lastRunDate);

                ParamNameValues paramNameValues = reportRequest.addNewParameterNameValues();
                ParamNameValue paramNameValue = paramNameValues.addNewListOfParamNameValues().addNewItem();
                paramNameValue.setName("LAST_RUN_DATE");
                paramNameValue.addNewValues().setItemArray(new String[]{lastRunDateString});
            }

            req.setReportRequest(reportRequest);
            req.setUserID(userID);
            req.setPassword(password);

            // 2. run and download the output data file

            RunReportResponseDocument res = stub.runReport(doc);
            ReportResponse reportResponse = res.getRunReportResponse().getRunReportReturn();

            byte[] bytes = reportResponse.getReportBytes();
            FileOutputStream fos = new FileOutputStream(reportDataFile);
            fos.write(bytes);
            fos.close();

            // 3. create the dummy signal file

            fos = new FileOutputStream(signalFile);
            fos.write((signalFile+" is extracted.").getBytes());
            fos.close();

        } catch(Exception e){
            e.printStackTrace();
        }
    }
}
Run the BipWSClient. If all parameters are set correctly, it will output two files
    -   X_BIP_SUPPLIERS_DATA.csv
    -   X_BIP_SUPPLIERS_DATA_CompleteSignal.txt
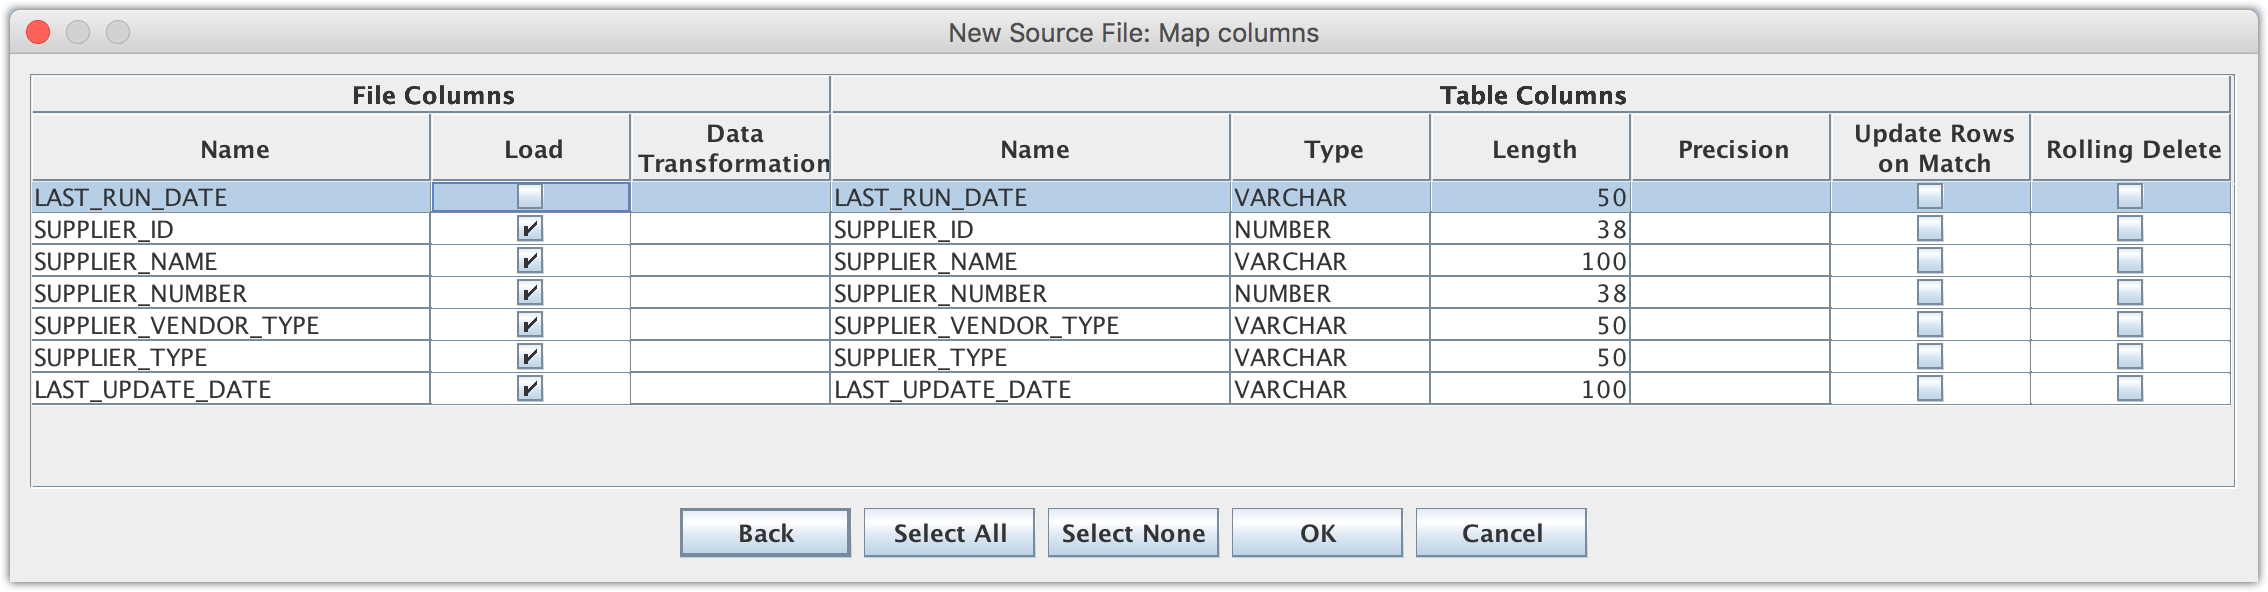
4. Create Data Sync mappings
Open Data Sync UI, create a new separate Data Sync project, let’s call it X_BIP_OTBI (a default Job X_BIP_OTBI-Job1 will be created as well when creating a new project); then create a new file data mapping that will load the X_BIP_SUPPLIERS_DATA.csv flat file.
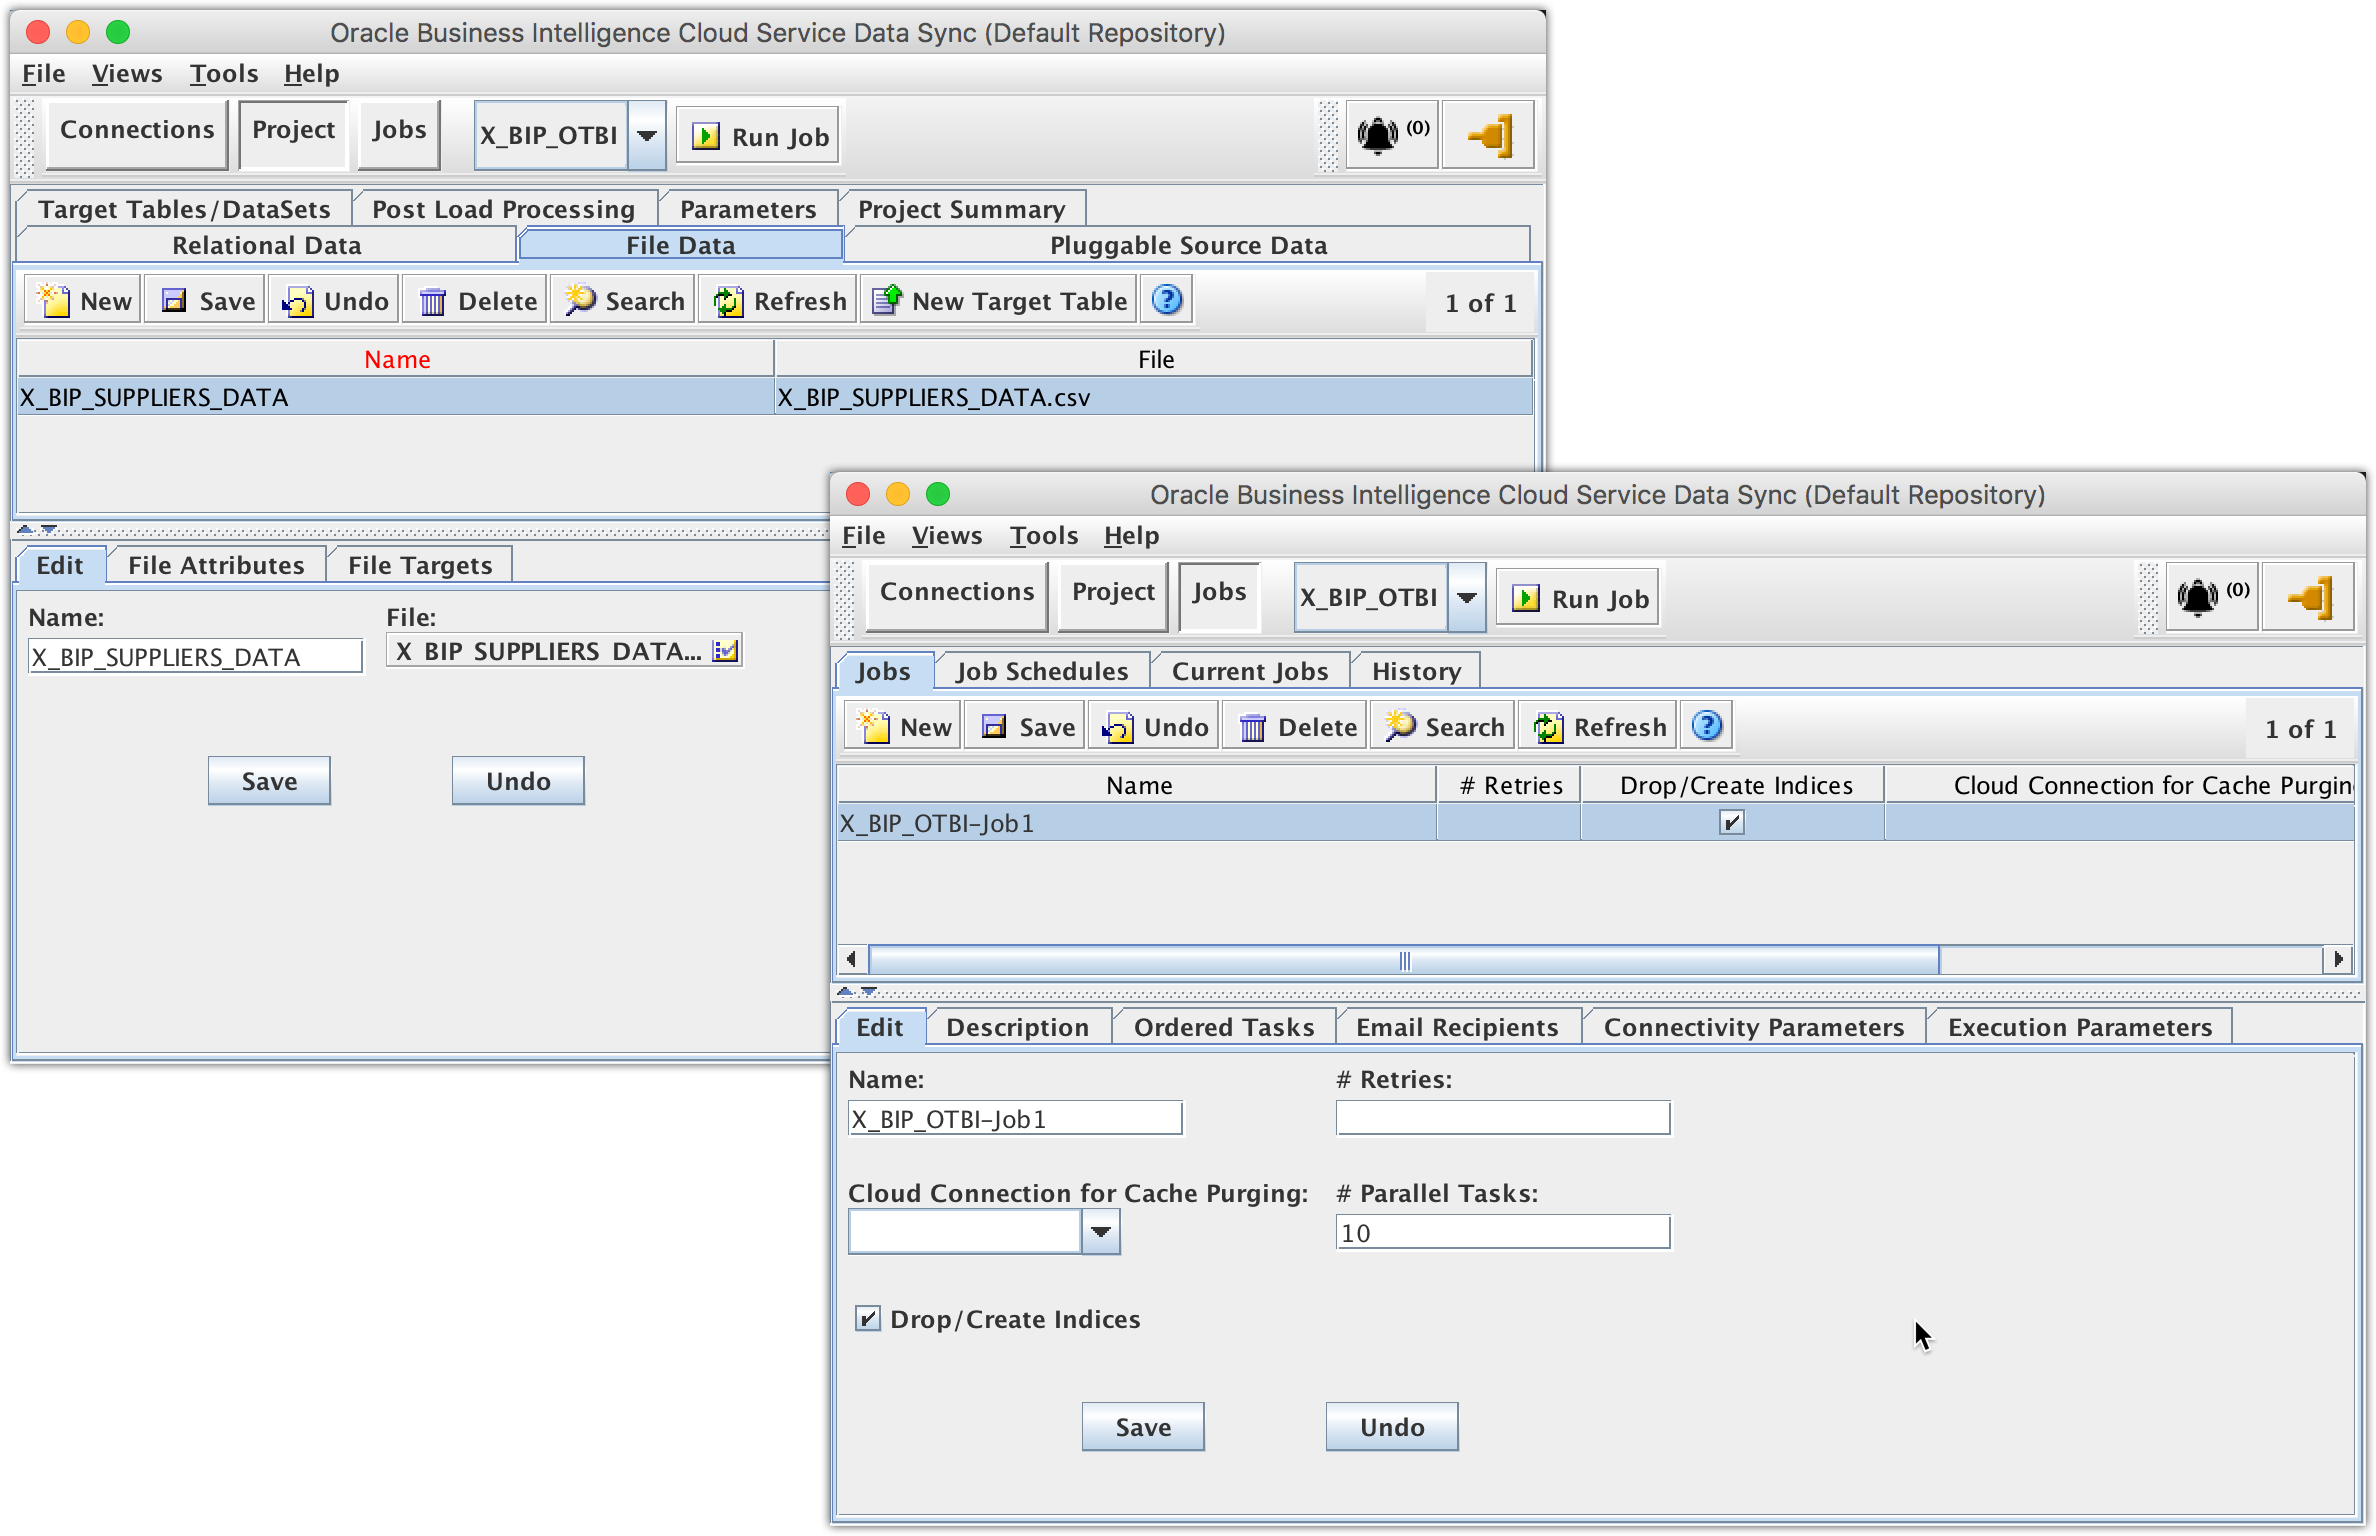
Creating the data mapping in its own separate Data Sync project is necessary for the Data Sync file trigger to work on the given job without impacting any existing Data Sync projects, jobs and data mappings.
5. Create Data Sync file trigger for load automation
Go to <Data-Sync-Install-Home>/config-shared folder, modify the on_demand_job.xml file to set up a file trigger on the signal file X_BIP_SUPPLIERS_DATA_CompleteSignal.txt to automatically trigger the data mapping load.
<OnDemandMonitors pollingIntervalInMinutes="5">
    <TriggerFile job="X_BIP_OTBI-Job1" file="X_BIP_SUPPLIERS_DATA_CompleteSignal.txt">
        <TimeWindow startTime="23:00" endTime="02:30"/>
    </TriggerFile>
</OnDemandMonitors>
Assuming that there is a daily scheduled job to run BipWSClient at 1 am, the TimeWindow setting will enable the signal file check every five minutes between 11 pm and 2:30 am every night.
After restarting the Data Sync server, the file trigger will start listening for the signal file. As soon as the signal file comes to existence, the configured will automatically start to run the configured data mapping job, and then delete the signal file.
For Incremental
Parameters can be used in the custom SQL to implement incremental data extraction through BI Publisher report, e.g. LAST_RUN_DATE is used in the example custom SQL for Suppliers data model.
The last modified date of the last csv data file is used for the LAST_RUN_DATE parameter. If no csv file is found, it will not pass in the parameter, and the custom SQL will treat it as a Full load and select all data.
When using csv output file format, parameters will be included in the csv data file as extra columns. Therefore these parameter columns, e.g. LAST_RUN_DATE, need to be unchecked for Load when creating such file data mappings.
Previous << Using Physical SQL … | Next >> Best Practices in Reality …