As an instrumental containerization tool in the DevOps technologies, Docker is useful and being widely applied in the continuous integration (CI), continuous delivery (CD) and auto deployment practice. Perficient China portal team has just completed a Liferay application dockerization. This implementation makes our entire application/instance to be lightweight in the deployment and lay the foundation of CI & CD.
- Requirement
We have been running a Liferay 6.2 portlet application and MySQL 5.7 DB instance in a Linux box for a while. Many customized objects such as SSO, user&group, theme, structure, template and portlets has been created in the application, so the migration work is quite different with the brand-new Liferay installation. We installed a new host Linux machine as a target, inside the host we will run MySQL, Liferay as the isolated process with needed resources.
- Solution Overview
In our case, we setup another Linux box to install Docker and then transfer the current Liferay application and Mysql schema into the Docker containers, but there is no change on the access method for the end users as they can just access the new Host machine with specified port (e.g. 8080). The latest Docker installations requires CentOS 7 version. The most effort spent during the installation and configuration are on the Docker images building and debugging. It includes the 3 parts:
- Install Docker environments in CentOS 7.0
- Build MySQL image, run the container and migrate scheme data
- Build Liferay 6.3 image, run the container and do the validation
Due to the limitation of the blog length, I am not going to provide all of the scripts and very detailed steps, but, I am to share the major steps that should give basic idea for you to achieve the requirement.
- Outlined Steps
1.Build up the Host OS with CentOS 7.0. This Linux box is similar to the old box that should have internet access, because the Docker and some packages will pull needed files from remote repositories. The firewall need to be enabled per my testing, otherwise the process in the Docker container cannot have an access to the internet.
2.Build MySQL images. The easier way is to pull available image from Docker Hub (https://hub.docker.com/_/mysql/). In my case, I referred the Mysql docker file and built my own one by a slight change.
3.Run the MySQL DB container and expose port to the host machine. One image can be started to be containers with proper parameters. Here we need to provide the password for the root when to start the DB instance. The default port is 3306 for which we can either expose it in the docker file or specify the port mapping as ‘-p 3306:3306’.
$ docker run –name liferaydb -p 3306:3306 -e MYSQL_ROOT_PASSWORD={password} -t -i mysql:5.7
4.Test the new DB Connection. In the docker file entrypoint or the command it will start mysql instance, we can use Mysql client to connect Mysql server on the port of 3306.
5.Transfer the Mysql Schema to new Database. The liferay store the portlet data in the scheme such as lportal. We can use the Mysal workbench client to transfer the scheme via its wizard. It is pretty straightforward.
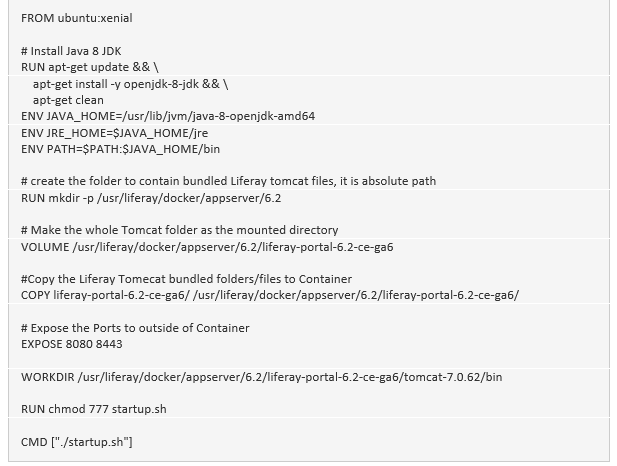
6.Write our own Liferay Docker file. There is no official docker for Liferay on Docker hub at this moment, but we can write our own Docker file to build up Docker image. With below sample docker file we can build the image.

7.Run the container with the image that we built, since we have exposed the port of 8080, 8443 in the file so we should be able to access these ports on Host machine (outside of container). We should mount several log folder and auto-deploy folder to the host machine. Therefore we can read the logs in the host machine like we did usually. Also, the liferay container will need to link to the DB container that we finished in above step.
8.Now we can find a client machine to test the Liferay home page on the port of 8080.
Try to move your application infrastructure to the Docker and get some fun, and you Bingo!
