
Following is a step-by-step process for installing IBM BPM v8.5.7 standard on Ubuntu 14.104:
Downloads
- Install the latest VirtualBox software from Oracle – also download the Extension Pack.
- Download the software from the IBM Software Catalog
- Download the ISO file for Ubuntu 14.04 LTS – DESKTOP from Ubuntu
- **Note: You can download the Server version of Ubuntu 14.04 LTS, but you will either need to:
- Install a GUI desktop (Gnome or otherwise to perform the installation of BPM later
- Run the installation via command line instructions (not covered in this tutorial)
- **Note: You can download the Server version of Ubuntu 14.04 LTS, but you will either need to:
- Oracle Database Server (DB2 and Oracle are not natively supported in Ubuntu and quite frankly it’s a real headache to resolve the dependencies and get installed, instead we’re going to utilize a pre-built VM for this with Oracle 12c already installed) – Oracle
Pre-Installation Setup
- Using the VirtualBox and the Ubuntu 14.04 LTS ISO, create a Virtual Machine with at least 30GB of disk space and at least 4GB of memory.
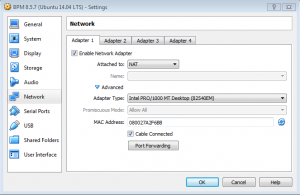
- Create 2 Network Adapters
- NAT Adapter – this will allow for the Guest OS to have access to the internet
- Host-Only Network – used for Host-to-Guest communication
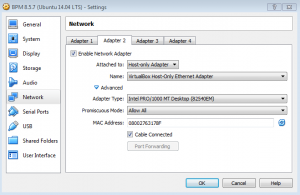
- In the Virtual Machine settings, under the Network section – create a Host-Only network
- Set the IP address to 192.168.56.1
- Disable the DHCP server
- NAT Adapter – this will allow for the Guest OS to have access to the internet
- In the Virtual Machine settings – create a Shared Folder linked to you DownloadDirector directory – typically located at C:\Users\\DownloadDirector
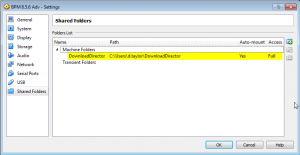
- Run the following command in Windows Command Prompt to enable symbolic links to the shared directory (you may need to change the working directory of your Windows command prompt to the VirtualBox installation folder – typically C:\Program Files\Oracle\VirtualBox
VBoxManage setextradata "BPM 8.5.7 (Ubuntu 14.04 LTS)" VBoxInternal2/SharedFoldersEnableSymlinksCreate/DownloadDirector 1- Add the Port Forwarding Rules
- Create a BAT file with the following content
- Update the script such that the second line points to your Oracle VirtualBox installation directory
- Update the script such the machine name match the name you gave you VM instance
@echo off

cd "C:\Program Files\Oracle\VirtualBox"

VBoxManage modifyvm "BPM 8.5.7 (Ubuntu 14.04 LTS)" --natpf1 "BPM - BOOTSTRAP_ADDRESS,tcp,127.0.0.1,9810,,9810"

VBoxManage modifyvm "BPM 8.5.7 (Ubuntu 14.04 LTS)" --natpf1 "BPM - SOAP_CONNECTOR_ADDRESS,tcp,127.0.0.1,8880,,8880"

VBoxManage modifyvm "BPM 8.5.7 (Ubuntu 14.04 LTS)" --natpf1 "BPM - ORB_LISTENER_ADDRESS,tcp,127.0.0.1,9101,,9101"

VBoxManage modifyvm "BPM 8.5.7 (Ubuntu 14.04 LTS)" --natpf1 "BPM - SAS_SSL_SERVERAUTH_LISTENER_ADDRESS,tcp,127.0.0.1,9404,,9404"

VBoxManage modifyvm "BPM 8.5.7 (Ubuntu 14.04 LTS)" --natpf1 "BPM - CSIV2_SSL_SERVERAUTH_LISTENER_ADDRESS,tcp,127.0.0.1,9405,,9405"

VBoxManage modifyvm "BPM 8.5.7 (Ubuntu 14.04 LTS)" --natpf1 "BPM - CSIV2_SSL_MUTUALAUTH_LISTENER_ADDRESS,tcp,127.0.0.1,9406,,9406"

VBoxManage modifyvm "BPM 8.5.7 (Ubuntu 14.04 LTS)" --natpf1 "BPM - WC_adminhost,tcp,127.0.0.1,9061,,9061"

VBoxManage modifyvm "BPM 8.5.7 (Ubuntu 14.04 LTS)" --natpf1 "BPM - WC_adminhost,tcp,127.0.0.1,9060,,9060"

VBoxManage modifyvm "BPM 8.5.7 (Ubuntu 14.04 LTS)" --natpf1 "BPM - WC_defaulthost,tcp,127.0.0.1,9080,,9080"

VBoxManage modifyvm "BPM 8.5.7 (Ubuntu 14.04 LTS)" --natpf1 "BPM - DCS_UNICAST_ADDRESS,tcp,127.0.0.1,9354,,9354"

VBoxManage modifyvm "BPM 8.5.7 (Ubuntu 14.04 LTS)" --natpf1 "BPM - WC_adminhost_secure,tcp,127.0.0.1,9044,,9044"

VBoxManage modifyvm "BPM 8.5.7 (Ubuntu 14.04 LTS)" --natpf1 "BPM - WC_adminhost_secure,tcp,127.0.0.1,9043,,9043"

VBoxManage modifyvm "BPM 8.5.7 (Ubuntu 14.04 LTS)" --natpf1 "BPM - WC_defaulthost_secure,tcp,127.0.0.1,9443,,9443"

VBoxManage modifyvm "BPM 8.5.7 (Ubuntu 14.04 LTS)" --natpf1 "BPM - SIP_DEFAULTHOST,tcp,127.0.0.1,5060,,5060"

VBoxManage modifyvm "BPM 8.5.7 (Ubuntu 14.04 LTS)" --natpf1 "BPM - SIP_DEFAULTHOST_SECURE,tcp,127.0.0.1,5061,,5061"

VBoxManage modifyvm "BPM 8.5.7 (Ubuntu 14.04 LTS)" --natpf1 "BPM - OVERLAY_UDP_LISTENER_ADDRESS,tcp,127.0.0.1,11007,,11007"

VBoxManage modifyvm "BPM 8.5.7 (Ubuntu 14.04 LTS)" --natpf1 "BPM - OVERLAY_TCP_LISTENER_ADDRESS,tcp,127.0.0.1,11008,,11008"

VBoxManage modifyvm "BPM 8.5.7 (Ubuntu 14.04 LTS)" --natpf1 "BPM - IPC_CONNECTOR_ADDRESS,tcp,127.0.0.1,9633,,9633"

VBoxManage modifyvm "BPM 8.5.7 (Ubuntu 14.04 LTS)" --natpf1 "BPM - SIB_ENDPOINT_ADDRESS,tcp,127.0.0.1,7276,,7276"

VBoxManage modifyvm "BPM 8.5.7 (Ubuntu 14.04 LTS)" --natpf1 "BPM - SIB_ENDPOINT_SECURE_ADDRESS,tcp,127.0.0.1,7286,,7286"

VBoxManage modifyvm "BPM 8.5.7 (Ubuntu 14.04 LTS)" --natpf1 "BPM - SIB_MQ_ENDPOINT_ADDRESS,tcp,127.0.0.1,5558,,5558"

VBoxManage modifyvm "BPM 8.5.7 (Ubuntu 14.04 LTS)" --natpf1 "BPM - SIB_MQ_ENDPOINT_SECURE_ADDRESS,tcp,127.0.0.1,5578,,5578"

VBoxManage modifyvm "BPM 8.5.7 (Ubuntu 14.04 LTS)" --natpf1 "BPM - SIB_MQ_ENDPOINT_SECURE_ADDRESS,tcp,127.0.0.1,8879,,8879"
- Startup your virtual machine, open the terminal and run the following set of commands (these may need to modified depending on your installation and BPM software build
- Change the root password (necessary for BPM installation)
- sudo –i
- passwd
- Rollback the installed version of Firefox (BPM requires version < ~43)
- apt-get purge firefox
- apt-cache show firefox | grep Version
- apt-get install firefox=<result from previous call < ~43)
- apt-mark hold firefox
- Grant permission to the shared folder for your Linux user
- usermod -a -G vboxsf <username>
- Log out of you Ubuntu instance or re-login to pick up the new settings
- Setup the Host-Only network static IP address
- nano /etc/network/interfaces
- Add the following to the end of the file, save and reboot for settings to take effect
# new network

auto eth1

iface eth1 inet static

address 192.168.56.101

netmask 255.255.255.0- Disable the Firewall
- sudo ufw disable
- Set the ulimit on your Linux by editing the /etc/security/limits.conf file, adding the following lines:
# - stack - maximum stack size (KB)

soft stack 32768

hard stack 32768

# - nofile - maximum number of open files

soft nofile 65536

hard nofile 65536

# - nproc - maximum number of processes

soft nproc 16384

hard nproc 16384

# - fsize - maximum file size

soft fsize 6291453

hard fsize 6291453
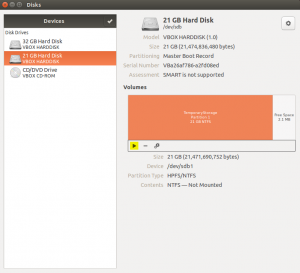
- Open the “Disks” utility and format the TemporaryStorage disk using the following settings:’”

- Mount the TemporaryStorage disk (using the Disks utility – this will mount the disk at the location /media/ubuntubpm/TemporaryStorage)
- Create a temporary directory for the installation extraction (i.e. – linuxInstall)
- mkdir /media/ubuntubpm/TemporaryStorage/linuxInstall
- Create a shell script file with the following contents – adjust for location/name of the folder created in the previous step
- *Note – the Network Folder created in Step #2 will be located at /media/sf_DownloadDirector
#!/bin/bash

# Extract all BPM installation files

unzip ../MFPF_7.1_INST_MGR_REP_MF_SVR_EN.zip -d /media/ubuntubpm/TemporaryStorage/linuxInstall

tar -xvf ../tds63-linux-x86-64-base.tar -C /media/ubuntubpm/TemporaryStorage/linuxInstall

unzip ../CZZ89ML.zip -d /media/ubuntubpm/TemporaryStorage/linuxInstalltar -zxvf ../DB2_10.5.0.3_limited_Lnx_x86-64.tar.gz -C /media/ubuntubpm/TemporaryStorage/linuxInstall

tar -zxvf ../DB2_AWSE_REST_Svr_11.1_Lnx_86-64.tar.gz -C /media/ubuntubpm/TemporaryStorage/linuxInstall

tar -zxvf ../DB2_NL_Pack_10.5.0.3_Linux_x86-64.tar.gz -C /media/ubuntubpm/TemporaryStorage/linuxInstall

tar -zxvf ../DB2_Svr_10.5.0.3_Linux_x86-64.tar.gz -C /media/ubuntubpm/TemporaryStorage/linuxInstall

unzip ../DB2_AWSE_Restricted_Activation_11.1.zip -d /media/ubuntubpm/TemporaryStorage/linuxInstall

unzip ../DB2_ESE_Restricted_QS_Act_10.5.0.1.zip -d /media/ubuntubpm/TemporaryStorage/linuxInstalltar -zxvf ../BPM_PFS_V857_Linux_x86.tar.gz -C /media/ubuntubpm/TemporaryStorage/linuxInstallunzip ../BPM_Std_V857_QuickStartGuide.zip -d /media/ubuntubpm/TemporaryStorage/linuxInstall

tar -zxvf ../BPM_Std_V857_Linux_x86_1_of_3.tar.gz -C /media/ubuntubpm/TemporaryStorage/linuxInstall

tar -zxvf ../BPM_Std_V857_Linux_x86_2_of_3.tar.gz -C /media/ubuntubpm/TemporaryStorage/linuxInstall

tar -zxvf ../BPM_Std_V857_Linux_x86_3_of_3.tar.gz -C /media/ubuntubpm/TemporaryStorage/linuxInstall- Execute the script

Installation – Installation Manager (Optional – Not Required)
At the time of writing this guide, there were issues with directly installing BPM right off the bat where the GUI would run into issue down the road. Install the Installation Manager first and it will resolve these problems.
- Extract installer.lnx.gtk.x86_64_1.8.5.zip (this can be done directly on the Host OS, there are no linking dependencies for this installation file)
- Navigate to the directory and execute ./install
- Follow the GUI installation wizard prompts
Installation – BPM
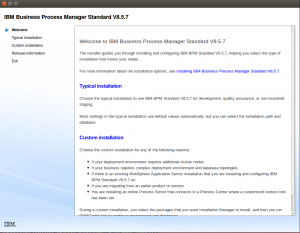
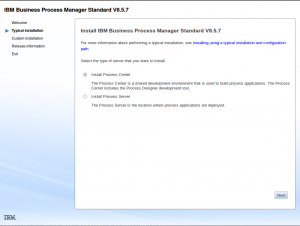
- Run the installation (as root) via ./launchPad.sh and following the installation instructions
- Install Process Center
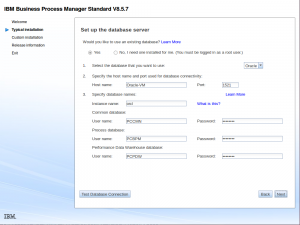
- Set the Process Center installation parameters

- Set the Database installation parameters
- Choose whether you want to download & install updates automatically during installation
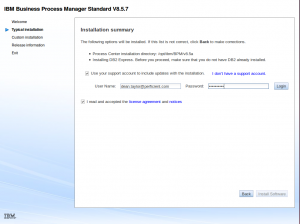
- Run the installation
- Start the Deployment Environment
Post Setup – Automatically start BPM on boot
- Setup to allow ubuntubpm to sudo without password
sudo visudo
Add to the end of the file
ubuntubpm ALL=(ALL) NOPASSWD: ALL
- Write a shell script
nano /home/ubuntubpm/autoStartBPM.sh
#!/bin/bash

echo Auto-Starting BPM....

if [ "$(whoami)" != "root" ]

then

echo not root, switching to root...

sudo su -s "$0"

exit

fi

if [ "$(whoami)" == "root" ]

then

echo ok, runnning as root...

/opt/ibm/BPM/v8.5/profiles/DmgrProfile/bin/startManager.sh -profileName DmgrProfile

/opt/ibm/BPM/v8.5/profiles/Node1Profile/bin/startNode.sh -profileName Node1Profile

/opt/ibm/BPM/v8.5/bin/BPMConfig.sh -start -profile DmgrProfile -de ProcessCenter

echo This window will close automatically in 30 seconds....

sleep 30

fi - Make it executable – sudo chmod +x autoStartBPM.sh
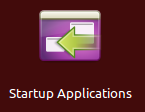
- Open the “Startup Applications” preferences
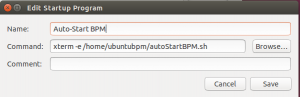
- Add an entry for Auto-Starting BPM