Software Development

Real-Time Communication in Next.js Using Socket.IO: A Beginner’s Guide

Social Network Online Sharing Connection Concept

In today’s web landscape, users expect instant feedback-whether it’s receiving a new chat message, seeing a real-time stock price update, or getting notified when someone comments on a post. This shift has made real-time communication essential for modern applications.

In this beginner-friendly tutorial, we’ll explore how to build real-time features in a Next.js app using Socket.IO. You’ll understand the fundamentals, build a simple real-time chat, and learn how to integrate Socket.IO cleanly into a Next.js environment.

What Is Socket.IO?

Socket.IO is a JavaScript library that facilitates real-time, bi-directional communication between web clients and servers. It uses WebSockets under the hood but adds many improvements:

  • Fallback mechanisms: Works even when WebSockets aren’t supported (e.g., via long-polling)
  • Event-based communication model
  • Automatic reconnection
  • Broadcasting support

This makes it ideal for applications like:

  • Chat systems
  • Live notifications
  • Multiplayer games
  • Online collaboration tools
  • Real-time analytics dashboards

Why Use Socket.IO with Next.js?

Next.js, as a full-stack React framework, offers static and server-side rendering, routing, API routes, and more. But real-time communication isn’t built-in. That’s where Socket.IO fits perfectly.

Benefits of using Socket.IO with Next.js:

  • Easily integrates with custom Express servers
  • Allows you to build both the frontend and backend in one unified project
  • Provides a seamless developer experience with React

Project Setup: A Real-Time Chat App

Let’s build a basic chat app to demonstrate real-time messaging

Step 1: Create a New Next.js App

Let’s start with a fresh project. Open your terminal and run:

Plain text
Copy to clipboard
Open code in new window
EnlighterJS 3 Syntax Highlighter
npx create-next-app@latest nextjs-socketio-chat
cd nextjs-socketio-chat
npx create-next-app@latest nextjs-socketio-chat cd nextjs-socketio-chat
npx create-next-app@latest nextjs-socketio-chat
cd nextjs-socketio-chat

Step 2: Install Required Packages

We need socket.io for the server and socket.io-client for the frontend. We’ll also use Express to create a custom server:

Plain text
Copy to clipboard
Open code in new window
EnlighterJS 3 Syntax Highlighter
npm install express socket.io socket.io-client

Step 3: Setup a Custom Express Server

Next.js supports custom servers for extending its capabilities. Here’s how to create one with Express and integrate Socket.IO.
Create a file called server.js:

Plain text
Copy to clipboard
Open code in new window
EnlighterJS 3 Syntax Highlighter
const express = require('express');
const next = require('next');
const{ createServer } = require('http');
const{ Server } = require('socket.io');
const dev = process.env.NODE_ENV !== 'production';
const app = next({ dev });
const handle = app.getRequestHandler();
app.prepare().then(()=>{
const expressApp = express();
const server = createServer(expressApp);
const io = newServer(server);
// Real-time communication logic
io.on('connection', (socket)=>{
console.log('A user connected:', socket.id);
socket.on('chat-message', (msg)=>{
io.emit('chat-message', msg); // broadcast to all clients including sender (if you want to broadcast to all client excluding sender, you have to call socket.emit function instead of io.emit function)
});
socket.on('disconnect', ()=>{
console.log('User disconnected:', socket.id);
});
});
expressApp.all('*', (req, res)=>handle(req, res));
server.listen(3000, ()=>{
console.log('> Server running on http://localhost:3000');
});
});
const express = require('express'); const next = require('next'); const { createServer } = require('http'); const { Server } = require('socket.io'); const dev = process.env.NODE_ENV !== 'production'; const app = next({ dev }); const handle = app.getRequestHandler(); app.prepare().then(() => { const expressApp = express(); const server = createServer(expressApp); const io = new Server(server); // Real-time communication logic io.on('connection', (socket) => { console.log('A user connected:', socket.id); socket.on('chat-message', (msg) => { io.emit('chat-message', msg); // broadcast to all clients including sender (if you want to broadcast to all client excluding sender, you have to call socket.emit function instead of io.emit function) }); socket.on('disconnect', () => { console.log('User disconnected:', socket.id); }); }); expressApp.all('*', (req, res) => handle(req, res)); server.listen(3000, () => { console.log('> Server running on http://localhost:3000'); }); });
const express = require('express');
const next = require('next');
const { createServer } = require('http');
const { Server } = require('socket.io');
const dev = process.env.NODE_ENV !== 'production';
const app = next({ dev });
const handle = app.getRequestHandler();

app.prepare().then(() => {
const expressApp = express();
const server = createServer(expressApp);
const io = new Server(server);
        // Real-time communication logic
        io.on('connection', (socket) => {
                console.log('A user connected:', socket.id);
            socket.on('chat-message', (msg) => {
                     io.emit('chat-message', msg); // broadcast to all clients including sender (if you want to broadcast to all client excluding sender, you have to call socket.emit function instead of io.emit function)
             });

             socket.on('disconnect', () => {
                    console.log('User disconnected:', socket.id);
             });
        });

        expressApp.all('*', (req, res) => handle(req, res));
server.listen(3000, () => {
                console.log('> Server running on http://localhost:3000');
        });
});

Step 4: Modify package.json Scripts

Update your package.json to use your custom server:

Plain text
Copy to clipboard
Open code in new window
EnlighterJS 3 Syntax Highlighter
"scripts": {
"dev": "node server.js", …
}
"scripts": { "dev": "node server.js", … }
"scripts":  {
     "dev": "node server.js",       …
}


Run the development server:

Plain text
Copy to clipboard
Open code in new window
EnlighterJS 3 Syntax Highlighter
npm run dev
npm run dev
npm run dev

Step 5: Build the Frontend Chat Component

Create a file: src/components/Chat.tsx

Plain text
Copy to clipboard
Open code in new window
EnlighterJS 3 Syntax Highlighter
"use client";
import{ useEffect, useState } from "react";
import{ io } from "socket.io-client";
const socket = io();
exportdefaultfunctionChat(){
const[message, setMessage] = useState("");
const[chatLog, setChatLog] = useState<{
message: string;
timeStamp: number
}[]
>([]);
useEffect(()=>{
socket.on("chat-message", (messages)=>{
setChatLog((prev)=>[...prev, messages]);
});
return()=>{
socket.off("chat-message");
};
}, []);
const handleSend = ()=>{
if(message.trim().length>0){
const timeStamp = Date.now();
socket.emit("chat-message", { message, timeStamp }); // you can add username or token also with this object after adding authentication flow
setMessage("");
}else{
alert("Please enter message");
}
};
return(
<div style={{ padding: "20px", maxWidth: "600px", margin: "auto"}}>
<h2>Real-Time Chat</h2>
<div style={{ display: "flex", gap: "10px"}}>
<input
value={message}
onChange={(e)=>setMessage(e.target.value)}
placeholder="Type your message"
style={{
flex: 1,
padding: "10px",
border: "1px solid #ccc",
borderRadius: 5,
}}
/>
<button onClick={handleSend}>Send</button>
</div>
<ul style={{ marginTop: "20px", listStyle: "none"}}>
{chatLog.map((chat, i)=>(
<li
key={i}
style={{
padding: 10,
border: "1px solid #ccc",
borderRadius: 5,
marginTop: 15,
}}
>
{chat.message}
<span style={{ display: "block", fontSize: 12, color: "#ccc"}}>- {newDate(chat.timeStamp).toLocaleString()}</span>
</li>
))}
</ul>
</div>
);
}
"use client"; import { useEffect, useState } from "react"; import { io } from "socket.io-client"; const socket = io(); export default function Chat() { const [message, setMessage] = useState(""); const [chatLog, setChatLog] = useState< { message: string; timeStamp: number }[] >([]); useEffect(() => { socket.on("chat-message", (messages) => { setChatLog((prev) => [...prev, messages]); }); return () => { socket.off("chat-message"); }; }, []); const handleSend = () => { if (message.trim().length > 0) { const timeStamp = Date.now(); socket.emit("chat-message", { message, timeStamp }); // you can add username or token also with this object after adding authentication flow setMessage(""); } else { alert("Please enter message"); } }; return ( <div style={{ padding: "20px", maxWidth: "600px", margin: "auto" }}> <h2>Real-Time Chat</h2> <div style={{ display: "flex", gap: "10px" }}> <input value={message} onChange={(e) => setMessage(e.target.value)} placeholder="Type your message" style={{ flex: 1, padding: "10px", border: "1px solid #ccc", borderRadius: 5, }} /> <button onClick={handleSend}>Send</button> </div> <ul style={{ marginTop: "20px", listStyle: "none" }}> {chatLog.map((chat, i) => ( <li key={i} style={{ padding: 10, border: "1px solid #ccc", borderRadius: 5, marginTop: 15, }} > {chat.message} <span style={{ display: "block", fontSize: 12, color: "#ccc" }}>- {new Date(chat.timeStamp).toLocaleString()}</span> </li> ))} </ul> </div> ); }
"use client";
import { useEffect, useState } from "react";
import { io } from "socket.io-client";

const socket = io();

export default function Chat() {
const [message, setMessage] = useState("");
const [chatLog, setChatLog] = useState< {
message: string;
timeStamp: number
}[]
                             >([]);

        useEffect(() => {
                socket.on("chat-message", (messages) => {
                    setChatLog((prev) => [...prev, messages]);
});

                return () => {
                    socket.off("chat-message");
             };
        }, []);

        
const handleSend = () => {
if (message.trim().length > 0) {
    const timeStamp = Date.now();
socket.emit("chat-message", { message, timeStamp });   // you can add username or token also with this object after adding authentication flow
                    setMessage("");
            } else {
                    alert("Please enter message");
            }
        };

        return (
                <div style={{ padding: "20px", maxWidth: "600px", margin: "auto" }}>
                    <h2>Real-Time Chat</h2>
                    <div style={{ display: "flex", gap: "10px" }}>
<input
          value={message}
          onChange={(e) => setMessage(e.target.value)}
          placeholder="Type your message"
          style={{
            flex: 1,
            padding: "10px",
            border: "1px solid #ccc",
            borderRadius: 5,
          }}
/>
                        <button onClick={handleSend}>Send</button>
                    </div>
                    <ul style={{ marginTop: "20px", listStyle: "none" }}>
{chatLog.map((chat, i) => (
<li
key={i}
style={{
              padding: 10,
              border: "1px solid #ccc",
              borderRadius: 5,
              marginTop: 15,
}}
                                >
                                    {chat.message}
                                        <span style={{ display: "block", fontSize: 12, color: "#ccc" }}>- {new Date(chat.timeStamp).toLocaleString()}</span>
                                </li>
))}
</ul>
                </div>
         );
}

Step 6: Load the Chat Component in a Page

Update src/app/page.tsx:

Plain text
Copy to clipboard
Open code in new window
EnlighterJS 3 Syntax Highlighter
import Chat from "@/components/Chat";
export default functionHome(){
return(
<div>
<Chat />
</div>
);
}
import Chat from "@/components/Chat"; export default function Home() { return ( <div> <Chat /> </div> ); }
import Chat from "@/components/Chat";

export default function Home() {
return (
<div>
                    <Chat />
</div>
);
}

Step 7: Test the Application

Start the server:

Plain text
Copy to clipboard
Open code in new window
EnlighterJS 3 Syntax Highlighter
npm run dev
npm run dev
npm run dev

Open http://localhost:3000 in two tabs or two different browsers.

Send a message in one tab and it will instantly appear in the other.

Output:
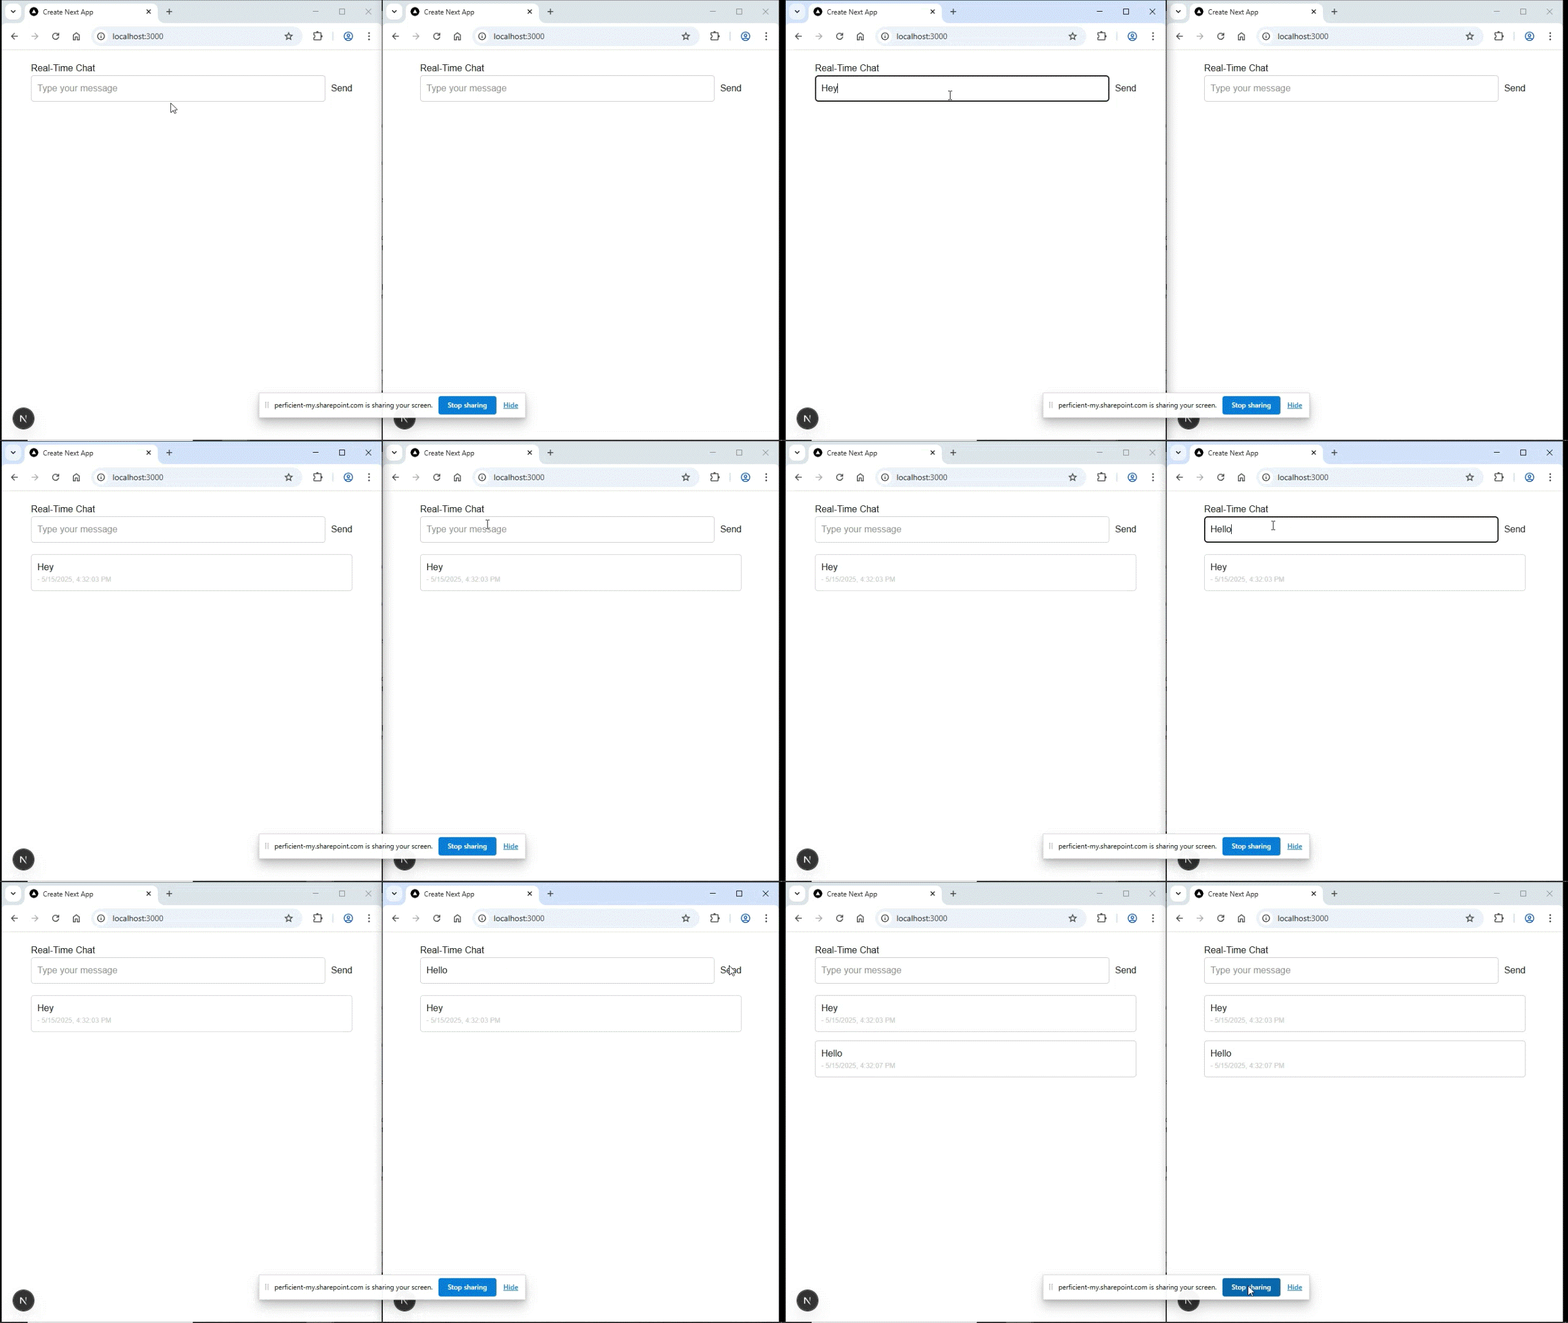
Congratulations! You now have a working real-time chat app using Socket.IO and Next.js.

How Socket.IO Works Under the Hood

Socket.IO uses a publish/subscribe (pub-sub) pattern. Events like ‘chat-message’ act as channels that clients and servers subscribe to or emit.

Key Concepts:

  • Socket: A persistent connection between the client and server
  • Events: Custom named messages exchanged (chat-message, user-joined)
  • Broadcasting: Send data to multiple clients at once

Unlike HTTP requests which are client-initiated, sockets keep the connection open both ways.

Advanced Socket.IO Features to Explore Later

  • Rooms: Group sockets together to send targeted messages
  • Namespaces: Create separate channels for different purposes
  • Middleware: Add authentication before accepting socket connections
  • Scaling: Use Redis adapter to scale Socket.IO across multiple servers

Common Use Cases in Next.js Projects

  • Chat Applications: Support group or private messaging
  • Live Notifications: Show instant updates like “New order placed”
  • Collaborative Tools: Real-time whiteboards or documents
  • Live Dashboards: Auto-updating sales, user, or stock data
  • Gaming: Multiplayer games using sockets for live sync

Conclusion

Adding real-time features like chat, notifications, or live dashboards is easy and efficient when using Socket.IO with Next.js. With a custom server, dynamic client components, and event-driven messaging, you’re equipped to build responsive and interactive apps that users love.

Socket.IO’s ease of use, power, and flexibility make it a go-to solution for real-time web communication.

Leave a Reply

Your email address will not be published. Required fields are marked *

This site uses Akismet to reduce spam. Learn how your comment data is processed.

Afnan Danish

Afnan Danish is a technical consultant at Perficient with over 4 years of experience in software development. He has expertise in a wide range of modern development technologies, including JavaScript, React.js, React Native, Node.js, Next.js, Express.js, HTML, and CSS. Afnan is passionate about building scalable, user-friendly web applications and continuously strives to stay current with evolving tech trends.

More from this Author

Follow Us