Building GitLab CI/CD Pipelines with AWS Integration
GitLab CI/CD (Continuous Integration/Continuous Deployment) is a powerful, integrated toolset within GitLab that automates the software development lifecycle (SDLC). It simplifies the process of building, testing, and deploying code, enabling teams to deliver high-quality software faster and more efficiently.
Understanding GitLab CI/CD
Getting started with GitLab CI/CD is simple. Start by creating a GitLab account and setting up a project for your application if you don’t have then install and configure a GitLab Runner, a tool responsible for executing the tasks defined in your .gitlab-ci.yml file. The runner handles building, testing, and deploying your code, ensuring the pipeline works as intended. This setup streamlines your development process and helps automate workflows efficiently.
What is a GitLab Pipeline?
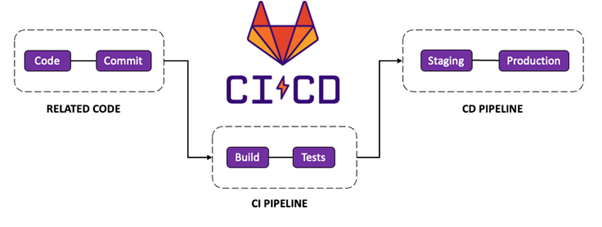
A pipeline automates the process of building, testing, and deploying applications. CI (Continuous Integration) means regularly merging code changes into a shared repository. CD (Continuous Deployment/Delivery) automates releasing the application to its target environment.

Related CODE: In this step, you push your local code changes to the remote repository and commit any updates or modifications.
CI Pipeline: Once your code changes are committed and merged, you can run the build and test jobs defined in your pipeline. After completing these jobs, the code is ready to be deployed to staging and production environments.
Important Terms in GitLab CI/CD
1. .gitlab-ci.yaml file
A .gitlab-ci.yml file in a GitLab repository is used to define the Continuous Integration/Continuous Deployment (CI/CD) pipeline configuration. This file contains instructions on building, testing, and deploying your project.
2. Gitlab-Runner
In GitLab CI/CD, a “runner” refers to the agent that executes the jobs defined in the .gitlab-ci.yml pipeline configuration. Runners can be either shared or specific to the project.
Here’s how runners work:
- Shared Runners: GitLab provides shared runners available to all projects within a GitLab instance. These runners are managed by GitLab administrators and can be used by any project. Shared runners are convenient if we don’t want to set up and manage our own runners.
- Specific Runners: We can also set up our own runners that are dedicated to our project. These runners can be deployed on our infrastructure (e.g., on-premises servers, cloud instances) or using a variety of methods like Docker, Kubernetes, shell, or Docker Machine. Specific runners offer more control over the execution environment and can be customized to meet the specific needs of our project.
3. Pipeline:
Pipelines are made up of jobs and stages:
- Jobs define what you want to do. For example, test code changes, or deploy to a dev environment.
- Jobs are grouped into stages. Each stage contains at least one job. Common stages include build, test, and deploy.
- You can run the pipeline either manually or from the pipeline schedule Job.
First is manually means directly commit, when you merged or commit any changes into code pipeline directly trigger.
And second is by using rules for that, you need to create a scheduled job.

4. Schedule Job:
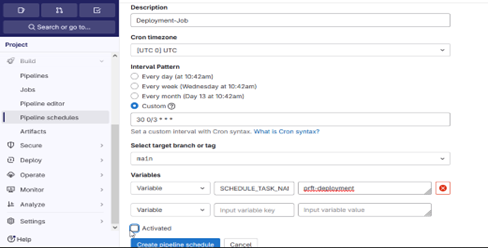
We use scheduled jobs to automate pipeline execution. To create a scheduled job, follow these steps:
- Navigate to Schedule Settings: Go to Build, select Pipeline Schedules, and click Create New Schedule.
- Configure Schedule Details:
- Description: Enter a name for the scheduled job.
- Cron Timezone: Set the timezone according to your requirements.
- Interval Pattern: Define the cron schedule to determine when the pipeline should run. If you prefer to run it manually by clicking the play button when needed, uncheck the Activate button at the end.
- Target Branch: Specify the branch where the cron job will run.
- Add Variables: Include any variables mentioned in the rules section of your .gitlab-ci.yml file to ensure the pipeline runs correctly.
- Input variable key = SCHEDULE_TASK_NAME
- Input variable value = prft-deployment


Demo
Prerequisites for GitLab CI/CD
- GitLab Account and Project: You need an active GitLab account and a project repository to store your source code and set up CI/CD workflows.
- Server Environment: You should have access to a server environment, like a AWS Cloud, where your install gitlab-runner.
- Version Control: Using a version control system like Git is essential for managing your source code effectively. With Git and a GitLab repository, you can easily track changes, collaborate with your team, and revert to previous versions whenever necessary.
Configure Gitlab-Runner
- Launch an AWS EC2 instance with any operating system of your choice. Here, I used Ubuntu. Configure the instance with basic settings according to your requirements.
- SSH into the EC2 instance and follow the steps below to install GitLab Runner on Ubuntu.
- sudo apt install -y curl
- curl -L https://packages.gitlab.com/install/repositories/runner/gitlab-runner/script.deb.sh | sudo bash
- sudo apt install gitlab-runner
After installing GitLab Runner, proceed to register it. Navigate to GitLab, go to Settings, then CI/CD, and under Runners, click on the three dots to access the registration options.
And copy-paste the below cmd:

Run the following command on your EC2 instance and provide the necessary details for configuring the runner based on your requirements:
- URL: Press enter to keep it as the default.
- Token: Use the default token and press enter.
- Description: Add a brief description for the runner.
- Tags: This is critical; the tag names define your GitLab Runner and are referenced in your .gitlab-ci.yml file.
- Notes: Add any additional notes if required.
- Executor: Choose shell as the executor.

Check GitLab-runner status and active status using the below cmd:
- gitlab-runner verify
- gitlab-runner list

Check gitlab-runner is active in gitlab also:
Navigate to GitLab, then go to Settings and select GitLab Runners.

Configure gitlab-ci.yaml file
- Stages: Stages that define the sequence in which jobs are executed.
- build
- deploy
- Build-job: This job is executed in the build stage, the first run stage.
- Stage: build
- Script:
- Echo “Compiling the code…”
- Echo “Compile complete.”‘
- Rules:
- if: ‘$CI_PIPELINE_SOURCE == “schedule” && $SCHEDULE_TASK_NAME == “prft-deployment”‘
- Tags:
- prft-test-runner
- Deploy-job: This job is executed in the deploy stage.
- Stage: deploy #It will only execute when both jobs in the build job & test job (if added) have been successfully completed.
- script:
- Echo “Deploying application…”
- Echo “Application successfully deployed.”
- Rules:
- if: ‘$CI_PIPELINE_SOURCE == “schedule” && $SCHEDULE_TASK_NAME == “prft-deployment”‘
- Tags:
- prft-test-runner
Note: If needed, you can add a test job similar to the BUILD and DEPLOY jobs.
Run Pipeline
Since the Cron job is already configured in the schedule, simply click the Play button to automatically trigger your pipeline.

To check pipeline status, go to Build and then Pipeline. Once the Build Job is successfully completed, the Test Job will start, and once the Test Job is completed, the deploy job will start.

Output
We successfully completed BUILD & DEPLOY Jobs.

Build Job

Deploy Job

Conclusion
As we can see, the BUILD & DEPLOY jobs pipeline has successfully passed.
We’ve provided a brief overview of GitLab CI/CD pipelines and a practical demonstration of how its components work together. Hopefully, everything is running smoothly on your end!

