
Rich text editors are essential for many web applications, allowing users to format text, add links, and even insert media directly into their content. Quill.js is a powerful, customizable open-source editor that integrates seamlessly with modern frameworks like Vue.js. This tutorial will walk us through the steps to set up and integrate Quill.js in a Vue.js project to create a dynamic rich text editor.
By the end of this guide, you’ll have a fully functional, tailored-to-your-needs rich text editor in your Vue.js application.
Prerequisites:
Before diving into the code, ensure that you have the following setup and basic knowledge of:
- Vue.js: The JavaScript framework you’ll be using for the project. [Learn more about Vue.js]
- TypeScript: For typing and ensuring robust code. [Introduction to TypeScript]
- Quill.js: The rich text editor library.[Quill.js Documentation]
- jQuery: Used for DOM manipulation and event handling in this example.[Kickstart your journey with jQuery]
Step 1: Installing Quill.js in Your Vue Application
First, we need to install Quill.js in your Vue project. Open your terminal, navigate to your project directory, and then run this command:
![]()
This command installs Quill.js and saves it as a dependency in your project.
Step 2: Creating a Custom Quill.js Component for Rich Text Editing
Let’s begin by creating a new Vue component called Quill.vue. This component will encapsulate the logic for initializing and managing the Quill editor instance.
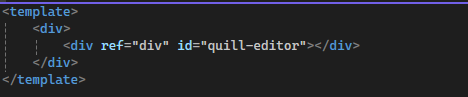
Step 3: Building the Quill Editor Template in Vue.js
Define the basic template structure in Quill.vue
Step 4: Importing Quill.js and CSS

Import the Quill.js library and the necessary CSS for the Snow theme.

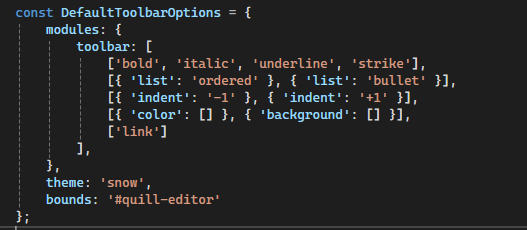
Step 5: Configuring Toolbar Options for Your Vue Rich Text Editor
Set up the default toolbar options for the editor.
This configuration provides basic text formatting options and controls for lists and links.
Step 6: Initializing the Quill.js Editor in Your Vue Component
In the mounted lifecycle hook, initialize the Quill editor on the referenced div element.
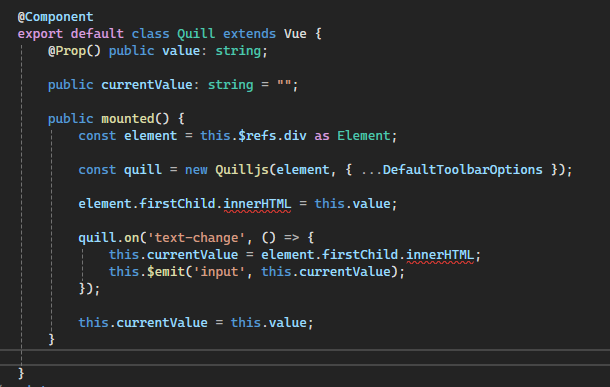
this.$refs.div: Accesses thedivwhere Quill.js will be rendered.new Quilljs(element, { ...DefaultToolbarOptions }): Initializes Quill.js with the defined toolbar options.quill.on('text-change'): Sets up an event listener to capture text changes and update the component’scurrentValue, which is emitted to the parent component.
Step 7: Capturing Text Changes in Quill.js with Vue.js
The @Watch decorator monitors the value prop, ensuring that any changes made externally are reflected in the editor.
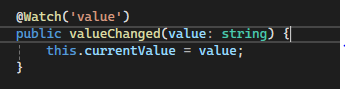
This makes the component reactive to prop changes from its parent.
Step 8: Integrating the Quill.js Editor into Your Vue.js Application
Finally, use the Quill component in a parent component as shown below:

In this tutorial, we walked through the steps to integrate Quill.js into a Vue.js application, creating a customizable rich text editor. This setup gives you the flexibility to build a feature-rich text editor tailored to your project’s needs.
Whether you’re building a content management system, a blogging platform, or any application that requires text editing, Quill.js with Vue.js provides a robust solution.