In this blog, we can set up a continuous integration/continuous delivery (CI/CD) pipeline using AWS Code-Commit, AWS Code-Build, and AWS Code-Deploy for application development and testing and AWS Code Pipeline for workflow orchestration. With the help of this pipeline, Applications may be automatically tested, built, and deployed to AWS services like Amazon EC2, Elastic Beanstalk, and other appropriate AWS deployment targets.
In today’s fast-paced digital landscape, the ability to deliver applications quickly and efficiently is paramount. DevOps practices, combined with the robust capabilities of Amazon Web Services (AWS), empower organizations to streamline their development and operational processes, ensuring faster time-to-market and improved reliability. This blog explores how AWS DevOps can revolutionize your workflow, offering insights into key services, best practices, and real-world applications.
What is AWS DevOps?
Combining DevOps methodologies with AWS’s cloud computing capabilities is known as AWS DevOps. By automating and integrating software development and IT teams’ processes, DevOps approaches seek to enable continuous delivery while enhancing the productivity and caliber of software development.
Key AWS DevOps Services
AWS offers a suite of tools and services designed to facilitate DevOps practices. Here are some of the key services:
AWS Code Pipeline
AWS Code Pipeline is a continuous integration and continuous delivery (CI/CD) service for fast and reliable application and infrastructure updates. It is a completely set up continuous delivery service that assists the user in automating their released pipelines for dependable and quick upgrades to their infrastructure and applications.
AWS CodeBuild
It completely controlled continuous integration service on a dynamically built build server that builds software packages performs tests and assembles source code.
AWS CodeDeploy
Automating code deployments using the AWS Code-Deploy service to any instance, including on-premises and Amazon EC2 instances.
This fully managed deployment service streamlines the process of deploying software to many computing services, such as your on-premises servers, AWS Lambda, AWS Fargate, and Amazon EC2. This allows you to deliver new features more quickly, minimize downtime during deployment, and handle the complexity of upgrading your apps.
AWS CodeCommit
AWS CodeCommit is a source control service for privately storing and managing assets in the cloud. It supports standard Git functionality and integrates with other AWS services to streamline the CI/CD process.
Workflow of CICD Pipeline
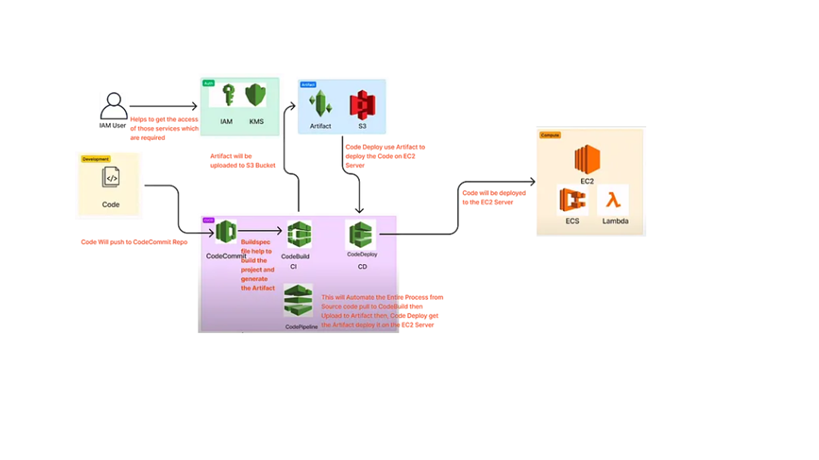
- Code: stored in our local machine
- IAM: AWS Identity and Access Management (IAM) is a service that helps you securely control access to AWS services and resources for your users
- EC2: Elastic Compute Cloud, sometimes called Amazon EC2, is a cloud computing service offering scalable computational power. It is designed to make web-scale cloud computing easier for developers.
- S3: The object storage service known as Amazon Simple Storage Service (Amazon S3) provides performance, security, scalability, and data availability that are among the best in the business.
AWS Code Commit
Step 1
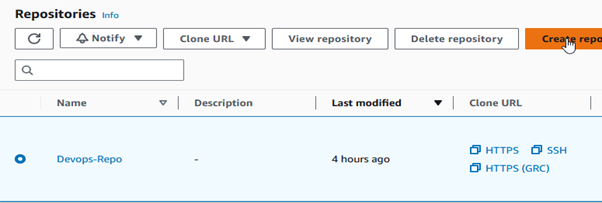
Create a secure repository to store share your code, you only need to add the repository name and description which are optional. I create repository name as “Devops-Repo” in AWS code-commit.
Step 2
Next, create an IAM user to generate HTTP credentials. Grant the user “AWScodecommitPowerUser” and “IAMUserChangePassword” permissions to access the Code-Commit repository from the local machine.

Step 3
Generate AWS credentials so you may access the repository locally.
After selecting IAM user, select Security Credentials. Scroll down to see your AWS Code HTTPS Git credentials. After committing, select “Generate Credential.”
Ensure that you download the CSV file or store the login and password in a secure location (once this credential will disappear, you can’t see it again).

Step 4
The AWS CodeCommit is private. So, we need to clone the repo on our local machine and then push the changes.

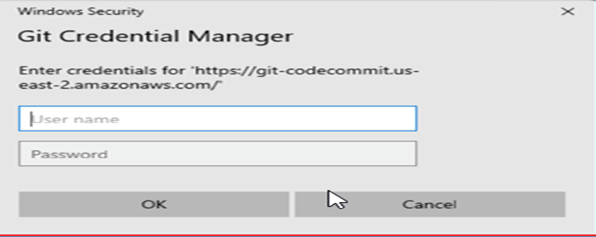
Now, we will clone the repo in VS-Code Editor. Next, you must authenticate by providing your username and password, which we will extract from the.csv file.
Make a new “index.html” file and add some sample code for testing.

Step 5
Then, save the changes and push them to remote repository

Step 6
Create a dev branch for testing. In the dev branch, create an index.html file and add some changes.

You can merge changes from dev to master using a pull request by selecting the source and destination branches.

Make sure to review your changes before merging.
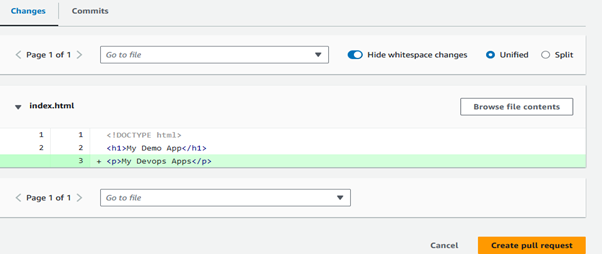
Click on “Create pull request” and see the changes merged successfully.
AWS Code Build
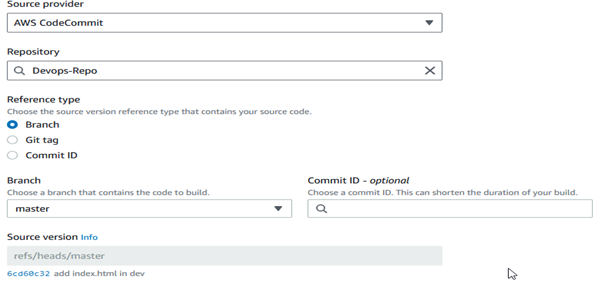
Create a build project and give it a name. Select “AWS CodeCommit” as the source provider and choose your repository and branch.
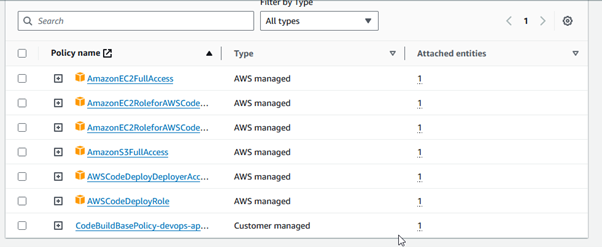
Create a service role in AWS Identity and Access Management (IAM) that establishes a connection between two services, like CodeCommit to EC2 or CodeBuild to CodeDeploy. As shown below, we need to add the policies to the “codebuild-devops-app-service-role” role.

The buildspec.yaml file is a specification for AWS CodeBuild that defines the build commands and settings. It is the most important part of code-build.

Create a buildspec.yaml file in your local repository, commit it to the dev branch, push it to the remote repository, and then merge it into the master branch. I configured buildspec.yaml with the following phases & commands.
version 0.2
- phases:
- install:
- commands:
- echo Installing NGINX
- sudo apt-get update
- sudo apt-get install -y
- commands:
- build:
- commands:
- echo Build Started on ‘date’
- cp index.html /var/www/html/
- commands:
- post-build:
- commands:
- Configuring NGINX
- commands:
- artifacts:
- files:
- /var/www/html/index.html
- files:
- install:
Create a pull request and integrate the development code into master to run code-build in master (we chose the master branch during the code-build setup).
Verify the modifications and merge them.

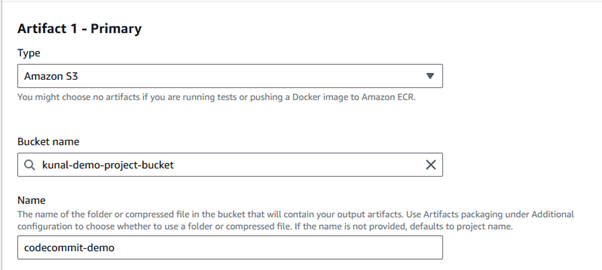
Use S3bucket to store the artifact; create a bucket on S3, create a folder inside the bucket, and then add the bucket’s configuration to the code-build’s artifact section. Select artifact packaging is “zip.”
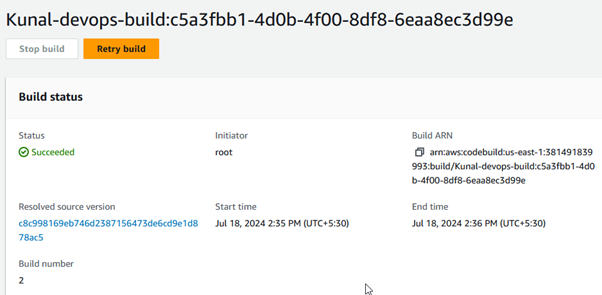
Click on Start build to run the job.

The build was successfully completed, as shown above. For additional information, you can review the build log and phase details.
AWS Code-deploy
In the AWS CodeDeploy Service, select “Create application.”
Make sure your EC-2 instance is created before developing a code-deploy application. If it isn’t, create one, I created it using Ubuntu OS.
After the instance has been launched, confirm that the EC-2 server is configured with the code-deploy agent. Check the below AWS document to configure the code-deploy agent in your EC2 instance:
Using the following policies, build an IAM role to connect EC2 to S3 and EC2 to code-deploy:

To attach the IAM role:
Select the instance you want to modify. Click on the “Actions” button. Select “Security” from the dropdown. Choose “Modify IAM role.”
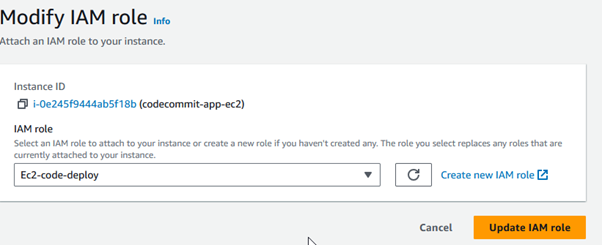
Once ec2-instance has been launched successfully, you must establish an application using code-deploy and choose the cloud platform (Ec2, for example) on which you wish to deploy the code. Go to Code-deploy & create an application.

After creating the application, click on its name to open it. Click on “Create deployment group.” Enter the deployment group name. Select a service role that CodeDeploy will use to interact with your instances.

This role must have the necessary permissions to interact with your EC2 instances and other AWS services, as shown below:

Choose “In-place” if you want to update the existing instances or “Blue/Green” if you want to create new instances for the deployment, and all remaining configurations are selected as default.
In the CodeDeploy console, select the application you created earlier. Click on “Deploy application.”

Configure Deployment Settings
- Application name: Ensure your application name is correct.
- Deployment group: Pick the newly created group.
- Revision type: Choose where your application files are located.
- Amazon S3: Enter the S3 bucket name and object key if your files are in an S3 bucket. Click create deployment
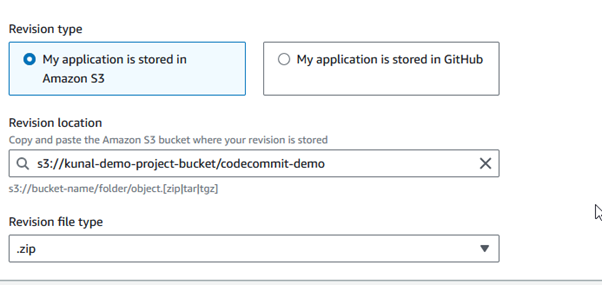
Now you can see deployment has started.

Click on the deployment ID for which you want to view details. On the deployment details page, you will see a summary of the deployment status and progress. Scroll down to the Deployment lifecycle events section. This section provides detailed information about each phase of the deployment. Click on View events to see a detailed log of the deployment process, including information on each lifecycle event such as BeforeInstall, Install, AfterInstall, ApplicationStart, ApplicationStop, and ValidateService.

AWS Code-Pipeline
To automate the deployment process using AWS CodePipeline, you must create a pipeline that integrates AWS CodeCommit, AWS CodeBuild, and AWS CodeDeploy. There are 4 stages to configuring the pipeline:
Stage 1
Click on Create pipeline. Enter Pipeline Settings:
Pipeline name: Give a name for your pipeline.
Select Execution mode – Queued
Service role:
- New service role: If you don’t have an existing service role, select this option. CodePipeline will create a new role with the necessary permissions.
- Existing service role: Choose this option if you already have a service role. You will need to select the role from the dropdown list.
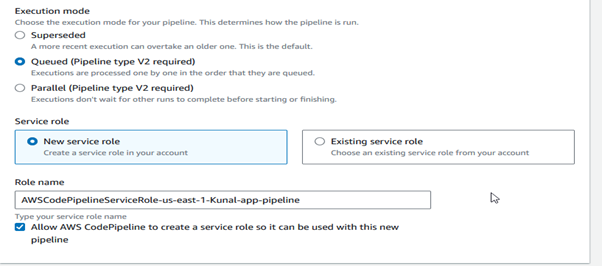
Stage 2
On the Add source stage page, you will configure the source provider for your pipeline.
Source provider: Choose the source provider for your pipeline.
AWS CodeCommit: For repositories hosted in AWS CodeCommit.
Add the Repository name and branch name, and select change detection options.
Click Next to move on to the build stage configuration.
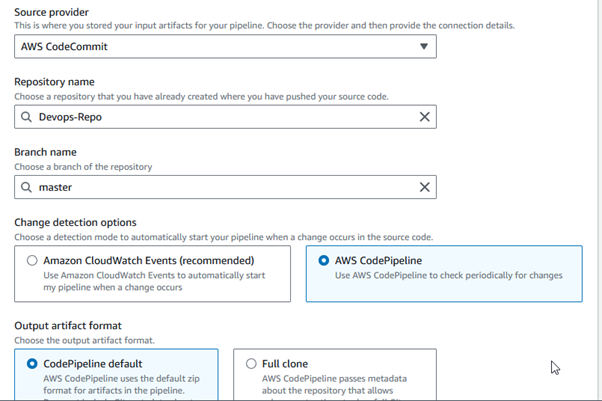
Stage 3
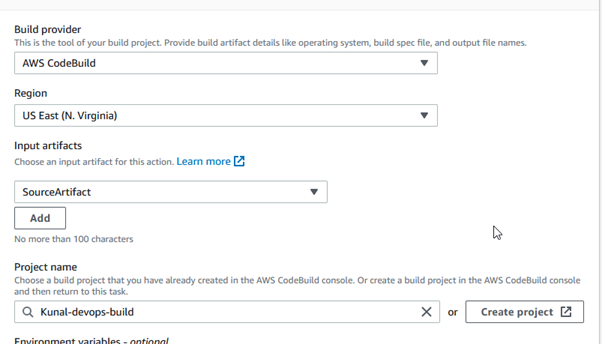
On the Add build stage page, configure the build provider settings.
Build provider: Choose the build provider for your pipeline.
Project name: Select the CodeBuild project you want to use.
Region: Select Region
Input artifact: Select the artifact from the previous source stage.
To proceed to the deploy stage setup, click Next.
Stage 4
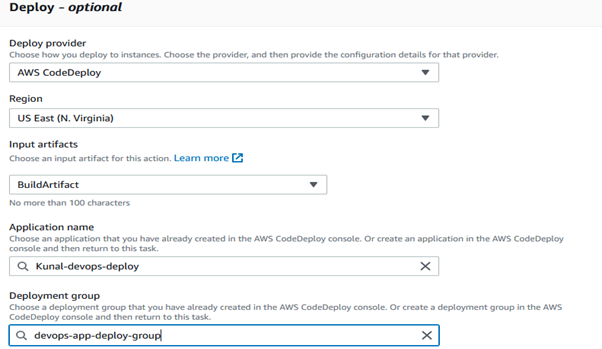
Configure the deploy provider settings on the Add deploy stage page.
Deploy provider: For your pipeline, select the deploy provider. (AWS code Deploy)
Application name: Select the CodeDeploy application you want to use.
Deployment group: Select the deployment group that you have set up in CodeDeploy.
Input artifact: Select the artifact from the build stage (e.g., BuildOutput).
Click Next to move on to any optional approval stages.
AWS CodePipeline will begin setting up your pipeline with the specified configurations by clicking Create Pipeline. This pipeline will use AWS CodeCommit, AWS CodeBuild, and AWS CodeDeploy to automate the code commit to the deployment process.
Output
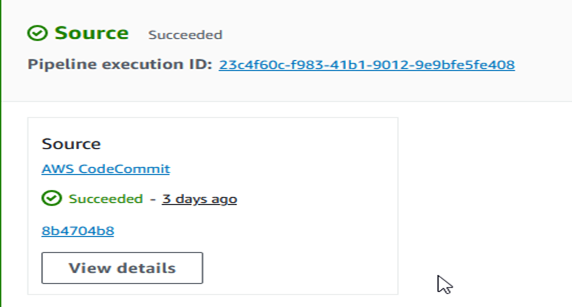
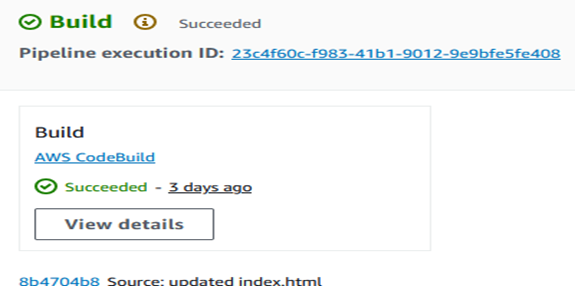
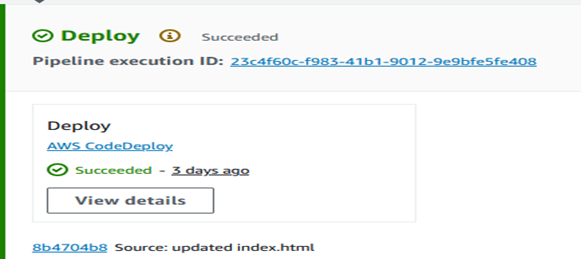
The pipeline was executed successfully. All stages (Source, Build, Deploy) were completed without errors.
By setting up this pipeline, we have automated the process from code commit to deployment, ensuring a streamlined CI/CD workflow.
You can access your application via the EC2 instance IP address to see the changes you made to the index.html file.
Open a web browser. Enter the public IP address of your EC2 instance in the address bar (e.g., http://<your-ec2-ip>).
The output of the index.html file that you deployed should now be visible.


The deployment flow explained here is very practical, especially the way AWS DevOps tools are tied together to reduce manual steps. We’ve seen similar patterns while working with an AWS DevOps consulting company, where automation really helped improve consistency across environments. While exploring different approaches, I also came across https://mobisoftinfotech.com/services/devops, which offered a helpful comparison of how teams structure DevOps consulting services across cloud platforms. Overall, this part does a good job of breaking down deployment automation in a clear, usable way.