
Benefits of Utilizing Path Assistant in Salesforce
In today’s fast-paced business environment, efficiency and consistency are key to success. Salesforce’s Path Assistant in Lightning Experience is designed to enhance user productivity and streamline workflows by visually guiding teams through critical stages of processes. This tool not only simplifies navigation but also ensures that best practices are followed consistently across Sales and Service Processes. Consequently, it enhances efficiency and reduces errors. Moreover, by implementing this tool, teams can seamlessly adapt to changes and maintain high standards throughout the transition. In this guide, we’ll explore how to set up Path Assistant for effective case management in Salesforce, maximizing its benefits for your team.
Supported Salesforce Objects for Path Assistant
- Path Assistant is compatible with a variety of objects, including:
- Accounts (business and personal accounts)
- Assets
- Campaigns
- Cases
- Contacts
- Contracts
- Fulfillment orders
- Leads
- Opportunities
- Orders
- Product service campaigns
- Quotes
- Service appointments
- Work orders
- Custom objects
Comprehensive Guide on Creating a Service Path in Salesforce
Let us take an example in Service Cloud, Path Assistant can be a valuable tool to streamline case management processes, ensuring that your support team follows consistent steps to resolve customer issues. Here’s a step-by-step guide to setting up Path Assistant for the Case object in Salesforce Lightning Experience.
Step 1:
Enable Path Functionality in Salesforce
- Log in to Salesforce: Use your credentials to log into your Salesforce organization.
- Go to the Setup Menu: Click the gear icon located in the upper-right corner and choose “Setup” from the dropdown options.
- Quick Find Box: In the Quick Find box on the left, type “Path Settings.”
- Enable Path: Click on “Path Settings” from the search results, then click “Enable” if it’s not already enabled.

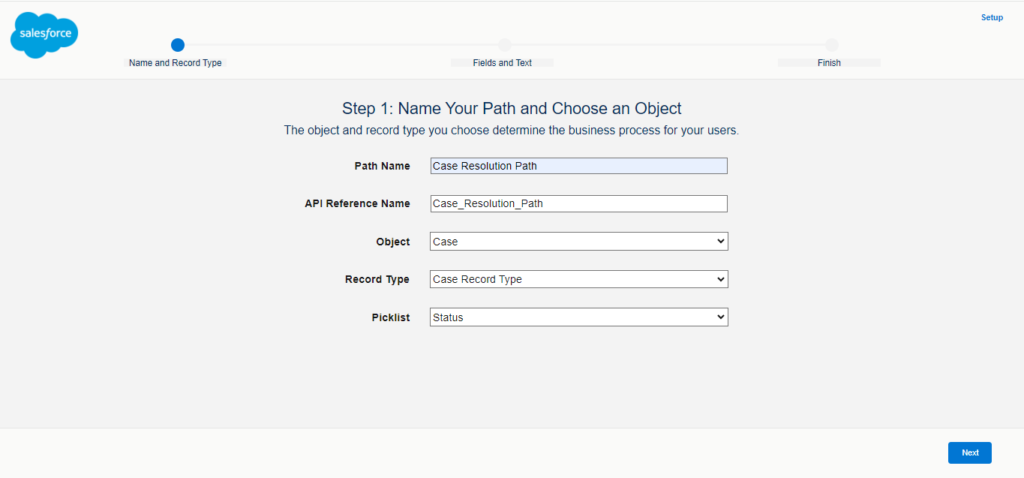
Step 2:
- Click on New Path: Within Path Settings, click on the “New Path” button.
- Enter Path Details:
- Path Name: Provide a descriptive name for your Path, such as “Case Resolution Path.”
- Object: Select “Case” as the object.
- Record Type: Choose the appropriate record type if your Case object uses multiple record types.
- Picklist Field: Select the field that will drive the Path, typically “Status.”
- Click Next: After filling in the necessary details, click “Next.”
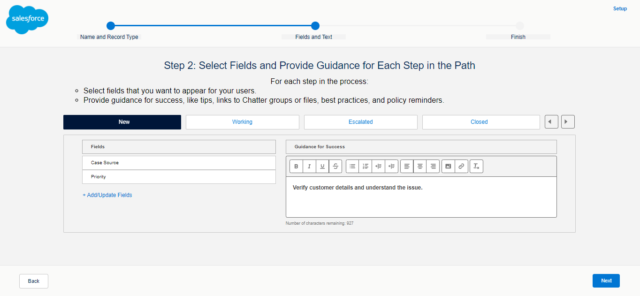
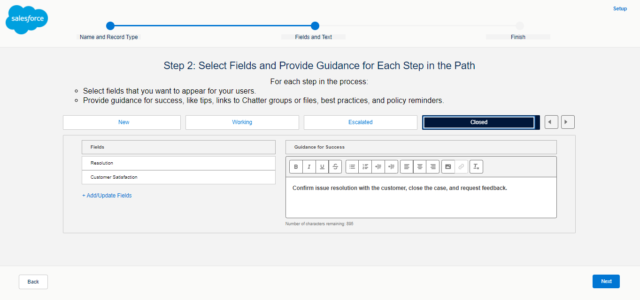
Step 3:
Configure Key Fields and Provide Guidance
- Select Key Fields: For each status (e.g., New, Working, Escalated, Closed), choose the key fields users should focus on.
- Add Fields: Click “Add Fields” to select relevant fields such as “Case Reason,” “Priority,” or “SLA Violation.”
- Provide Guidance: Enter helpful guidance or tips for users at each stage.
- Guidance Text: For example, for the “New” status, you might include instructions to verify customer details and understand the issue.
- Click Next: Once you’ve added the key fields and guidance for each stage, click “Next.”
Step 4:
Activate Your Path for Users
- Review and Activate: On the final screen, review the Path settings and click “Activate” to make it available to users.
- Finish Setup: Click “Finish” to complete the Path setup process.
Step 5:
Integrate Path into the Case Page Layout
- Navigate to Object Manager: Click on the gear icon and select “Object Manager.”
- Select the Case Object: Choose “Case” from the list of objects.
- Go to Page Layouts: Click on “Page Layouts.”
- Edit Page Layout: Select the Case page layout you want to edit and click “Edit.”
- Add Path Component: Drag and drop the Path component to the desired section of the layout.
- Save Layout: Save the changes to the page layout.
Step 6:
Using Path Assistant in Lightning Experience
- Open a Case Record: Navigate to a case record.
- View the Path: You’ll see the Path component at the top of the case record page.
- Follow the Stages: Users can follow the stages of the Path, view key fields, and read the guidance for success as they work on the case.
Use Case: Streamlining Case Management Processes
Let’s consider a scenario where the support team needs to follow a defined process for resolving customer issues:
1. New:
- Key Fields: Case Reason, Priority
- Guidance: Verify customer details and understand the issue.
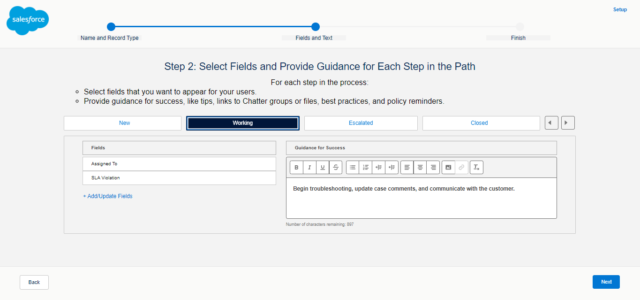
2. Working:
- Key Fields: Assigned To, SLA Violation
- Guidance: Begin troubleshooting, update case comments, and communicate with the customer.

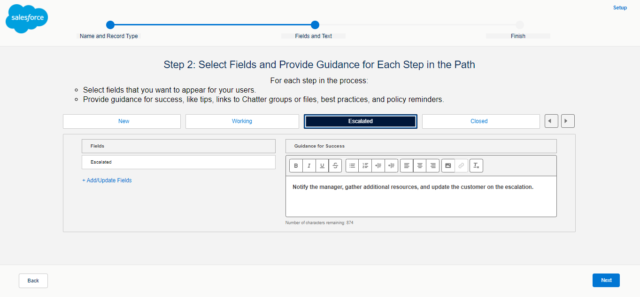
3. Escalated:
- Key Fields: Escalation Level, Next Steps
- Guidance: Notify the manager, gather additional resources, and update the customer on the escalation.
4. Closed:
- Key Fields: Resolution, Customer Satisfaction
- Guidance: Confirm issue resolution with the customer, close the case, and request feedback.
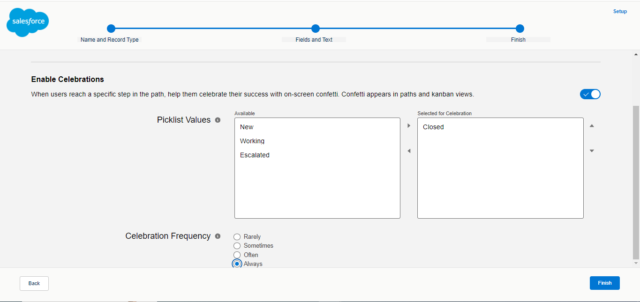
Finish Step :
You can enable Celebration based on your requirements. First, select the picklist value to display the Success Celebration. Additionally, you can set the Celebration Frequency according to your needs. Consequently, this allows you to customize how and when celebrations are shown, ensuring they align with your team’s goals and enhance motivation effectively.
Additional Tips for Optimizing Path Assistant
- Customize as Needed: You can revisit Path Settings in Setup to customize, deactivate, or make any changes as needed.
- Train Your Users: Ensure your support team understands how to use the Path and benefit from the guidance provided at each stage.
- Monitor and Improve: Regularly gather feedback from your users to make improvements to the Path and its guidance.
Conclusion: Enhancing User Productivity with Path Assistant
By following these steps, you can effectively set up Path Assistant for the Case object in Salesforce Service Cloud. Consequently, this ensures a streamlined and consistent process for resolving customer issues. Additionally, once you have set up Path Assistant, you will find that it simplifies navigation through case management stages. Furthermore, it helps maintain adherence to best practices, which in turn enhances efficiency and reduces errors. As a result, you can handle customer issues more effectively, leading to improved service quality and faster resolution times. Overall, by leveraging Path Assistant, you optimize the Case management process, achieving a more organized and efficient workflow.
References
- Salesforce Official Documentation: Path Settings in Salesforce
- Salesforce Trailhead Module: Salesforce Path Assistant