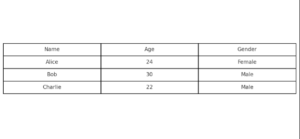
In the world of modern web development, handling and displaying data efficiently is crucial. Salesforce developers often face the challenge of rendering complex data tables with high performance and interactivity. One solution I’ve found incredibly useful is Tabulator, a powerful JavaScript library designed for creating interactive tables. In this blog, I’ll walk you through the process of integrating Tabulator into Lightning Web Components (LWC), share technical examples, discuss common debugging techniques, and highlight the advantages.
What is Tabulator?
It is an open-source JavaScript library that allows you to create highly interactive tables. It offers a wide range of features, including pagination, sorting, filtering, and custom formatting. Therefore, it is an excellent choice for Salesforce developers who need to manage and display large datasets efficiently.
Setting Up Tabulator in LWC
To get started, follow these steps:
Install Tabulator:
Download the Tabulator files and upload them as static resources.
Create the Static Resource:
Upload the Tabulator CSS and JS files to Salesforce as static resources. This can be done via the Salesforce Setup menu or by using Salesforce CLI.
LWC Component Structure:
Create a new LWC component and structure it to include the Tabulator table. Here’s a basic example:
html
<!-- Example.html -->

   <template>

       <div class="tabulator-container" lwc:dom="manual"></div>

   </template>
js
   // Example.js

   import { LightningElement, api } from 'lwc';

   import tabulatorCSS from '@salesforce/resourceUrl/tabulator_css';

   import tabulatorJS from '@salesforce/resourceUrl/tabulator_js';

   import { loadScript, loadStyle } from 'lightning/platformResourceLoader';


   export default class MyExample extends LightningElement {

       @api tableData;


       renderedCallback() {

           if (this.isTabulatorInitialized) {

               return;

           }

           this.isTabulatorInitialized = true;


           Promise.all([

               loadStyle(this, tabulatorCSS),

               loadScript(this, tabulatorJS)

           ])

               .then(() => {

                   this.initializeTabulator();

               })

               .catch(error => {

                   console.error('Error loading:', error);

               });

       }


       initializeTabulator() {

           const table = new Tabulator(this.template.querySelector('.tabulator-container'), {

               data: this.tableData,

               layout: 'fitColumns',

               columns: [

                   { title: 'Name', field: 'name' },

                   { title: 'Age', field: 'age' },

                   { title: 'Gender', field: 'gender' }

               ]

           });

       }

   }
Common Problems and Debugging Tips
While working with Tabulator in LWC, you might encounter common issues. Here are a few problems I faced and how to debug them:
Static Resource Loading Issues:
If Tabulator CSS or JS files aren’t loading, ensure the static resource paths are correct and the resources are uploaded correctly in Salesforce. Use the browser console to check for any loading errors.
Table Not Rendering:
If the table doesn’t render, first verify that you have correctly initialized the Tabulator library. Subsequently, add console logs in the initializeTabulator method to ensure it is being called
initializeTabulator() {

       console.log('Initializing ...');

       const table = new Tabulator(this.template.querySelector('.tabulator-container'), {

           // Configuration...

       });

   }
CSS Styling Issues:
If the table styles look off, check if the Tabulator CSS is loading correctly. Inspect the DOM elements to see if the style classes are applied.
Advantages
Performance: It optimizes handling large datasets efficiently, ensuring smooth performance even with complex data.
Customization: With extensive configuration options, you can customize the appearance and behavior of the table to fit your specific needs.
Interactivity: Features like sorting, filtering, and pagination are built-in. As a result, they provide a rich user experience without additional development effort.
Responsiveness: It supports responsive design; therefore, tables adapt well to different screen sizes and devices. Consequently, this enhances accessibility and usability across various platforms.
Conclusion
Integrating Tabulator with Lightning Web Components can significantly enhance your data display capabilities in Salesforce. Moreover, with its robust feature set and flexibility, it simplifies the process of creating interactive tables. Consequently, this allows you to focus on building great user experiences. By following the steps outlined in this blog and leveraging the debugging tips, you can seamlessly incorporate it into your LWC projects and, in turn, enjoy the numerous advantages it offers. Happy coding!
For more information visit the below
Tabulator Documentation
Row-Level Actions in Lightning Datatable in Lightning Web Component


