
Server-side validation protects against invalid and malicious data, ensuring data integrity and security. In this post, we’ll look at how to utilize Zod, a declarative JavaScript validation library, for server-side form validation in a Next.js application. We will also explore how to handle validation failures provided by the server.
Assumptions
This blog assumes you have Next.js set up locally. If you don’t, please follow the official setup guide on the Next.js website: Next.js Setup Guide.
Prerequisites
In this blog post, I am using:
– Next.js 14.x
– Tailwind CSS
– TypeScript
– Zod (an NPM package for schema declaration and validation library for TypeScript)
Why Add Server-Side Validation?
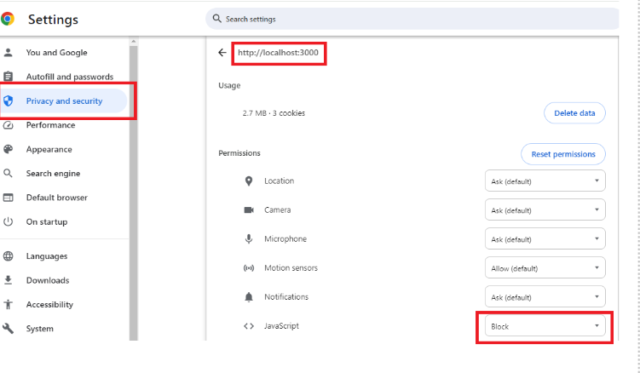
Assume we’ve built a form with Next.js and added client-side validation. This form shows validation when the browser’s JavaScript is enabled but not when it is disabled. Without server-side validation, the form will not initiate validation and will submit the form. To prevent users from entering invalid data, we use server-side validation.
Here’s a screenshot showing how to disable JavaScript for a particular site in Chrome:
Below is a screenshot of my codebase. Once you have set up Next.js, you only need to create a components folder and an action.ts file, which should be parallel to the components folder.


Creating the SignUp.tsx Component
In the components folder, create SignUp.tsx:
"use client";

import { FC, useState } from "react";
import { useFormState } from "react-dom";
import { createNewUser } from "@/action";

interface FormErrorProps {
errors?: string[];
}

const FormError: FC<FormErrorProps> = ({ errors }) => {
if (!errors?.length) return null;
return (
<div className="p-2">
{errors.map((err, index) => (
<p className="text-tiny text-red-400 list-item" key={index}>
{err}
</p>
))}
</div>
);
};

const SignUp: FC = () => {
const [date, setDate] = useState(new Date());
const [state, formAction] = useFormState(
createNewUser.bind(null, { date: date?.toISOString() }),
{ success: false }
);

return (
<form action={formAction} className="flex flex-col gap-y-2">
<label htmlFor="name">SignUp</label>
<input id="name" name="name" className="border-2" />
<FormError errors={state?.errors?.name} />

<input id="email" name="email" className="border-2" />
<FormError errors={state?.errors?.email} />

<input id="password" name="password" className="border-2" />
<FormError errors={state?.errors?.password} />

<button type="submit" className="border-2">
Create
</button>
</form>
);
};

export default SignUp;
Note: All form field elements can remain unchecked, and we don’t need to utilize React’s useState hook for the form state. In this component, we use the React form hook useFormState, which takes a function as its first argument. In our example, we are passing a function written in action.tsx and the state object for the form:
const [state, formAction] = useFormState(
createNewUser.bind(null, { date: date?.toISOString() }),
{ success: false }
);
CreateNewUser Function
We are still missing the createNewUser function used in the form’s action attribute. We’ll create this function in the action.ts file. This is a server action.
Server actions passed to the form action attribute receive the additional data, SignUpErrors, and FormData object of the form as the first argument, which encapsulates all the data of the form. We’ll use this object to get the value of the input fields and validate with Zod. In action.ts, I wrote the Zod schema for name, email, and password validation:
const userSchema = z.object({
name: z.string().trim().min(3, "Name must be at least 3 characters long!").max(18),
email: z.string().email("Email is invalid"),
password: z
.string()
.min(8, "Password is too short!")
.max(20, "Password is too long")
.regex(passwordValidation, {
message: "Your password is not valid",
})
.optional(),
});
Checking Form Data with safeParse()
In action.ts, we check the form data with safeParse(). If an error occurs, return an object with {success: false, errors: result.error.flatten().fieldErrors}, or on success, return {success: true}.
actions.ts
"use server";

import { z } from "zod";

/* TypeScript-first schema validation with static type inference */
const passwordValidation = new RegExp(
/^(?=.*[a-z])(?=.*[A-Z])(?=.*\d)(?=.*[@$!%*?&])[A-Za-z\d@$!%*?&]{8,}$/
);

const userSchema = z.object({
name: z.string().trim().min(3, "Name must be at least 3 characters long!").max(18),
email: z.string().email("Email is invalid"),
password: z
.string()
.min(8, "Password is too short!")
.max(20, "Password is too long")
.regex(passwordValidation, {
message: "Your password is not valid",
})
.optional(),
});

export interface SignUpErrors {
errors?: {
name?: string[];
email?: string[];
password?: string[];
};
success: boolean;
}

export const createNewUser = async (
date: any,
data: SignUpErrors,
formData: FormData
): Promise<SignUpErrors> => {
const result = userSchema.safeParse({
name: formData.get("name"),
email: formData.get("email"),
password: formData.get("password"),
});
if (result.success) {
/* Database action like creating a user */
return { success: true };
}
return { success: false, errors: result.error.flatten().fieldErrors };
};
Note: We are using useFormState in SignUp.tsx. It only works in a Client Component, but none of its parents are marked with “use client”, so they are Server Components by default.
Conclusion
In this post, we covered the concept of Server Actions, their advantages over typical API routes, and using Server Actions in Next.js apps. Server Actions improve the user experience and development process by decreasing client-side JavaScript, increasing accessibility, and enabling server-side data modifications. If you want to create modern web applications with Next.js, Server Actions are a must-have tool. Experiment with Server Actions to improve your apps. Run the next bundle analyzer on a regular basis as part of your development process to keep track of changes in bundle size and detect any regressions.