
The approval process in Salesforce is a systematic workflow designed to streamline and manage the approval of various business processes within an organization. It helps to make critical decisions, approve sales discounts, contract approvals as well as many such kinds of requests that need to be approved before coming into process. With the approval process in Salesforce, organizations can establish predefined rules, criteria, and steps that guide the approval flow. This enables stakeholders to collaborate effectively and make informed decisions while maintaining transparency and accountability.
This is Part 2 of the Approval Process series.
If you’ve not read my previous blog on Introduction to the Approval Process in Salesforce, then please go through this also.
In this approval process, we will take an example of the “Leave Request Management” process which is highly familiar to any job professional and will help you comprehend the concept.
Prerequisites:
Before starting for Approval Process, you must have a clear understanding of the user who will approve the request. In addition, on which object you have to create an approval process.
Here, for the Leave Request Management, I’ve created 3 users like Employee Jack (who will request leave), Manger- Isabella (who will approve the request), and Senior Manager- Robert (who will also approve the request) respectively.

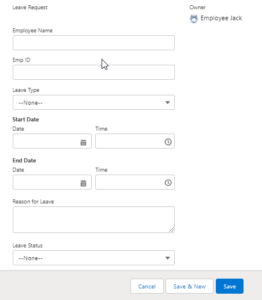
In addition, we built an object called “Leave Request” on which we are going to create an approval process. The object and its associated fields are depicted below.
Let’s create Approval Process with a few easy steps:
Step 1: – Create an Approval Process.
- Go to Setup. Enter the Approval Process in Quick Find Box. Select “Approval Processes”.
- From the Manage Approval Processes picklist, select the “Leave Request” object.
- Click on the “Create New Approval Process” drop-down menu and select “Use Standard Setup Wizard”.
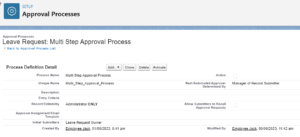
- In the Process Name column, type “Multi-Step Approval Process”. Unique names will be automatically populated. Click Next.
- In the Specify entry criteria section, select “criteria are met” from the picklist since we need to input all the records (leave requests) into the approval process. So, leave everything alone. Click Next.
- In the “Next Automated Approver Determined by” field, select Manager from the drop-down menu. Click Next.
- Leave the Email Template step as is and click Next.
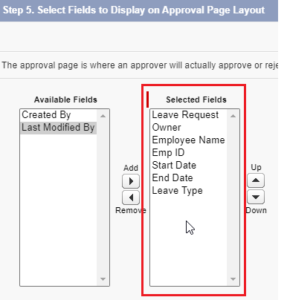
- As shown in the picture, select the fields that must be displayed to the approver and click Next.
- Check the “Display approval history info” box. Keep the rest of the things as is and click Next.
- For the Submitter Type, select Owner from the picklist. Ensure that “Leave Request Owner” will be there in the Allowed Submitters box and click Save.
- Select the – “I’ll do this later….” option. And click Go.
Now, with this, you are done with the approval process. But we are only half done. There are a few more miles to go. So, stay tuned.
Step 2: – Create Approval Steps.
- Inside the Approval Step related list, click New Approval Step.
- Enter Name and Description. Click Next.
- Keep “All records should enter this step“ as it is and click Next.
- In the Select Approver step, select Automatically Assign using the user field that was previously selected. (Manager) and click Save.
- Click the third option and click Go.
Step 3: – Initial Submission Actions.
The purpose of “Initial Submission Actions” in an approval process is to determine whether the created record (here leave request) has been submitted for approval or not. These actions come up with features like email alerts, Field Updates and Outbound Messages respectively.

Let’s create an initial submission action in our approval process for the field update of the “Leave Type” picklist field so that an employee Jack (here) will get to know about it.
- Inside the Initial Submission Actions related list, click Add New and select Field Update.
- Enter the Name and select the field you want to update.
- To specify a new field value, select In Process from the picklist – A specific value.
- Click Save.
Step 4: – Final Approval Actions.
“Final Approval Action” is for updating the field as well as sending an Email Alert when the record is approved.
Let’s create a final approval action in our approval process for field update of the “Leave Type” picklist field so that an employee Jack (here) will get know about it.
- Inside the Final Approval Actions related list, click Add New and select Field Update.
- Enter the Name and select the field you want to update.
- From specify new field value, select Approved from the picklist – A specific value.
- Click Save.
Step 5: – Final Rejection Actions.
When a record is denied/rejected, the “Final Rejection Action” is used to update the field as well as send an email alert.
Let’s create a final rejection action to our approval process for field update of the “Leave Type” picklist field so that an employee Jack (here) gets notified.
- Inside the Final Rejection Actions related list, click Add New and select Field Update.
- Enter the Name and select field you want to update.
- From specify new field value, select Rejected from picklist – A specific value.
- Click Save.
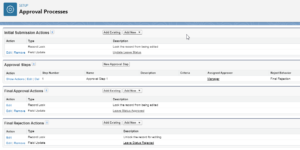
You’ve now built Initial Submission Actions, Final Approval Actions, and Final Rejection Actions in your Approval Process. It will appear as follows.
Let’s create a Leave request record and see how all the actions work that you’ve created so far.
Leave Request Record –
- Go to the App Launcher, enter and select Leave Requests.
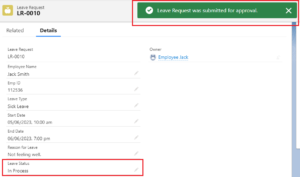
- Create a new record for Leave Request by entering all the required details. (From the “Leave Status” drop-down menu, don’t select any value.)
- Click Save. Notice that the “Leave Status” field is empty.
- Now, on the right-hand side, click “Submit for Approval” button. In this way you can submit record for approval. (If button is not visible, enable it from Page Layout.)
- After clicking submit for approval, the Leave status field’s value will automatically be changed. Here Initial submission action comes into process.
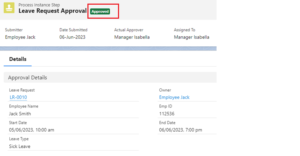
Now, the leave request is submitted to Jack’s Manager Isabella. So, from Users, login as Isabella and check the approval process came or not.
Here, if you log in as Manager Isabella, you will come to know that the approval request is floating at the notification icon on the right side. The request will be in a “pending” state until and unless Manager Isabella approves it.
Now, to approve the request, on the right side,
- Click Approve
- Enter comment (optional). Again
Click Approve again.
In this way, you approved the approval request. The request’s status also gets changed to Approved. “Final Approval Action” was initiated here.
The same phenomenon goes with the Rejection of approval requests. At this stage “Final Rejection Action” is launched.
Conclusion:
By implementing the approval process in Salesforce, organizations can enhance efficiency, reduce manual effort, maintain compliance, and ensure consistency in decision-making. It empowers teams to collaborate effectively, expedite critical business processes, and ultimately drive success in their sales, operations, and overall organizational workflows.
Happy Reading !!