In previous versions of Sitecore, the go-to tool for creating forms was either Web Forms for Marketers or a custom-made form in Web Forms or MVC. Starting with Sitecore 9, one of the new features added is a built-in Forms module. Sitecore 9 still supports WFFM in order to ease the upgrade from earlier versions, but in the future, the focus will be more on the built-in module.
So, let’s try making our own custom form with a custom action for an existing web page and see how the process goes step by step.
After installing Sitecore 9, you’ll notice a new icon on the launchpad called ‘Forms’.
Once you click the Forms icon, a new window will show with a ‘create’ button on the left hand side and ‘Blank form’ option on the right. If you’ve created forms templates in the past, they will show up here as well for further editing and modifications.
You can add elements by dragging and dropping them to the blank page, and then save the form as a template or as a single form.
Either way, once you open your Content Editor, you’ll notice that in the menu both the form and the template are visible.
For each of the forms or templates, you can see all the elements you created in the menu, and for each element, you can see the attributes attached to it such as Title, Text, Html Tag, CSS Class and others. Next, let’s look at how to use the new forms option with SCORE 3.0 and add it to an existing page. If you follow the official Sitecore manual, you’ll see a small note on the ‘Add a form to a webpage’ page.
The first step in adding the form to your already existing page is to navigate to your website and select the page you want to add the form to. Under the Presentation tab, click on Details.
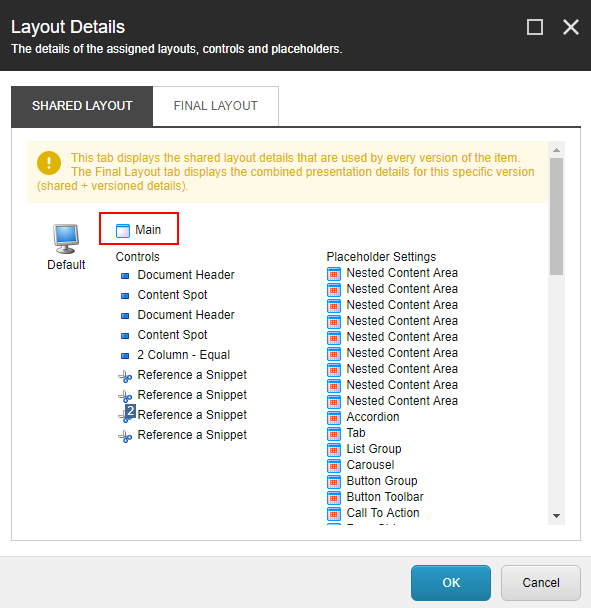
In the Layout Details dialog box, you’ll see the default layout for your page.
The layout details window will pop up, and you can click on the name of your default layout. In this case, it’s Main.
After determining your layout, you need to navigate to your project. Since we are using the SCORE Framework and have a scaffolded SCORE view layout, we can go ahead and edit it.
Go to your Views folder and find the Main.cshtml file, or whatever the name of your default layout is.
If you’re using SCORE, you will find the layout under <ProjectName>.Web->Areas->ProjectName->Views-> Layouts.
Open the project in Visual Studio and under layouts find the Main.cshtml.
Under the head tag add @Html.RenderFormScripts() and @Html.RenderFormStyles() and add the namespace at the beginning of the page @using Sitecore.Mvc.Analytics.Extensions.
Also under the head tag, add the following script references :
&amp;lt;img src="data:image/gif;base64,R0lGODlhAQABAIAAAAAAAP///yH5BAEAAAAALAAAAAABAAEAAAIBRAA7" data-wp-preserve="%3Cscript%20src%3D%22%40Url.Content(%22~%2Fsitecore%2520modules%2FWeb%2FExperienceForms%2Fscripts%2Fjquery-2.1.3.min.js%22)%22%3E%3C%2Fscript%3E" data-mce-resize="false" data-mce-placeholder="1" class="mce-object" width="20" height="20" alt="&amp;amp;lt;script&amp;amp;gt;" title="&amp;amp;lt;script&amp;amp;gt;" /&amp;gt; &amp;lt;img src="data:image/gif;base64,R0lGODlhAQABAIAAAAAAAP///yH5BAEAAAAALAAAAAABAAEAAAIBRAA7" data-wp-preserve="%3Cscript%20src%3D%22%40Url.Content(%22~%2Fsitecore%2520modules%2FWeb%2FExperienceForms%2Fscripts%2Fjquery.validate.min.js%22)%22%3E%3C%2Fscript%3E" data-mce-resize="false" data-mce-placeholder="1" class="mce-object" width="20" height="20" alt="&amp;amp;lt;script&amp;amp;gt;" title="&amp;amp;lt;script&amp;amp;gt;" /&amp;gt; &amp;lt;img src="data:image/gif;base64,R0lGODlhAQABAIAAAAAAAP///yH5BAEAAAAALAAAAAABAAEAAAIBRAA7" data-wp-preserve="%3Cscript%20src%3D%22%40Url.Content(%22~%2Fsitecore%2520modules%2FWeb%2FExperienceForms%2Fscripts%2Fjquery.validate.unobtrusive.min.js%22)%22%3E%3C%2Fscript%3E" data-mce-resize="false" data-mce-placeholder="1" class="mce-object" width="20" height="20" alt="&amp;amp;lt;script&amp;amp;gt;" title="&amp;amp;lt;script&amp;amp;gt;" /&amp;gt; &amp;lt;img src="data:image/gif;base64,R0lGODlhAQABAIAAAAAAAP///yH5BAEAAAAALAAAAAABAAEAAAIBRAA7" data-wp-preserve="%3Cscript%20src%3D%22%40Url.Content(%22~%2Fsitecore%2520modules%2FWeb%2FExperienceForms%2Fscripts%2Fjquery.unobtrusive-ajax.min.js%22)%22%3E%3C%2Fscript%3E" data-mce-resize="false" data-mce-placeholder="1" class="mce-object" width="20" height="20" alt="&amp;amp;lt;script&amp;amp;gt;" title="&amp;amp;lt;script&amp;amp;gt;" /&amp;gt; &amp;lt;img src="data:image/gif;base64,R0lGODlhAQABAIAAAAAAAP///yH5BAEAAAAALAAAAAABAAEAAAIBRAA7" data-wp-preserve="%3Cscript%20src%3D%22%40Url.Content(%22~%2Fsitecore%2520modules%2FWeb%2FExperienceForms%2Fscripts%2Fform.validate.js%22)%22%3E%3C%2Fscript%3E" data-mce-resize="false" data-mce-placeholder="1" class="mce-object" width="20" height="20" alt="&amp;amp;lt;script&amp;amp;gt;" title="&amp;amp;lt;script&amp;amp;gt;" /&amp;gt; &amp;lt;img src="data:image/gif;base64,R0lGODlhAQABAIAAAAAAAP///yH5BAEAAAAALAAAAAABAAEAAAIBRAA7" data-wp-preserve="%3Cscript%20src%3D%22%40Url.Content(%22~%2Fsitecore%2520modules%2FWeb%2FExperienceForms%2Fscripts%2Fform.tracking.js%22)%22%3E%3C%2Fscript%3E" data-mce-resize="false" data-mce-placeholder="1" class="mce-object" width="20" height="20" alt="&amp;amp;lt;script&amp;amp;gt;" title="&amp;amp;lt;script&amp;amp;gt;" /&amp;gt;
You might need to install an additional nuget called sitecore.experienceforms.mvc if you don’t have it already installed. First, try installing Sitecore.ExperinceForms.Mvc if you run into issues and the nuget is asking that you install upgrades that you don’t want or need, then install the Sitecore.ExperinceForms.Mvc.NoRefrences.
After this, the only remaining step is to add your MVC forms rendering to the placeholder of your choice and add it to your page. I added mine under Nested Content Area.
Since we chose the Nested Content Area, that’s where we will add the MVC form. Once you do this, please click the Save button.
After this step, you need to add the Form on the page in a Nested Content Area Placeholder.
Select the form you’ve used for the data source, click the Save button, republish the website and you’re done!
Now you’ve learned how to create and add a form to an existing web page. Next time, we’ll talk about ways to customize various aspects of Sitecore 9 forms. Hope you found the information useful!


