
Amazon Simple Storage Service (S3) and Amazon Elastic Compute Cloud (EC2) are two major storage services for AWS. S3 is more lightweight and provides the capability to store data. EC2, on the other hand, is a web service that provides secure, resizable computing capacity in the cloud.
As we know, backup and recovery are becoming more and more important in disaster recovery. Backing up data in case of a loss or before making a big change in the current environment is vital in case we need to roll back to the latest working environment.
Below are the detailed steps for backing up and restoring with S3 and EC2.
S3 Backup and Restore
Create the S3 bucket
1.Sign in to the AWS Management Console and open the Amazon S3 console at https://console.aws.amazon.com/s3/.
2.Choose Create bucket.

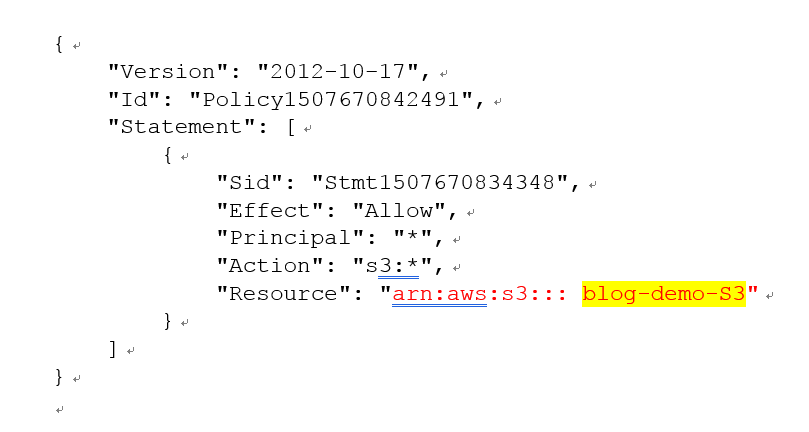
3. In the Bucket name field, type a unique DNS-compliant name for your new bucket. Create the bucket name using the follow naming convention (blog-demo-S3):
The name must be unique across all existing bucket names in Amazon S3.
After you create the bucket, you cannot change the name.
4. Choose Create.

5.After creating the bucket, go to Permissions -> Bucket Policy.
6.Paste the following policy. Make sure the ARN name matches the name of your new bucket and click save.

Create Sync Backup folder to S3 Bucket
- Putty into the server and navigate to the folder you want to sync
Backup Script: aws s3 sync {folder path} s3://{S3 ARN bucket name}
- To restore the folder, make sure you rename or delete the existing folder before executing the command.
Restore Script: aws s3 sync s3://{S3 ARN bucket name} {folder path}
EC2 – Create, Backup and Restore Snapshots in AWS
To create a snapshot using the console
- Open the Amazon EC2 console at https://console.aws.amazon.com/ec2/.
- Choose Snapshots in the navigation pane.
- Choose Create Snapshot.
- In the Create Snapshot dialog box, select the volume to create a snapshot for, and then choose Create.
To restore an EBS volume from a snapshot using the console
1.Click on the EC2 Link to access all instances

2. In the left navigation pane, choose ELASTIC BLOCK STORE, Snapshots.
3. Search and Select the snapshot you want to restore and choose Create Volume.
4. The defined values for the volume configuration will be populated.
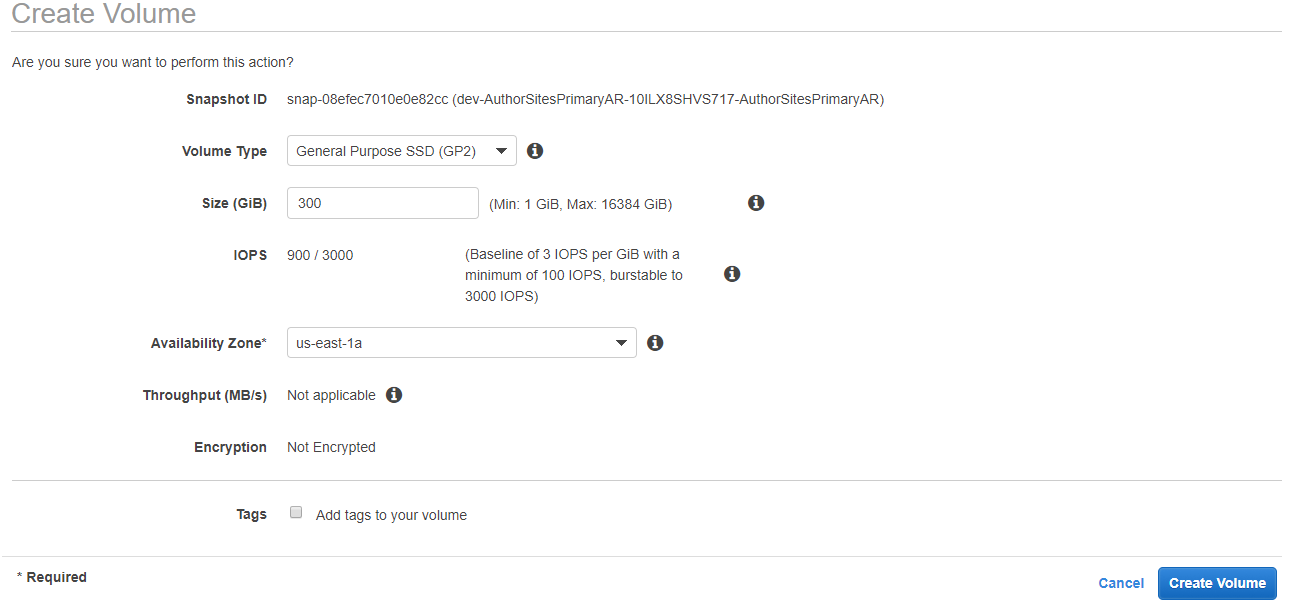
5. Choose Create Volume and note the volume ID.

6.NEXT STEP: After you have restored a volume from a snapshot, you can attach it to an instance.
To attach an EBS volume to an instance using the console
- Click on the EC2 Link to access all instances

2. In the left navigation pane, choose Volumes, select a volume and choose Actions, Attach Volume.
3. In the Attach Volume dialog box, start typing the name or ID of the instance to attach the volume to and select it from the list. You must stop the instance before attaching volume.
4.Keep the suggested device name and choose Attach
Note: Newer Linux kernels may rename your devices to /dev/xvdf through /dev/xvdp internally, even when the device name entered here (and shown in the details) is /dev/sdf through /dev/sdp.
5.NEXT STEP: Connect to your instance and make the volume available.