Today most android devices in the market has a GPU, we all know that it’s a hardware unit for processing 3D graphics. The performance of your smart phone’s GPU is important, especially when you are playing 3D games. And you may wonder how do app developers build all those complex graphics and animations in a game. Well, one way to do that is through OpenGL ES.
What’s OpenGL ES?
It’s a abbreviation for Open Graphics Library for Embedded Systems. OpenGL ES a flavor or subset of the OpenGL specification, it’s intended for embedded devices like smart phones, PDA and game consoles. In Android platform, several versions of the OpenGL ES API are supported, but why OpenGL ES 2.0? Because it does a great job both in compatibility and performance, you can check it here.
OpenGL Basics
There’re two basic ideas in OpenGL, vertex and fragment. All graphics starts with vertex, a list of vertices can form a piece of graph. And fragments corresponding to pixels, usually a fragment is a pixel, but in some high resolution devices, a fragment may have more pixels.
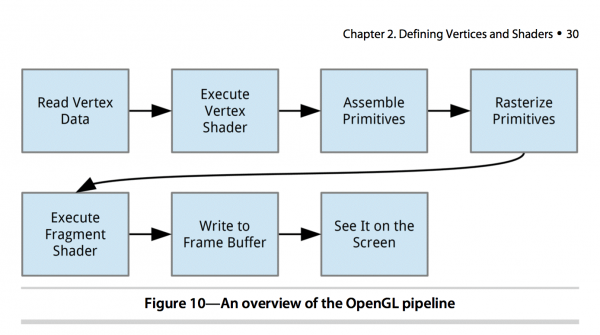
To understand the fragment better, we need to know about Rasterization. Rasterization is a process to map point, line or triangle into pixels on the screen, every mapping area is called a fragment. So rasterization is actually a process of generating fragments. Here’s a figure shows this process.
Shaders played a very important role in this process as you can see in the figure. They are used to describe how to render the graphics. There are two types of shader, Vertex Shader and Fragment Shader. The language shader use is called GLSL, full name is OpenGL Shader Language, it’s a C like language.
Another important knowledge in OpenGL is Graphics Pipeline. There are several steps for OpenGL to render graphics. First, every vertex will execute its Vertex Shader to know the final position of each vertex. There must be a global variable called “gl_Position” in its main method, it’s used to assemble all the vertices into dot, line or triangle. After rasterization, every fragment will execute Fragment Shader once to determine the color, and its related global variable is “gl_FragColor“, it’s used to determine the final color of the fragment.
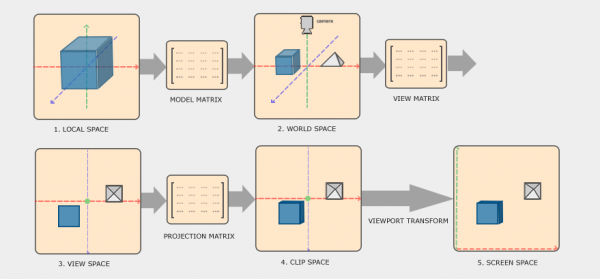
There are 5 different coordinate systems in OpenGL.
- Local Space: After a graphics object is created, the origin coordinates is in the center of the object(0, 0, 0). Different objects have different local space.
- World Space: After a Model Transformation, different objects are put into a same world space. In computer graphics, a transformation is usually done by a matrix multiplication. So the model transformation here is actually left-multiplied a Model Metrics, after that we got a world space. In general, there are 3 kinds of model transformation: Scaling, Rotation and Translation.
- View Space: It’s also called Eye Space or Camera Space. We need to do a View Transformation to adjust a world space to view space.
- Clip Space: We do a Projection for all the Camera Coordinates, and then we get clip space. In clip space, each axis will have a visible range, if the coordinate exceeds this range, the exceeded part will be clipped, so in the current scene, this part won’t be rendered, as a result, we can’t see this part. There are 3 kinds of projection: Orthographic Projection, Perspective Projection, 3D Projection. Clip Space is also called Normalized Device Coordinate (NDC).
- Screen Space: It’s the space in the screen which glViewport Since the range of NDC coordinates in each axis is [-1, 1], but the Screen Coordinate is not, for example, some screen’s resolution is 720×1280, so an object will be stretched in the screen. To handle that, we need to do a Viewport Transformation to transform NDC coordinates into screen coordinates. After getting the screen coordinates, we then can make these coordinates into pixels in screen, so we can actually see the content in the screen. This is done during rasterization.
Show Me the Code
Ok, enough said, it’s time to do some real work. Here I’m going to show you how to draw a pentagon with OpenGL ES 2.0.
First of all, declare OpenGL ES use in your AndroidManifest.xml:
And then implement both a GLSurfaceView and a GLSurfaceView.Renderer.
To implement GLSurfaceView.Renderer, there’re 3 methods you must override:
- onSurfaceCreated: This is called only once when creating the related GLSurfaceView, so we can do some prepare work here, like setting up the OpenGL environment parameters and initiating OpenGL graphic objects.
- onSurfaceChanged: This method is called when the geometry of the view changes, like when device’s screen orientation changes.
- onDrawFrame: This is called every time the view need to be redrawn.
As you can see, we created a manager class called Pentagon to hold all the OpenGL creation and render work. In Pentagon, first there are Vertex Shader and Fragment Shader, we need to define these shaders so that we can draw the shape.
Here the MVPMatrix stands for Model View Projection Matrix, as I mentioned earlier, we need to do a Project for the camera coordinates, so the view won’t be skewed by the unequal proportions of the view window. And as you can see in this GLSL code, uMVPMatrix factor must be first, in order for the matrix multiplication product to be correct.
Then we can define the coordinates and draw order, every polygon in OpenGL world is formed by triangles, so a pentagon needs three triangles:
In the constructor, we do some initialization work like this:
And then we define a draw method to draw the graphics:
Now we can implement the GLSurfaceView, we need to link the renderer with this GLSurfaceView, simple call these method in the constructor:
At last, add this customized GLSurfaceView in your activity’s ContentView:
Run your project now, you will see a pentagon on your screen like this:
To make things cooler, let’s make the pentagon move. The Android framework allows us combine OpenGL ES object with the touch event, so we can add touch listener on the GLSurfaceView to capture user interactions.
Remember to set your GLSurfaceView‘s render mode to RENDERMODE_WHEN_DIRTY, so that renderer can draw the frame again when the touch event is captured.
Wrapping Up
With OpenGL ES 2.0 framework, you can make the most use of the device’s GPU, and you can build graphics that are limited only by your imagination. You can even build an Augmented Reality application if you want.
I’d welcome your feedback.
References


Hi Thanks for the tutorial…..I have a question How can I convert this 3D coordinates to screen point…..
float sRectVerts[] = {
-0.5f, -0.5f, 0.0f,
-0.5f, 0.5f, 0.0f,
0.5f, 0.5f, 0.0f,
0.5f, -0.5f, 0.0f };
float[] modelView = target.getViewMatrix();
float[] projection = target.getProjectionMatrix();
float[] modelViewprojectionarray = target.getModelViewProjectionMatrix();
I have above values now I need the screen point