SAML (Security Assertion Markup Language) is a XML-based open standard format to exchange authentication and authorization data between an identity provider (IdP) and a service provider (SP). A SAML-enabled web application allows browser single sign-on (SSO). We have had success implementing SSO for our clients with Active Directory Federation Services (ADFS) as the identity provider and Oracle PBCS as the service provider. SAML uses secure tokens to pass digitally signed, encrypted authentication and authorization messages between ADFS and PBCS application with an established trust relationship.
ADFS is part of Microsoft Windows Active Directory Services; it is commonly used among IT organizations to provide single sign-on access to applications and systems within or outside of company security realms. ADFS uses a claims-based access authorization scheme to maintain application security and to establish federated identity, i.e., trusted relationship with SAML-compliant partners such as PBCS.
Prior to setting up SSO, ADFS must be installed on premise on a Windows server, configured for local user authentication, and SSL-enabled. From PBCS, create or grant an account with the identity domain administrator role. Configuring SAML SSO is then pretty straightforward and the steps are highlighted below.
-
- Extract and save ADFS Identity Provider federation file. From IE, browse to URL, e.g., https://servername.domain.com/FederationMetadata/2007-06/FederationMetadata.xml.
- Logon to PBCS URL https://cloud.oracle.com/sign-in with identity domain administrator ID.
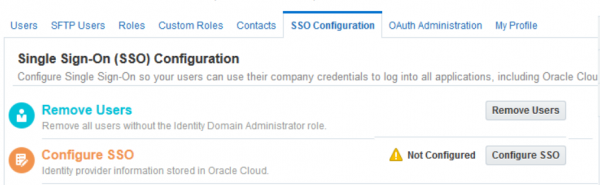
- Navigate to Users->SSO Configuration
- Click Configure SSO
-
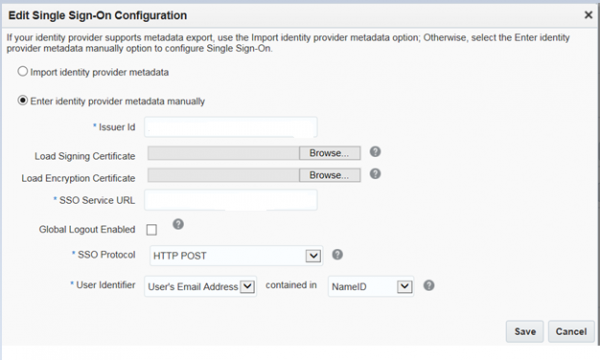
- Select ‘Import identity provider metadata’ and browse to upload the FederationMetadata.xml file. Or, select option to enter IdP metadata manually. For manual entry, Issuer ID and SSO Service URL are required as indicated. In addition, extract and upload token-signing certificate and encryption certificate from ADFS. Leave SSO protocol at HTTP Post, User Identifier at User’s Email Address contained in NameID as attributes. Save.
-
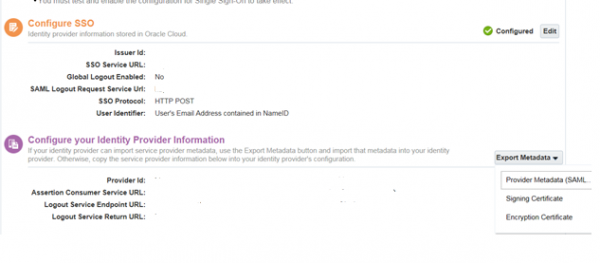
- After the IdP is successfully configured (green checked), export and save SP metadata (PBCS-metadata.xml) from Configure your Identity Provider Information section.
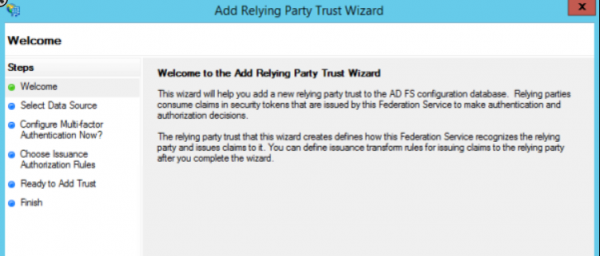
7. Import PBCS-metadata.xml file to ADFS
Open ADFS management console. Add a new relying party trust from ADFS -> Trust Relationships -> Relying Party Trust (right click) to open the wizard:
8. Step through the wizard to select ‘Import data about the relying party from a file’ and browse to PBCS metadata file location. On next several screens,
Select ‘I do not want to configure multi-factor authentication settings for this relying party trust at this time’,
Select ‘Permit all users to access this relying party’,
Unselect ‘Open the Edit Claim Rules dialog for this relying party trust when the wizard closes’
9. From ADFS console, right click newly added relying party -> Properties-> Advanced tab.

Guide to Oracle Cloud: 5 Steps to Ensure a Successful Move to the Cloud
Explore key considerations, integrating the cloud with legacy applications and challenges of current cloud implementations.
Select SHA-2 as the secure hash algorithm.
10. Add claim rules to ADFS
Right click the newly added relying party->Edit Claim Rules->Add Rule
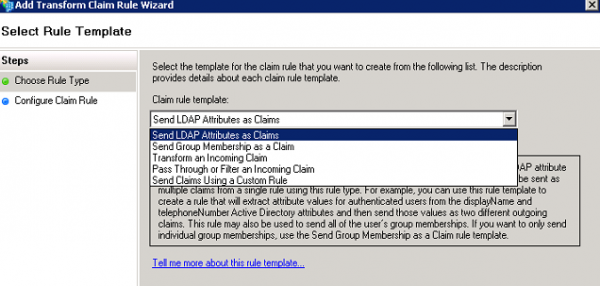
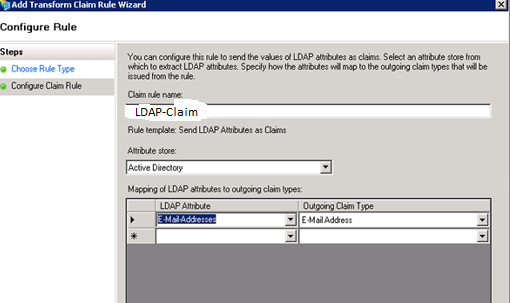
Use Send LDAP Attributes as Claims template
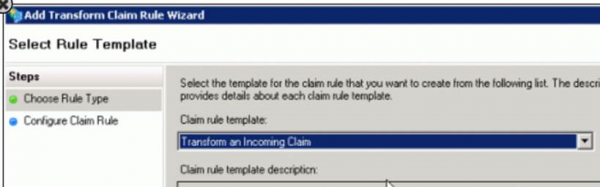
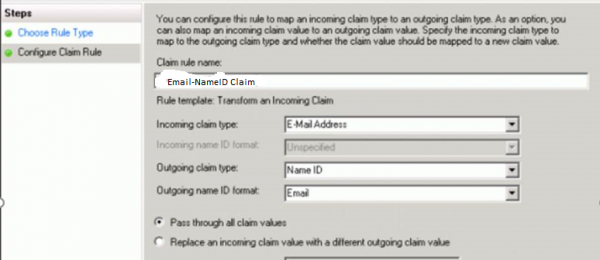
Add a second Claim Rule, use Transform an Incoming Claim template:
11. Test SSO on PBCS
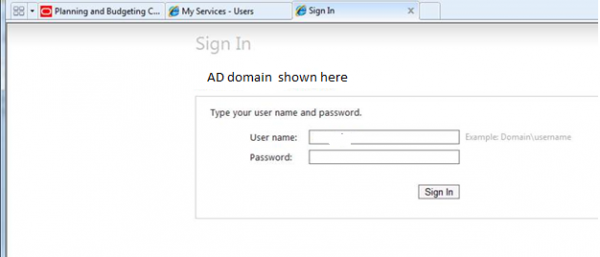
Now that we have configured both the IdP and SP, click Test to initiate federation SSO

A sign in screen displays. Enter Windows domain username and password:
‘Authentication Successful’ message displays on next screen:
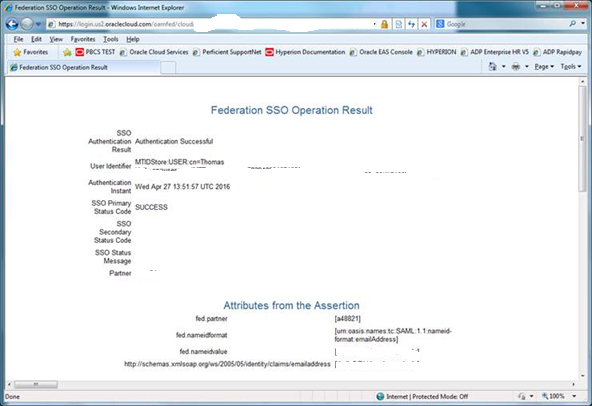
If this step fails, go back to Configure IdP section (step 5) to review the IdP metadata. Entering IdP metadata manually may help to troubleshoot issues. Extract SP metadata again if changes are made to the IdP side.
12. Enable SSO on PBCS (only after Test SSO step is successful)

13. Enable Identity Domain (Cloud) credentials. This step is optional.

14. SAML v2 SSO enablement with ADFS (2.0 or 3.0) as identity provider and PBCS as service provider is now complete.