
When working with forms, a common problem is spam form submissions. There are several ways to prevent this problem. Using CAPTCHAs to stop bot submissions is the most popular technique to avoid this issue. However, bots can now bypass CAPTCHA security. This is where honeypot fields come in: a simple, invisible, and user-friendly way to detect and prevent automated submissions. In this post, we’ll explore how to effectively implement and use honeypot fields in Sitecore Forms.
What Is a Honeypot Field and Why Use It in Sitecore Forms?
A honeypot field is a hidden input field that has been implemented in forms. It is invisible to humans but detected by spambots. Bots often fill out all form fields automatically, so they unknowingly complete the hidden honeypot field, which aids in the detection and blocking of spam submissions.
In Sitecore Forms, honeypot fields offer an easy-to-use method of blocking spam without interfering with the user experience. Honeypot fields are not visible to users and require no user action, in contrast to CAPTCHAs. By using honeypots, you can protect your form submissions and Sitecore database by eliminating unnecessary entries.
How to Implement Honeypot Fields in Sitecore Forms
Step 1: Create the Honeypot Field View Model
Since the honeypot field will be a simple input field, we start by creating a new model class HoneypotFieldViewModel.cs that inherits from StringInputViewModel.
public class HoneypotFieldViewModel : StringInputViewModel
{
}
Step 2: Create the Honeypot Validator Class
Next, create a validator class named HoneypotValidator.cs. This class is responsible for validating that the honeypot field contains no data when the form is submitted. If the field has value, the submission should be marked as spam.
public class HoneypotValidator : ValidationElement<string>
{
    public HoneypotValidator(ValidationDataModel validationItem) : base(validationItem)
    {
    }

    public override IEnumerable<ModelClientValidationRule> ClientValidationRules
    {
        get
        {
            yield break;
        }
    }

    public override ValidationResult Validate(object value)
    {
        var fieldValue = value as string;

        if (!string.IsNullOrEmpty(fieldValue))
        {
            return new ValidationResult("Invalid submission.");
        }

        return ValidationResult.Success;
    }
}
Step 3: Create the Honeypot View
Create a view named Honeypot.cshtml at the path Views/FormBuilder/Honeypot.cshtml. This view will render the honeypot field, which should be hidden from users but remain detectable by bots.
@model Your.Namespace.HoneypotFieldViewModel
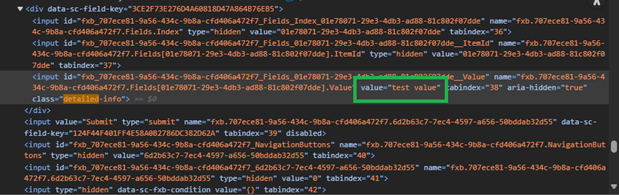
<input id="@Html.IdFor(m => m.Value)"
name="@Html.NameFor(m => m.Value)"
value="@Model.Value"
class="detailed-info"
tabindex="-1"
aria-hidden="true" />
<script>
if (window.location.href.includes('/sitecore/client/Applications/FormsBuilder'))
{
var inputElement = document.getElementById('@Html.IdFor(m => m.Value)');
if (inputElement) {
inputElement.outerHTML = '<span>Optional Field</span>';
}
}
</script>
Css to hide the field:
.detailed-info {
  opacity: 0;
  position: absolute;
  top: 0;
  left: 0;
  height: 0;
  width: 0;
  z-index: -1;
}
Note:
When implementing a honeypot field to catch bots, it’s important to create the input field just like any other form input, with proper ID, name, and value attributes. Avoid naming it obviously like “honeypot” or “trap,” since bots often look for such keywords to skip or bypass honeypots.
Do not use display: none or hidden attributes to hide the field, as many bots can detect these and ignore the field. Instead, use CSS techniques that visually hide the field from human users but keep it accessible in the DOM, such as setting opacity: 0, positioning it off-screen, or shrinking it to zero size, like in our example.
This way, normal users won’t see the field, but bots that blindly fill in all inputs will likely trigger the honeypot, helping you filter out spam submissions more effectively.
Sitecore Item Setup
Now let’s configure the necessary items in the Sitecore database.
In the Core Database
- Create a form property by copying an existing item, such as SingleLineText, and rename it as “HoneypotField”:
/sitecore/client/Applications/FormsBuilder/Components/Layouts/PropertyGridForm/PageSettings/Settings/HoneypotField


In the Master Database
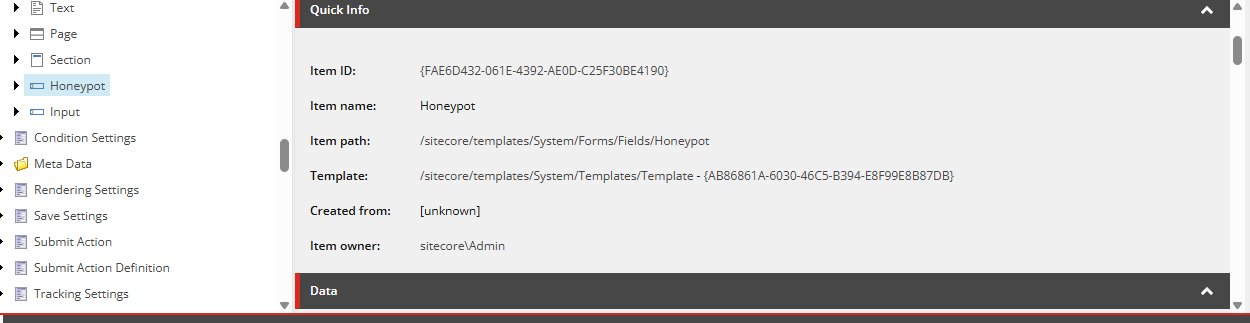
- In the Content Editor, go to the following path: /sitecore/templates/System/Forms/Fields and Create a copy of the Input field and rename it to “Honeypot”:
/sitecore/templates/System/Forms/Fields/Honeypot
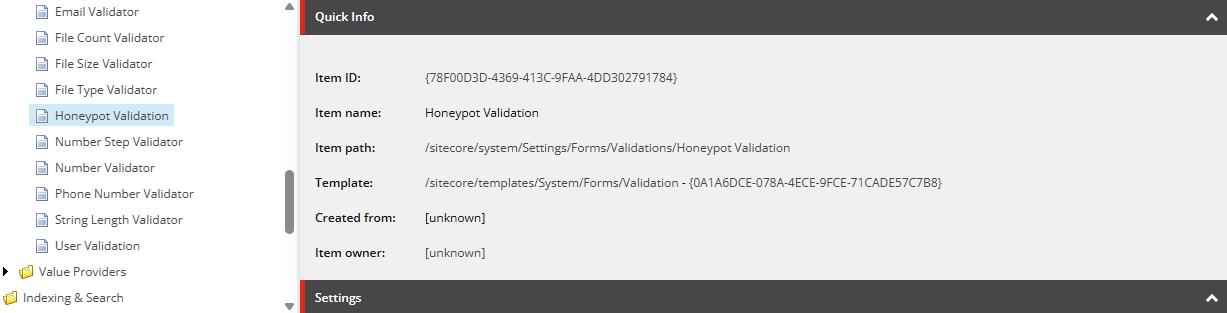
- Create a new Validation Item at /sitecore/system/Settings/Forms/Validations called “Honeypot Validation”.
/sitecore/system/Settings/Forms/Validations/Honeypot Validation
- Now create a new field type under path /sitecore/system/Settings/Forms/Field Types/Security and name it “Honeypot Field” :
/sitecore/system/Settings/Forms/Field Types/Security/Honeypot Field
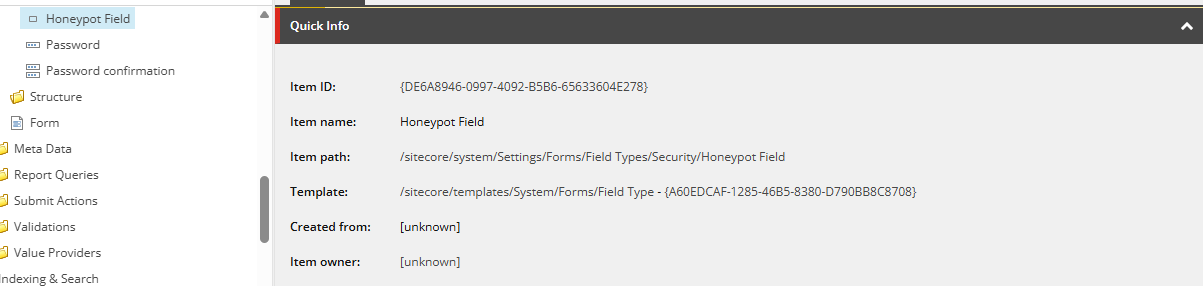
Configuration for Honeypot Field Type
When configuring the Field Type for the Honeypot Field, set the following:
- View Path: Path to your view file (e.g., ~/Views/FormBuilder/Honeypot/Honeypot.cshtml).
- Model Type: <Namespace>.HoneypotFieldViewModel, <AssemblyName>.
- Allowed Validations: Honeypot Validation.
- Property Editor: Property Editor Settings/HoneypotField.
- Field Template: Fields/Honeypot.
- Icon: Choose any icon you prefer (e.g., OfficeWhite/32×32/element.png).
- BackgroundColor: Tomato (or any color you prefer).
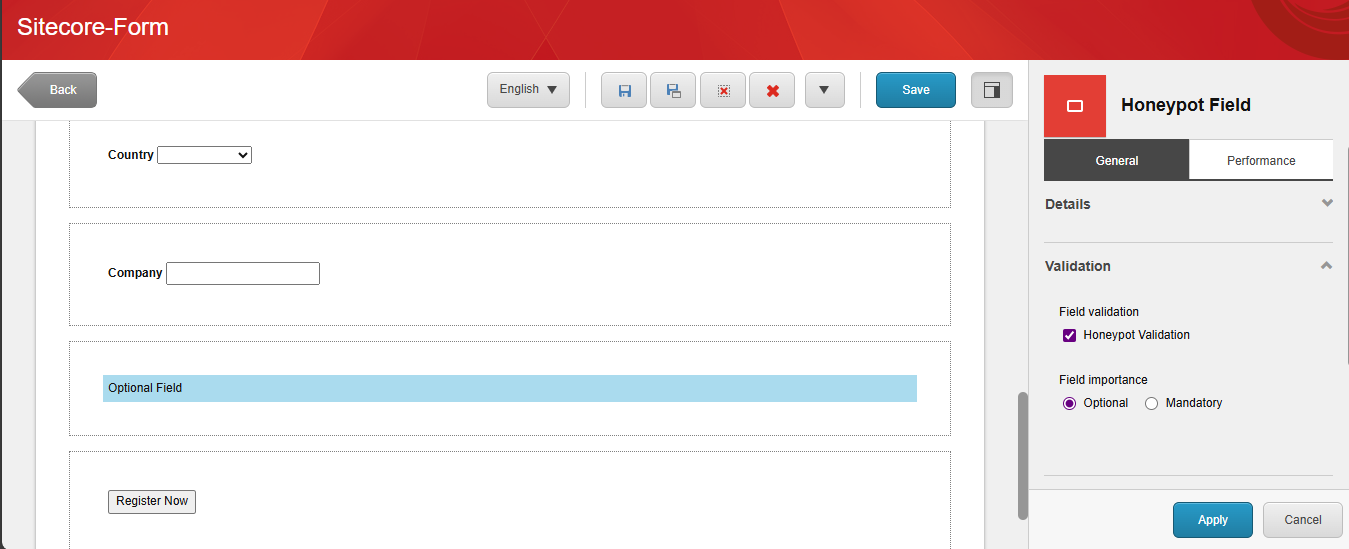
Adding the Honeypot Field to Forms
Now, the Honeypot field is available for use in Sitecore Forms. Simply go to Sitecore Forms, drag and drop the Honeypot field under the Security section. Don’t forget to select the Honeypot Validation checkbox.
Browser Inconsistencies with Honeypot Fields
During testing, I noticed that honeypot fields can behave inconsistently across different browsers, which is important to understand for effective development and testing:
- When manually changing the value of hidden honeypot input fields via browser developer tools (for example, using “Edit as HTML” or direct form editing), some browsers update the visible DOM. Still, JavaScript cannot reliably read these manual changes.
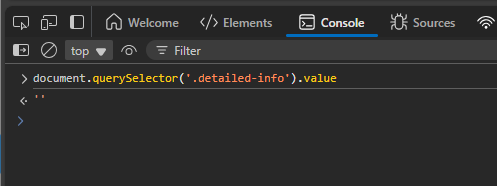
- However, setting the field’s value programmatically via JavaScript works correctly and consistently across all browsers. For example:
document.querySelector(‘.detailed-info’).value = “test”;
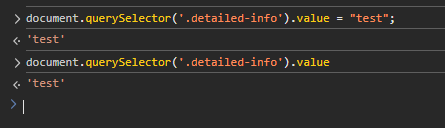
- This behaviour is related to how some browsers handle manual DOM manipulation of hidden inputs and does not impact real-world honeypot use cases, as bots typically set these values programmatically.
Key takeaway: Always rely on programmatic methods when testing or manipulating honeypot fields to ensure consistent behaviour across browsers.
Conclusion
And that’s it! Your Honeypot field is now set up and ready to use. This will help prevent spam form submissions without requiring any action from your users.