Customizing IBM Sterling Store Engagement allows businesses to tailor the application to their specific needs, enhancing both functionality and user experience. This guide provides advanced tips and strategies for technical stakeholders who are involved in customizing the UI components of the IBM Sterling Store Engagement application. Here are some useful tips to start with the customization efforts.
Understanding the Architecture
Before you start customizing IBM Sterling Store Engagement, it’s essential to have a deep understanding of its architecture. The platform is built on a modular framework that leverages microservices, allowing for flexible and scalable customizations. Familiarize yourself with the key components, including the front-end (UI layer), back-end services, and the communication protocols between them. Knowing how these pieces interact will help you identify the best points for integration and customization. This foundational knowledge ensures that your customizations are both effective and maintainable, reducing the risk of conflicts and enhancing the overall stability of your deployment.
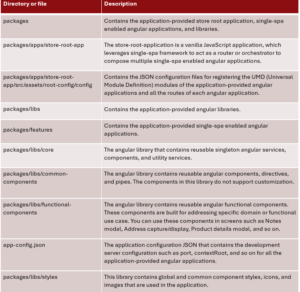
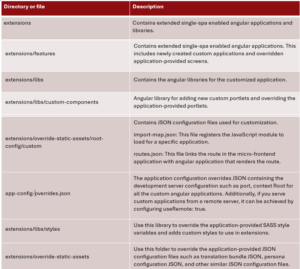
Directory Layout of the application


Understanding the UI structure
Before customizing UI components, familiarize yourself with the existing structure and layout of IBM Sterling Store Engagement. Identify the components you wish to modify or extend based on your business needs.
Customizing UI Component
To add a new flow in the UI, go to the <store-temp> directory, and run the following command:
yarn new-extension-feature –module-name=<module-name> –port=<port>
- Creates a new Angular application with prefix “isf” under <store-temp>/extensions/features/<module-name>.
- Installs single-spa-angular.
- Generates main.single-spa.ts in the src folder.
- Creates a lazy-loaded module with <module-name> in the src/app folder.
- Updates src/app-routing.module.ts with:
– A route for the lazy-loaded module.
– An EmptyRouteComponent for unmatched routes. - Adds start and build scripts to package.json.
- Registers the application in <store-temp>/extensions/override-static-assets/root-config/custom/import-map.json.
- Generates i18n folders in src/assets for localization, including an empty en.json in src/assets/<module-name>/i18n.
- Sets up TranslateModule to load the appropriate translation bundle JSON files.
HTML and CSS Customization
Locate Component Files: Navigate to the relevant component directories in your project structure. Update the HTML templates (.html files) to reflect new layouts or incorporate additional functionality. Adjust CSS (.scss files) to match your brand’s design guidelines or improve visual appeal. Leverage Angular Material for consistent UI elements if applicable.
Enhancing Functionality of Angular Components and Services
Extend Component Logic: If required, extend TypeScript (*.ts) files to add or modify component behavior. Write the Business logic to invoke the mashup. Here’s a sample code snippet.
Service.ts file
import { Injectable } from '@angular/core';
import { MashupService, WizardService, AppCtxStore } from '@store/core';

@Injectable()
export class ExtnCustomDataService {

  private MASHUP_NAME = 'extn_isf_getOrderList';
  constructor(
    private _mashupService: MashupService,
  ) { }

  public getOrderList(input) {
    return this. _mashupService.callMashup(this. MASHUP_NAME, input,
      {'handleMashupError': true, 'showMask': false }).then(
        mashupOutput => this. _mashupService.getMashupOutput(mashupOutput, this. MASHUP_NAME),
        mashupError => Promise.reject(mashupError));
  }
}
Component.ts file
this._extnCustomDataService. getOrderList (inputMashup).then((output) => {
 //logic to handle the mashup output
});
Navigation to routes
Managing routing efficiently is key to a smooth user experience. Here’s how to handle routing. The new routes are present in <store-temp>/extensions/root-config/custom.
{"type": "route",
    "path": "shell/module_name",
    "routes": [
      {
        "type": "application",
        "name": "module_name"
      }
    ]
  }
Communication with different components
Angular components can communicate with each other in the following ways:
- Parent to Child: Using @Input() decorator to pass data from a parent component to a child component.
- Child to Parent: Using @Output() decorator and EventEmitter to send data from a child component to a parent component.
- Sibling Components: Using a shared service to exchange data and messages.
- Unrelated Components: Also using a shared service for data exchange.
- Component Interaction via ViewChild: Accessing child component methods and properties using @ViewChild decorator in the parent component.
Working with Mashups
Mashup layer is used for XAPI calls for handling data in the backend layer. Each XAPI call and multiple XAPI call are always called under one transaction. Each multiple XAPI is under one transaction. The mashup layer is a mixture of XAPIs and other mashups.
New custom Mashups
Save the Custom Mashups:
– Place your custom mashup files in the <runtime>/extensions/isf/webpages/mashupxmls/ directory.
– Ensure that each file name ends with _mashups.xml.Naming Convention:
– Use the following format for the mashup ID: extn_isf.<module_name>.<component_name>.<task>.
Overriding mashups
Extend an application-provided mashup by using the override extensibility, copy the existing mashups into files with names suffixed _overridemashups.xml in the <runtime>/extensions/isf/webpages/mashupxmls/ directory.
Incrementing mashups
Extend mashups incrementally, when you need attributes to be added to the mashup input or output, copy the existing mashup into files with names suffixed _incrementalmashups.xml in the <runtime>/extensions/isf/webpages/mashupxmls/ directory.
Copy the updated mashup file to appserver- /smcfs.ear/isf.war/extn/mashupxmls
restart the app-server to validate your changes.
Testing
To locally verify the new flow, start the application by running the following command,
- yarn start-app
Reference Links:
- IBM Sterling Store Engagement (Next-generation) – IBM Documentation
- Working with mashups – IBM Documentation
- Adding a new view and portlet – IBM Documentation
- Customizing micro front-end architecture-based user interface – IBM Documentation


Thank you for sharing good information.