Introduction To Pipeline Templates
In today’s agile software development landscape, teams rely heavily on robust workflows called “pipelines” to automate tasks and enhance productivity. For DevOps teams who were historically familiar with Microsoft’s Azure DevOps CICD Automation platform, one of the most powerful functionalities rolled out by the platform that allowed teams to drastically speed up the pipeline development process was: “YAML Templates“.
Templates in Azure DevOps are reusable configuration files written in YAML, allowing us to enforce best practices and accelerate build and release automation for large groups of teams. These templates facilitate faster onboarding, ease of maintenance through centralized updates and version control, and enforcement of built-in security measures and compliance standards.
For a lot of my clients that are not building in the Azure ecosystem, however, there is a popular question – how do we accomplish this same template functionality in other toolchains? One platform which has been growing rapidly in popularity in the DevOps automation space is GitHub Actions. GitHub Actions distinguishes itself with seamless integration into the GitHub ecosystem, providing an intuitive CI/CD solution via YAML configurations within repositories. Its strength lies in a user-friendly approach, leveraging a rich marketplace for prebuilt actions and multiple built-in code security features.
In today’s blog, I am going to dive in to show how we can implement the same templating functionality using GitHub Actions so that we can share common code, best practices, and enforced security across multiple teams to provide a structured and versionable approach to define pipeline configurations, fostering reusability, consistency, and collaborative development practices for build and release automation across any stack.
Setting Up GitHub
GitHub offers a structured environment for collaboration within a company. The top level structure for GitHub is an “Enterprise Account”. Inside of an account, however, a company can create multiple Organizations: Organizations are a group construct that companies can use to arrange users & teams so that they can collaborate across many projects at once – Organizations offer sophisticated security and administrative features which allow companies to govern their teams and business units. Leveraging this structure, administrators can manage access controls to repositories, including regulating access to Starter Workflows. By configuring repository settings and access permissions, companies can ensure that these predefined workflows are accessible only to members within their Organization.
Typically, enterprises will have a single business unit or department that is responsible for their cloud environments (whether this team actually builds all cloud environments or is simply in charge of broader cloud foundations, security, and governance varies depending on the size and complexity of the company and their infrastructure requirements). Setting up a single Organization for this business unit makes sense as it allows all the teams in that unit to share code and control the cloud best practices from a single location that other business units or organizations can reference.
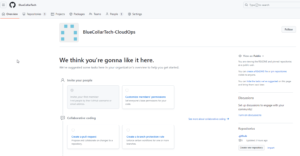
To simulate this I am going to setup a new organization for a “Cloud OPs” department:
Once I have my organization setup, I could customize policies, security settings, or other settings to protect my department’s resources. I won’t dive into this, but below are a couple of good articles of GitHub documentation which go through some common settings, roles, and other features that should be configured by your company when you have created a new GitHub org.
https://docs.github.com/en/organizations/managing-user-access-to-your-organizations-repositories
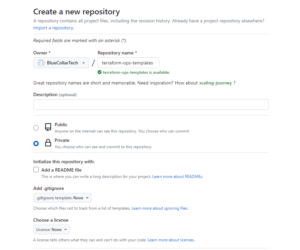
The next step after creating the org is to create a repository for hosting our templates:
Now that we have a repository, we are ready to start writing our YAML code!
Let’s Compare Azure DevOps Templates to GitHub Actions Starter Workflows:
With the setup of GitHub complete, let’s dive in and start converting an Azure DevOps template into a Github Starter Workflow so that we can store it in our repo.
Being a technical director in a cloud consulting team, one of the most common use-cases I have for using pipeline templates is for sharing common Terraform automation.
By using Azure DevOps Pipeline templates to bundle common, repeatable Terraform automation steps, I am able to provide a standardized, efficient, and flexible approach for creating reusable infrastructure deployment pipelines across all the teams within my company.
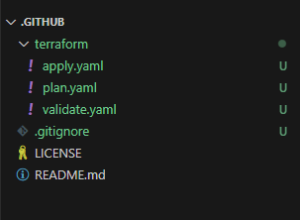
Below is an example of a couple of common Terraform templates my team uses:
Any team automating infrastructure with Terraform is going to write automation to run these three processes. So it is logical to write them once in a template fashion so that future teams can extend their pipelines from these base templates to expedite their development process. Here are some very basic versions of what these templates can look like written for Azure DevOps pipelines:
###VALIDATE TEMPLATE###

parameters:
  - name: terraformPath
    type: string

stages:
  - stage: validate
    displayName: "Terraform validate"
    jobs:
      - job: validate
        displayName: "Terraform validate"

        variables:
          - name: terraformWorkingDirectory
            value: $(System.DefaultWorkingDirectory)/${{ parameters.terraformPath }}

        steps:
          - checkout: self

          - task: PowerShell@2
            displayName: "Terraform init"
            inputs:
              targetType: 'inline'
              pwsh: true
              workingDirectory: $(terraformWorkingDirectory)
              script: |
                terraform init -backend=false

          - task: PowerShell@2
            displayName: "Terraform fmt"
            inputs:
              targetType: 'inline'
              pwsh: true
              workingDirectory: $(terraformWorkingDirectory)
              script: |
                terraform fmt -check -write=false -recursive

          - task: PowerShell@2
            displayName: "Terraform validate"
            inputs:
              targetType: 'inline'
              pwsh: true
              workingDirectory: $(terraformWorkingDirectory)
              script: |
                terraform validate
###PLAN TEMPLATE###

parameters:
  - name: condition
    type: string
  - name: dependsOnStage
    type: string
  - name: environment
    type: string
  - name: serviceConnection
    type: string
  - name: terraformPath
    type: string
  - name: terraformVarFile
    type: string

stages:
  - stage: plan
    displayName: "Terraform plan: ${{ parameters.environment }}"
    condition: and(succeeded(), ${{ parameters.condition }})
    dependsOn: ${{ parameters.dependsOnStage }}
    jobs:
      - job: plan
        displayName: "Terraform plan"

        steps:

          - checkout: self

          - task: AzureCLI@2
            displayName: "Terraform init"
            inputs:
              scriptType: bash
              scriptLocation: inlineScript
              azureSubscription: "${{ parameters.serviceConnection }}"
              addSpnToEnvironment: true
              workingDirectory: ${{ parameters.terraformPath }}
              inlineScript: |
                export ARM_CLIENT_ID=$servicePrincipalId
                export ARM_CLIENT_SECRET=$servicePrincipalKey
                export ARM_SUBSCRIPTION_ID=$DEPLOYMENT_SUBSCRIPTION_ID
                export ARM_TENANT_ID=$tenantId

                terraform init \
                  -backend-config="subscription_id=$TFSTATE_SUBSCRIPTION_ID" \
                  -backend-config="resource_group_name=$TFSTATE_RESOURCE_GROUP_NAME" \
                  -backend-config="storage_account_name=$TFSTATE_STORAGE_ACCOUNT_NAME" \
                  -backend-config="container_name=$TFSTATE_CONTAINER_NAME" \
                  -backend-config="key=$TFSTATE_KEY"
            env:
              DEPLOYMENT_SUBSCRIPTION_ID: $(${{ parameters.environment }}DeploymentSubscriptionID)
              TFSTATE_CONTAINER_NAME: $(TfstateContainerName)
              TFSTATE_KEY: $(TfstateKey)
              TFSTATE_RESOURCE_GROUP_NAME: $(TfstateResourceGroupName)
              TFSTATE_STORAGE_ACCOUNT_NAME: $(TfstateStorageAccountName)
              TFSTATE_SUBSCRIPTION_ID: $(TfstateSubscriptionID)

          - task: AzureCLI@2
            displayName: "Terraform plan"
            inputs:
              scriptType: bash
              scriptLocation: inlineScript
              azureSubscription: "${{ parameters.serviceConnection }}"
              addSpnToEnvironment: true
              workingDirectory: ${{ parameters.terraformPath }}
              inlineScript: |
                export ARM_CLIENT_ID=$servicePrincipalId
                export ARM_CLIENT_SECRET=$servicePrincipalKey
                export ARM_SUBSCRIPTION_ID=$DEPLOYMENT_SUBSCRIPTION_ID
                export ARM_TENANT_ID=$tenantId

                terraform workspace select $(${{ parameters.environment }}TfWorkspaceName)

                terraform plan -var-file '${{ parameters.terraformVarFile }}'
            env:
              DEPLOYMENT_SUBSCRIPTION_ID: $(${{ parameters.environment }}DeploymentSubscriptionID)
###APPLY TEMPLATE###


parameters:
  - name: condition
    type: string
  - name: dependsOnStage
    type: string
  - name: environment
    type: string
  - name: serviceConnection
    type: string
  - name: terraformPath
    type: string
  - name: terraformVarFile
    type: string

stages:
  - stage: apply
    displayName: "Terraform apply: ${{ parameters.environment }}"
    condition: and(succeeded(), ${{ parameters.condition }})
    dependsOn: ${{ parameters.dependsOnStage }}
    jobs:
      - deployment: apply
        displayName: "Terraform apply"
        environment: "fusion-terraform-${{ parameters.environment }}"
        strategy:
          runOnce:
            deploy:
              steps:

                - checkout: self

                - task: AzureCLI@2
                  displayName: "Terraform init"
                  inputs:
                    scriptType: bash
                    scriptLocation: inlineScript
                    azureSubscription: "${{ parameters.serviceConnection }}"
                    addSpnToEnvironment: true
                    workingDirectory: ${{ parameters.terraformPath }}
                    inlineScript: |
                      export ARM_CLIENT_ID=$servicePrincipalId
                      export ARM_CLIENT_SECRET=$servicePrincipalKey
                      export ARM_SUBSCRIPTION_ID=$DEPLOYMENT_SUBSCRIPTION_ID
                      export ARM_TENANT_ID=$tenantId

                      terraform init \
                        -backend-config="subscription_id=$TFSTATE_SUBSCRIPTION_ID" \
                        -backend-config="resource_group_name=$TFSTATE_RESOURCE_GROUP_NAME" \
                        -backend-config="storage_account_name=$TFSTATE_STORAGE_ACCOUNT_NAME" \
                        -backend-config="container_name=$TFSTATE_CONTAINER_NAME" \
                        -backend-config="key=$TFSTATE_KEY"
                  env:
                    DEPLOYMENT_SUBSCRIPTION_ID: $(${{ parameters.environment }}DeploymentSubscriptionID)
                    TFSTATE_CONTAINER_NAME: $(TfstateContainerName)
                    TFSTATE_KEY: $(TfstateKey)
                    TFSTATE_RESOURCE_GROUP_NAME: $(TfstateResourceGroupName)
                    TFSTATE_STORAGE_ACCOUNT_NAME: $(TfstateStorageAccountName)
                    TFSTATE_SUBSCRIPTION_ID: $(TfstateSubscriptionID)

                - task: AzureCLI@2
                  displayName: "Terraform apply"
                  inputs:
                    scriptType: pscore
                    scriptLocation: inlineScript
                    azureSubscription: "${{ parameters.serviceConnection }}"
                    addSpnToEnvironment: true
                    workingDirectory: ${{ parameters.terraformPath }}
                    inlineScript: |
                      $env:ARM_CLIENT_ID=$env:servicePrincipalId
                      $env:ARM_CLIENT_SECRET=$env:servicePrincipalKey
                      $env:ARM_SUBSCRIPTION_ID=$env:DEPLOYMENT_SUBSCRIPTION_ID
                      $env:ARM_TENANT_ID=$env:tenantId

                      terraform workspace select $(${{ parameters.environment }}TfWorkspaceName)

                      terraform apply -var-file '${{ parameters.terraformVarFile }}' -auto-approve
                  env:
                    DEPLOYMENT_SUBSCRIPTION_ID: $(${{ parameters.environment }}DeploymentSubscriptionID)
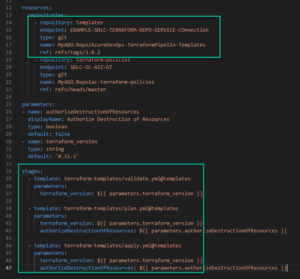
The three stages of Terraform automation are bundled together into sets of repeatable steps – THEN, when any other teams want to use these templates in their own pipelines, they can simply call them using a “Resources” link in their code:
How do we do this same concept in GitHub Actions?
Github Actions offers the concept of “Starter Workflows” as their version of “Pipeline Templates” which are offered by Azure DevOps. Starter Workflows are preconfigured templates designed to expedite the setup of automated workflows within repositories, providing a foundation with default configurations and predefined actions to streamline the creation of CI/CD pipelines in GitHub Actions.
The good news is that both Azure DevOps YAML and GitHub Actions YAML use very similar syntax – so the conversion process from an Azure DevOps Pipeline Template to a Starter Workflow is not a major effort. There are some features that are not yet supported in GitHub actions, so I have to take that into account as I start my conversion. See this document for a breakdown of differences between the two platforms from a feature perspective:
To demonstrate the concept, I am going to convert the “Validate” template that I showed above into a GitHub Actions Starter Workflow and we can compare it to the original Azure DevOps version:
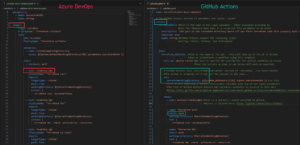
Here is a list of what we had to change:
- Inputs: What Azure DevOps refers to as “Parameters”, GitHub Actions calls “Inputs”. Inputs allow us to pass in settings, variables, or feature flags into the template so that we can control the behavior.
- Stages: Azure DevOps offers a feature called “Stages” which are logical boundaries in a pipeline. We use Stages to mark separation of concerns (for example, Build, QA, and production). Each stage acts as a parent for one or more Jobs. GitHub, however, does not support stages. SO, we have to remove the stage syntax and use declarative logic and efficient comments in our scripts to logically divide the workflow.
- Variables: Azure DevOps provides the ability to define various string key-value pairs that you can then later use in your pipeline. As can be seen our templates above, we use variables to define the file path to where our main.tf file is located in our Terraform code repository. As that information is likely to be needed by multiple different steps in the automation, it is a logical use case to define the value once versus hard-coding it everywhere that it needs to be used.GitHub actions uses a different syntax for defining variables: https://docs.github.com/en/actions/learn-github-actions/variables#defining-environment-variables-for-a-single-workflow.
However, the concept is very similar in execution to how Azure DevOps defines their variables. As can be seen in the comparison above we specify that we are creating environment variables and then proceed to pass in the key value pair to create. - Shell Type: Azure DevOps has multiple pre-built task types. These are analgous to Github’s pre-built actions. But in Azure DevOps, the shell-type is generally specified by the type of task you select. In GitHub Actions, however, we need to specify the type of shell we should target for this workflow. There are various shell types to choose from:
latforms Shell Description All (windows + Linux) pythonExecutes the python command All (windows + Linux) pwshDefault shell used on Windows, must be specified on other runner environment types All (windows + Linux) bashDefault shell used on non-Windows platforms, must be specified on other runner environment types Linux / macOS shThe fallback behavior for non-Windows platforms if no shell is provided and bash is not found in the path. Windows cmdGitHub appends the extension .cmd to your script Windows PowerShellThe PowerShell Desktop. GitHub appends the extension .ps1 to your script name. when we pass in the shell parameter we are telling the runner that will be executing our YAML scripts, what command-line tool it should use to ensure that we don’t run into any unexpected behavior.
- Secrets: This last one is less obvious than the others because secrets in a pipeline are not actually included in the YAML code itself (putting secrets in your source code is an anti-pattern which you should never do to prevent Credential Leakage). In Azure DevOps, there are a couple of options for providing secrets or credentials to your pipeline including Service Connections and Library Groups.
We add the secrets into the library group and then choose the option to set the variable as a Secret:
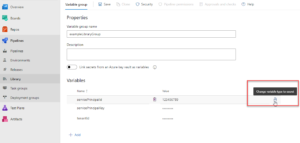
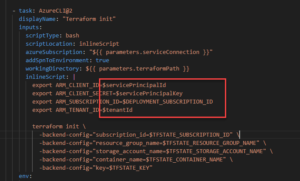
This will encrypt the variable with a one-way encryption so that it will never be visible. These Library Groups can then be added into your pipeline as environment variables using the ADO variable syntax:
In GitHub the portal offers a similar secrets option: https://docs.github.com/en/actions/security-guides/using-secrets-in-github-actions#about-secrets. Go to the settings menu for the repo where your top-level pipeline will live (NOTE – this is usually the “Consumer” of the pipeline templates and not the repo where the templates live) and select the settings menu. From there, you should see a sub-menu where secrets can be set!
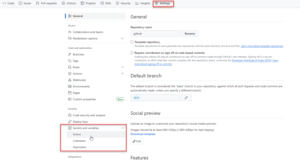
There are several types of secrets to choose from. Typically Environment secrets are the easiest to work with because these secrets will get injected into your Runner runtime as environment variables that you can reference from your YAML code like so:
steps:
  - shell: bash
    env:
      SUPER_SECRET: ${{ secrets.SuperSecret }}
    run: |
      example-command "$SUPER_SECRET"
With that change, our conversion is largely complete! Let’s take a look at final result below.
name: terraform-plan-base-template

# The GitHub Actions version of paramters are called "inputs"
inputs:
  terraformPath: #This is the name of the input paramter - other pipelines planning to
                 #use this template must pass in a value for this parameter as an input
    description: "The path to the terraform directory where all our first Terraform code file (usually main.tf) will be stored."
    required: true
    type: string #GitHub Actions support the following types:
                 #string, choice, boolean, and environment


  jobs:
    Terraform_Validate: #This is the name of the job - this will show up in the UI of GitHub
                        #when we instantiate a workflow using this template
      runs-on: ubuntu-latest #We have to specify the runtime for the actions workflow to ensure
                             #that the scripts we plan to use below will work as expected.

      # GitHub Actions uses "Environment Variables" instead of "Variables" like Azure DevOps.
      #The syntax is slightly different but the concept is the same...
      env:
        terraformWorkingDirectory: ${{GITHUB_WORKSPACE}}/${{ inputs.terraformPath }} #In this
        #line we are combining a default environment variable with one of our input parameters
        #The list of GitHub defined default ENV variables available is located in this doc:
        #https://docs.github.com/en/github-ae@latest/actions/learn-github-actions/variables#default-environment-variables

      steps:
        - uses: actions/checkout@v4 #This is a pre-built action provided by github.
                                    #Source is located here: https://github.com/actions/checkout

        - name: "Terraform init"
          shell: pwsh
          working-directory: $terraformWorkingDirectory
          run: |
            terraform init -backend=false

        - name: "Terraform fmt"
          shell: pwsh
          working-directory: $terraformWorkingDirectory
          run: |
            terraform fmt -check -write=false -recursive

        - name: "Terraform validate"
          shell: pwsh
          working-directory: $terraformWorkingDirectory
          run: |
            terraform validate
How do use the starter workflows in other pipelines?
The next step is to start sharing these starter workflows with other teams and pipelines. In my next blog, I will show how we can accomplish sharing the templates for different organizations to consume!
Stay tuned and keep-on “Dev-Ops-ing”!

