In this blog post, I will share my firsthand experience tackling and resolving a critical issue with an inaccessible and failed EC2 instance. I’ll provide a detailed account of the problem, its impact, and the step-by-step approach I took to address it. Additionally, I’ll share valuable insights and lessons learned to help prevent similar issues in the future.
EC2 Instance Recovery

An EC2 instance faced Instance Status Check failures and was inaccessible through SSM due to a boot process transitioning into emergency mode. After analyzing the OS boot log, it was identified that the issue stemmed from a mount point failure caused by a malformed/missing secondary block device; there are several steps you can take to troubleshoot and resolve the issue.
Benefits of EC2 Instance Recovery
- Quick Diagnosis and Resolution
- Effective Mitigation
- Accurate Problem Localization
- Minimal Downtime
- Restoration of SSM (Systems Manager) Access
Here’s a general guide to help you identify and address the problem:
Step 1: Check Instance Status Checks
- Go to the AWS Management Console.
- Navigate to the EC2 dashboard and select “Instances.”
- Identify the problematic instance and check the status checks.
- There are two types: “System Status Checks” and “Instance Status Checks.”
- Look for the specific error messages that may provide insights into the issue.
Step 2: Check System Logs
- Review the system logs for the instance to gather more information on the underlying issue.
- Access the AWS EC2 Instance and go to “Action” –> “Monitor and Troubleshoot” to view the logs.

Step 3: Verify IAM Role Permissions
- Ensure that the IAM role associated with the EC2 instance has the necessary permissions for SSM (System Manager).
- The role should have the ‘AmazonSSMManagedInstanceCore’ policy attached.
- If the mentioned policy is not attached, then you need to attach the policy.

Certainly, if the issue is related to a malformed device name in the /etc/fstab file, you can follow the below steps to correct it:
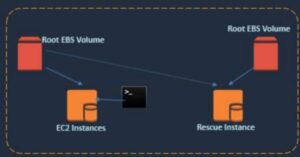
1. Launch a Rescue Instance
- Launch a new EC2 instance in the same region as your problematic instance. This instance will be used to mount the root volume of the problematic instance.
2. Stop the Problematic Instance
- Stop the problematic EC2 instance to detach its root volume.
3. Detach the Root Volume from the problematic Instance
- Go to the AWS Management Console –> Navigate to the EC2 dashboard and select “Volumes.” –> Identify the root volume attached to the problematic instance and detach it.


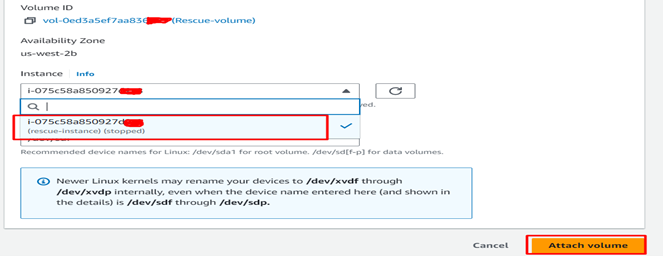
4. Attach the Root Volume to the Rescue Instance
- Attach the root volume of the problematic instance to the rescue instance. Make a note of the device name it gets attached to (e.g., /dev/xvdf).


5. Access the Rescue Instance
- Connect to the rescue instance using SSH or other methods.
Mount the Root Volume:
- Create a directory to mount the root volume. For example: sudo mkdir /mnt/rescue
- Mount the root volume to the rescue instance: sudo mount /dev/xvdf1 /mnt/rescue
- Edit the /etc/fstab File: Open the /etc/fstab file for editing :
- You can use a text editor such as nano or vim: sudo nano /mnt/rescue/etc/fstab
Locate the entry that corresponds to the secondary block device and correct the device name. Ensure that the device name matches the actual device name for the attached volume.
Save and Exit:
- Save the changes to the /etc/fstab file and exit the text editor.
- Unmount the Root Volume: sudo umount /mnt/rescue
- Detach the Root Volume from the Rescue Instance
6. Attach the Root Volume back to the Problematic Instance
- Go back to the AWS Management Console.
- Attach the root volume back to the problematic instance using the original device name.
- Start the Problematic Instance: Start the problematic instance and monitor its status checks to ensure it comes online successfully.
This process involves correcting the /etc/fstab file on the root volume by mounting it on a rescue instance. Once corrected, you can reattach the volume to the original instance and start it to check if the issue is resolved. Always exercise caution when performing operations on production instances, and ensure that you have backups or snapshots before making changes.
Conclusion
Resolving EC2 instance status check failures involves a systematic approach to identify and address the underlying issues. Common causes include networking problems, operating system issues, insufficient resources, storage issues, and AMI or instance configuration issues.


