
The approach I am going to show you would work for any CI/CD pipeline with XM Cloud with some level of customization, however, I will be showing it on an example of GitHub Actions.
Why?
One would ask – if my codebase is located at GitHub, why on earth would I need to leverage GitHub Actions if the XM Cloud Deploy app already provides build&deploy pipelines for GitHub? It is a valid question, so let’s answer it:
- XM Cloud Deploy app is a black box where you have no control other than developers allow you to specify within
xmcloud.build.jsonconfiguration file. - GitHub Actions in opposite give you much more precise control over all aspects of the process
- It relies on the ready-use and well-tested open-source re-usable actions for you simply pick and use
- Thanks to the above it is quick and low-code compared to other CI/CD approaches, but at the same time, it is highly customizable and may suit any enterprise-level needs (consider GitHub Enterprise in such case).
- Actions use any OS-based runners that execute at GitHub, while the Deploy app utilizes shared XM Cloud infrastructure
- Seamless integration into the GitHub account allows keeping all the eggs in the same basket.
With that in mind, let’s take a look at how easily we can set up multisite multi-environment XM Cloud CI/CD workflows.
Preparing XM Cloud
Let’s start with the creation of XM Cloud Project and 2 environments – Staging and Production.
Of course, you can do the above manually by using XM Cloud Deploy app, however, I automated that with a reusable PowerShell code. In order to manipulate XM Cloud from scripts, I need to obtain a pair of automation ClientID and ClientSecret first. This pair is required internally by Login.ps1 script but will be used all the way down this exercise, so save it carefully.
# Script to created a project and environments with the named provided (see lines 71-72 below)
$projectName ="JumpStart"
$environmentStaging= "Staging"
$environmentProd = "Production"
& "$PSScriptRoot/../Security/Login.ps1"
function Create-Project {
param ([string]$projectName)
$projectList = dotnet sitecore cloud project list --json | ConvertFrom-Json
$project = $projectList | Where-Object { $_.name -eq $projectName }
if (-not $project) {
Write-Warning "Project '$projectName' not found. Creating new project..."
$output = dotnet sitecore cloud project create --name $projectName --json
if($output -eq "Organization tier does not allow more projects"){
return $null;
}
else {
$projectList = dotnet sitecore cloud project list --json | ConvertFrom-Json
$project = $projectList | Where-Object { $_.name -eq $projectName }
return $project.id
}
}
else {
Write-Warning "Project $projectName already exists. Skipping create."
return $project.id
}
}
function Create-Environment {
param (
[string]$environmentName,
[string]$projectId,
[bool]$isProd = $false,
[array]$environmentList
)
# Checking if environment exists.
$environment = $environmentList | Where-Object { $_.name -eq $environmentName }
if (-not $environment) {
Write-Warning "Environment '$environmentName' not found. Creating new environment..."
$output = dotnet sitecore cloud environment create --name $environmentName --project-id $projectId --prod $isProd --json | ConvertFrom-Json
if($output.Status -eq "Operation failed"){
$output.Message
return $null
}
else{
return $output.id
}
}
else {
$environmentId = $environment.id
"Environment $environmentName already exists"
return $environmentId
}
}
$projectId = Create-Project -projectName $projectName
$environmentList = dotnet sitecore cloud environment list --project-id $projectId --json | ConvertFrom-Json
$stagingId = Create-Environment -environmentName $environmentStaging -projectId $projectId -environmentList $environmentList
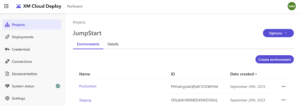
$prodId = Create-Environment -environmentName $environmentProd -projectId $projectId -isProd $true -environmentList $environmentList Upon completion it will return you Environment IDs for both created environments, you can also get this information after refreshing Deploy app page:
Additionally, I’d like to enable SPE and Authoring and Management GraphQL API, before the deployment takes place so that I don’t have to redeploy it later:
dotnet sitecore cloud environment variable upsert -n SITECORE_SPE_ELEVATION -val Allow -id $stagingId
dotnet sitecore cloud environment variable upsert -n Sitecore_GraphQL_ExposePlayground -val true -id $stagingId

dotnet sitecore cloud environment variable upsert -n SITECORE_SPE_ELEVATION -val Allow -id $prodId
dotnet sitecore cloud environment variable upsert -n Sitecore_GraphQL_ExposePlayground -val true -id $prodId
So far so good. Let’s deploy now.
XM Cloud Provisioning
Here is the entire code of the GitHub Actions workflow I will be using for provisioning XmCloud:
name: Build & Deploy - XM Cloud Environments
on:
  workflow_dispatch:
  push:
    branches: [ JumpStart ]
    paths:
    - .github/workflows/CI-CD_XM_Cloud.yml
    - .github/workflows/deploy_xmCloud.yml
    - .github/workflows/build_DotNet.yml
    - 'xmcloud.build.json'
    - 'src/platform/**'
    - 'src/items/**'
  pull_request:
    branches: [ JumpStart ]
    paths:
    - .github/workflows/CI-CD_XM_Cloud.yml
    - .github/workflows/deploy_xmCloud.yml
    - .github/workflows/build_DotNet.yml
    - 'xmcloud.build.json'
    - 'src/platform/**'
    - 'src/items/**'

jobs:

  build-dotnet:
    uses: ./.github/workflows/build_DotNet.yml
    with:
      buildConfiguration: Release

  deploy-staging:
    uses: ./.github/workflows/deploy_xmCloud.yml
    needs: build-dotnet
    with:
      environmentName: Staging
    secrets:
      XM_CLOUD_CLIENT_ID: ${{ secrets.XM_CLOUD_CLIENT_ID }}
      XM_CLOUD_CLIENT_SECRET: ${{ secrets.XM_CLOUD_CLIENT_SECRET }}
      XM_CLOUD_ENVIRONMENT_ID: ${{ secrets.STAGING_XM_CLOUD_ENVIRONMENT_ID }}

  deploy-prod:
    if: github.ref == 'refs/heads/JumpStart'
    needs: build-dotnet
    uses: ./.github/workflows/deploy_xmCloud.yml
    with:
      environmentName: Production
    secrets:
      XM_CLOUD_CLIENT_ID: ${{ secrets.XM_CLOUD_CLIENT_ID }}
      XM_CLOUD_CLIENT_SECRET: ${{ secrets.XM_CLOUD_CLIENT_SECRET }}
      XM_CLOUD_ENVIRONMENT_ID: ${{ secrets.PRODUCTION_XM_CLOUD_ENVIRONMENT_ID }}
Please pay attention to the following parts of it:
on: push, pull_request and workflow_dispatch – define event to trigger. The last one means manual trigger from the GitHub UI, I will use it below.branchesspecify to which branches push or pull request triggers apply to.- paths iterate the filesystem locations to be used further ahead with a runner.
jobs: specify what we’re going to perform, in which consequence and the dependencies between these actions.- each of these jobs executes a consequence of steps to take, referred from another file by
usesparameter needsspecify the dependency from a previous action to complete successfully, prior to this one to execute.ifclauses define conditions for the job to run, if not met job will receive ‘Skipped’ status along with all the other dependant jobs.
secretsare taken from stored GitHub Actions secrets and passed down to the jobs
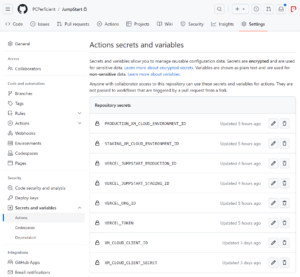
For each of the jobs I need to provide 3 parameters from the secrets:
XM_CLOUD_CLIENT_IDandXM_CLOUD_CLIENT_SECRET– is a pair of automation ClientID and ClientSecret, the same we obtained at the beginning of this article.STAGING_XM_CLOUD_ENVIRONMENT_IDorPRODUCTION_XM_CLOUD_ENVIRONMENT_IDare the IDs we obtained upon environment creation. You may always look them up in the Deploy app.
So, we have 3 jobs created from 2 steps of consequences of action:
- Build the DotNet solution
- Deploy the solution and items to an XM Cloud instance
Build the DotNet solution workflow:
name: Build the DotNet Solution

on:
  workflow_call:
    inputs:
      buildConfiguration:
        required: true
        type: string

jobs:
  build-dotnet:
    name: Build the .NET Solution
    runs-on: windows-latest
    steps:
    - uses: actions/checkout@v3
    - name: Setup MSBuild path
      uses: microsoft/setup-msbuild@v1.1
    - name: Setup NuGet
      uses: NuGet/setup-nuget@v1.0.6
    - name: Restore NuGet packages
      run: nuget restore JumpStart.sln
    - name: Build
      run: msbuild JumpStart.sln /p:Configuration=${{ inputs.buildConfiguration }}
The top part of the file within on section receives the parameters from a calling workflow. Within jobs, we specify steps to take. Important clause – uses – executes an action from the repository of published actions.
The codebase is open so you may take a lookup for a better understanding of what it is doing and how parameters are being used, for example, we’re passing buildConfiguration parameter down to the action in order to define if we need to debug or release.
Now let’s take a look at a more advanced workflow Deploy the solution and items to an XM Cloud instance:
name: Deploy the solution and items to an XM Cloud instance

on:
  workflow_call:
    inputs:
      environmentName:
        required: true
        type: string
    secrets:
      XM_CLOUD_CLIENT_ID:
        required: true
      XM_CLOUD_CLIENT_SECRET:
        required: true
      XM_CLOUD_ENVIRONMENT_ID:
        required: true

jobs:

  deploy:
    name: Deploy the XM Cloud ${{ inputs.environmentName }} Site
    runs-on: ubuntu-latest
    steps:
    - uses: actions/checkout@v3
    - uses: actions/setup-dotnet@v2
      with:
        dotnet-version: '6.0.x'
    - run: dotnet tool restore
    - run: dotnet sitecore --help
    - name: Authenticate CLI with XM Cloud
      run: dotnet sitecore cloud login --client-credentials --client-id ${{ secrets.XM_CLOUD_CLIENT_ID }} --client-secret ${{ secrets.XM_CLOUD_CLIENT_SECRET }} --allow-write
    - name: Deploy the CM assets to XM Cloud
      run: |
        result=$(dotnet sitecore cloud deployment create --environment-id ${{ secrets.XM_CLOUD_ENVIRONMENT_ID }} --upload --json)
        echo $result
        isTimedOut=$(echo $result | jq ' .IsTimedOut')
        isCompleted=$(echo $result | jq ' .IsCompleted')
        if [ $isTimedOut = true ]
        then
            echo "Operation Timed Out."
            exit -1
        fi
        if ! [ $isCompleted = true ]
        then
            echo "Operation Failed."
            exit -1
        fi
echo "Deployment Completed" 
Please pay attention to actions/setup-dotnet@v2 – it relies on this codebase and you pass the desired dotnet version as the parameter to it: with: dotnet-version: '6.0.x'.
You can also execute commands within the context of an isolated VM where the steps execute, by using run clause, such as run: dotnet tool restore.
What is notable here is that Sitecore CLI is written with .NET Core which means it is truly cross-platform and may run on Mac and Linux. Therefore we may employ better lightweight runtimes for it with runs-on: ubuntu-latest clause, instead of using Windows-based runtime.
We may pass secrets right into the executed command and capture the execution results into a variable to process:
result=$(dotnet sitecore cloud deployment create --environment-id ${{ secrets.XM_CLOUD_ENVIRONMENT_ID }} --upload --json) Note, that we actually must do the above in order to receive the outcomes of the above command rather than a binary flag showing if it was executed or not. If the CLI commands execute in principle, it returns positive status code 0, while we need to process the output and throw status codes based on it.
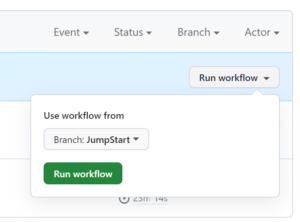
TIP: Actions and workflows related to a specific git branch they belong to. However, they won’t be seen in GitHub Action until you bring them to
mainbranch. Once they reachmain, they become seen from the UI and you can trigger and manually execute the workflows specifying any desired branch.
I already took care of the above so now can execute, this time manually:
.. and the result:
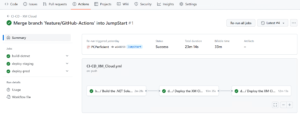
After the execution completes we can optionally test the environments if they are up and running. They are good, and feature in my case three websites per each of the environments. These websites were provisioned from the serialization I’ve previously done, however, they only exist in these CM environments and have not yet been published.

You can do that by clicking Publish all sites button, however, I prefer using the command line:
    # need to connect to the environment first
    dotnet sitecore cloud environment connect --environment-id STGqNKHBXMEENSWZIVEbQ
    dotnet sitecore publish --pt Edge -n Staging
    dotnet sitecore cloud environment connect --environment-id PRDukrgzukQPp0CVOOKFhM
    dotnet sitecore publish --pt Edge -n Production
After publishing is complete, we can optionally verify it using GrpahQL IDE and generate an Edge token to be used as the Sitecore API Key. Both could be done by running New-EdgeToken.ps1 script which will generate and output a token and then launch GraphQL IDE to test it.
Configuring Vercel
For the sake of an experiment, I am using my personal “hobby”-tier Vercel account. Of course, you don’t have to use Vercel and can consider other options, such as Netlify, Azure Static Web Apps, or AWS Amplify. I am going to talk about configuring those in later posts, but today will focus on Vercel.
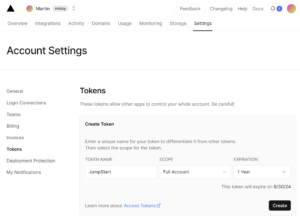
Let’s navigate to Account Settings. There we need to obtain two parameters:
- Vercel ID from the General tab
- A token that allows external apps to control Vercel account, under the Tokens tab
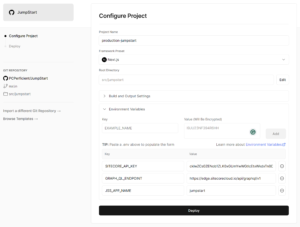
I am going to create two projects in it, named staging-jumpstart and production-jumpstart which will deploy under staging-jumpstart.vercel.app and production-jumpstart.vercel.app hostnames correspondingly. To do so firstly I need to provide a relevant source code repository, in my case that would be obviously GitHub. Other than that it requires choosing the implemented framework (Next.js) and providing a path to the source folder of Next.js app, which it nicely auto-recognized and highlights with Next.js icon. Finally, we need to provide at least three environmental variables:
JSS_APP_NAME– in my case it isjumpstart.GRAPH_QL_ENDPOINTwhich is a known value https://edge.sitecorecloud.io/api/graphql/v1SITECORE_API_KEYwhich we obtained at a previous step from runningNew-EdgeToken.ps1script.
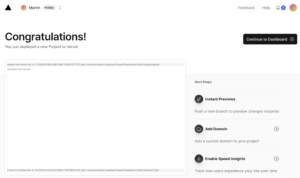
Clicking Deploy after submitting the above will deploy the website and it will be already accessible by the hostname, correctly pulling the layout data from Experience Edge because:
- we already published all the sites for each environment to Experience Edge, so it is available from there
- we instructed the site on how to pull the data from Edge with a combination of JSS_APP_NAME,
GRAPH_QL_ENDPOINT, andSITECORE_API_KEY.
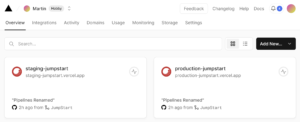
At this stage we can celebrate yet another milestone and will grab a Project ID parameter from each of these deployed sites – staging-jumpstart and production-jumpstart in my case:
Build and Deploy Next.js app
We need to provide a workflow the following parameters, and we have them all:
VERCEL_ORG_IDto specify which Vercel account it applies toVERCEL_TOKENso that it becomes able to control a given Vercel accountVERCEL_JUMPSTART_STAGING_IDandVERCEL_JUMPSTART_PRODUCTION_ID– a project ID to deploy
Homework: you can go ahead and parametrize this script for even better re-usability passing site name as a parameter, from a caller workflow.
name: Build & Deploy - JumpStart Site
on:
  workflow_dispatch:
  push:
    branches: [ JumpStart ]
    paths:
      - .github/workflows/CI-CD_JumpStart.yml
      - .github/workflows/build_NextJs.yml
      - .github/workflows/deploy_vercel.yml
      - 'src/jumpstart/**'
  pull_request:
    branches: [ JumpStart ]
    paths:
      - .github/workflows/CI-CD_JumpStart.yml
      - .github/workflows/build_NextJs.yml
      - .github/workflows/deploy_vercel.yml
      - 'src/jumpstart/**'

jobs:

  build-jumpstart-site:
    # if: github.ref != 'refs/heads/JumpStart'
    uses: ./.github/workflows/build_NextJs.yml
    with:
      workingDirectory: ./src/jumpstart

  deploy-jumpstart-staging:
    uses: ./.github/workflows/deploy_vercel.yml
    needs: build-jumpstart-site
    if: always() &&
        github.repository_owner == 'PCPerficient' && needs.build-jumpstart-site.result != 'failure' && needs.build-jumpstart-site.result != 'cancelled'
    secrets:
      VERCEL_TOKEN: ${{ secrets.VERCEL_TOKEN }}
      VERCEL_ORG_ID: ${{ secrets.VERCEL_ORG_ID }}
      VERCEL_PROJECT_ID: ${{ secrets.VERCEL_JUMPSTART_STAGING_ID }}

  deploy-jumpstart-production:
    uses: ./.github/workflows/deploy_vercel.yml
    needs: build-jumpstart-site
    if: always() &&
        github.repository_owner == 'PCPerficient' && needs.build-jumpstart-site.result != 'failure' && needs.build-jumpstart-site.result != 'cancelled'
    secrets:
      VERCEL_TOKEN: ${{ secrets.VERCEL_TOKEN }}
      VERCEL_ORG_ID: ${{ secrets.VERCEL_ORG_ID }}
      VERCEL_PROJECT_ID: ${{ secrets.VERCEL_JUMPSTART_PRODUCTION_ID }}
There are three jobs here, with the last two running in parallel:
build-jumpstart-sitedeploy-jumpstart-stagingdeploy-jumpstart-production
Build job:
name: Build a Next.js Application

on:
  workflow_call:
    inputs:
      workingDirectory:
        required: true
        type: string

jobs:

  build:
    name: Build the NextJs Application
    runs-on: ubuntu-latest
    env:
      FETCH_WITH: GraphQL
      GRAPH_QL_ENDPOINT: https://www.google.com
      DISABLE_SSG_FETCH: true
    defaults:
      run:
        working-directory: ${{ inputs.workingDirectory }}
    steps:
    - uses: actions/checkout@v3
    - uses: actions/setup-node@v3
      with:
        node-version: 18.12.1
    - run: npm install
    - run: npm run build
    - run: npm run lint
Deploy job:
name: Deploy asset to Vercel

on:
  workflow_call:
    secrets:
      VERCEL_TOKEN:
        required: true
      VERCEL_ORG_ID:
        required: true
      VERCEL_PROJECT_ID:
        required: true

jobs:
  deploy:
    name: Deploy the rendering host to Vercel
    runs-on: ubuntu-latest
    steps:
      - uses: actions/checkout@v3
      - name: Setup Node.js
        uses: actions/setup-node@v3
        with:
          node-version: lts/*
      - uses: amondnet/vercel-action@v20
        with:
          vercel-token: ${{ secrets.VERCEL_TOKEN }}
          vercel-args: ${{ fromJSON('["--prod", ""]')[github.ref != 'refs/heads/JumpStart'] }}
          vercel-org-id: ${{ secrets.VERCEL_ORG_ID}}
          vercel-project-id: ${{ secrets.VERCEL_PROJECT_ID}}
          scope: ${{ secrets.VERCEL_ORG_ID}}
          working-directory: ./
At this stage, you’ve got and learned everything enough to implement the above approach for your own XM Cloud solution.
Visual Code Extension
The good news is that GitHub Action has an extension for VS Code which allows to manage workflows and runs:
- Manage your workflows and runs without leaving your editor.
- Keep track of your CI builds and deployments.
- Investigate failures and view logs.
- Install the extension from the Marketplace.
- Sign in with your GitHub account and when prompted allow
GitHub Actionsaccess to your GitHub account. - Open a GitHub repository.
- You will be able to utilize the syntax features in Workflow files, and you can find the GitHub Actions icon on the left navigation to manage your Workflows.
Hope you enjoyed the simplicity of GitHub Actions and will consider implementing your solutions with it!
Thank you for sharing good information.