REST API is king when it comes to writing server-side logic and providing data to the client-side. As your team and solution scale upward, your team’s API documentation workflow will need a strategy to maintain clear and high-level documentation. My recommendation is use OpenAPI Specification and Swagger.
OpenAPI Specification (OSA) is a standard for writing API documentation. Swagger is an integrated API design and documentation platform.
This article will focus on leveraging the power of the OSA standard and Swagger UI while developing your Next.js API routes. I will discuss the benefits of documenting your Next.js API routes to OpenAPI Specifications and the benefits of leveraging your OpenAPI Specification with Swagger. I will also teach you how to generate an OpenAPI Specification from your Next.js API implementation and how to host your OpenAPI Specification in Swagger with examples from a real-world, Next.js application.
Benefits of documenting your Next.js API routes with OpenAPI Specifications (OAS 3.0):
- OAS is a standard, language-agnostic interface that humans and computers can use to understand your API service with minimal implementation context.
- A consumer can understand and interact with your API with minimal code and minimal implementation context.
-
One of the best ways to integrate your API routes to Swagger is to have developers define an OpenAPI Specification when they create an API route.
- An OpenAPI Specification can be useful for generating visual displays of your API service, generating client- and server-side code to interact with your API, or integrating testing tools.
Benefits of leveraging your OpenAPI Spec using Swagger:
- UI-driven API testing
- Non-technical people can see the benefits and purpose of your API at a high-level
- Documentation can help acclimate new team members to your solution
How to create your OpenAPI spec with next-swagger-doc dependency:
- I recommend using next-swagger-doc to generate your OpenAPI Specification
- Using this dependency, you may either natively create your Swagger documentation, generate your OpenAPI specification to a page, or generate a .json file via the CLI.
- You may follow your preferred method via the dependency’s implementation guide here: https://www.npmjs.com/package/next-swagger-doc
OpenAPI Comment Syntax (read the docs: https://swagger.io/docs/specification/basic-structure/)
- next-swagger-doc method #3 will generate your OpenAPI spec from your Next.js routes’ comments.
-
This is my preferred method because it provides the most customizability to your documentation. I will cover how to write the OAS comments required to use method #3 in this section. You may skip this section if you prefer to use method #1 or #3 from the implementation guide.
-
I will be writing my comments with YAML to OAS 3.0 standards. It is also possible to write your comments in JSON format.
-
-
Building Schemas
- A schema in this context is a way to map object models to your routes.
- Let’s say we’re defining an object for a brewery.
- TypeScript model:
-
-
class BreweryObject { public DocumentID: string; public Name: string; public Description: string; public Short_Description: string; public Url: string; public Facebook_Url: string; public Twitter_Url: string; public Instagram_Url: string; public Address: string; }- This object can be mapped to an OpenAPI schema with a type: object and 9 properties.
- Each property has 3 important attributes: type, description, and example
- Here is an example of this object’s schema:
-
/**
 * @swagger
 * components:
 *   schemas:
 *     BreweryObject:
 *       type: object
 *       properties:
 *         DocumentID:
 *           type: string
 *           description: The BreweryObject DocumentID.
 *           example: hWWNwskdGOnEdq0KIQ3S
 *         Name:
 *           type: string
 *           description: The brewery's name.
 *           example: "Creature Comfort Brewery"
 *         Description:
 *           type: string
 *           description: Full description of brewery.
 *           example: "It's a great brewery in Athens, GA. Go Dawgs!"
 *         Short_Description:
 *           type: string
 *           description: Abbreviated description of brewery.
 *           example: "A brewery in Athens, GA. Go Dawgs!"
 *         Url:
 *           type: string
 *           description: Brewery's website url.
 *           example: https://creaturecomfortsbeer.com/
 *         Facebook_Url:
 *           type: string
 *           description: Brewery's Facebook url.
 *           example: https://www.facebook.com/CreatureComfortsBeer/
 *         Twitter_Url:
 *           type: string
 *           description: Brewery's Twitter url.
 *           example: https://mobile.twitter.com/creaturebeer
 *         Instagram_Url:
 *           type: string
 *           description: Brewery's Instagram url.
 *           example: https://www.instagram.com/creaturecomfortsbeer/
 *         Address:
 *           type: string
 *           description: Brewery's address.
 *           example: 271 W Hancock Ave, Athens, GA 30601
 */
class BreweryObject {
  ...
}
export default BreweryObject;
- This object can be mapped to an OpenAPI schema with a type: object and 9 properties.
-
-
Visually, in Swagger, this will translate to…
-
- TypeScript model:
-
Building Routes
-
- GET
- Let’s build a GET request comment to generate a Swagger route.
- We’ll continue with our BreweryObject example. We’ll send a GET request for all our BreweryObjects in our database.
-
-
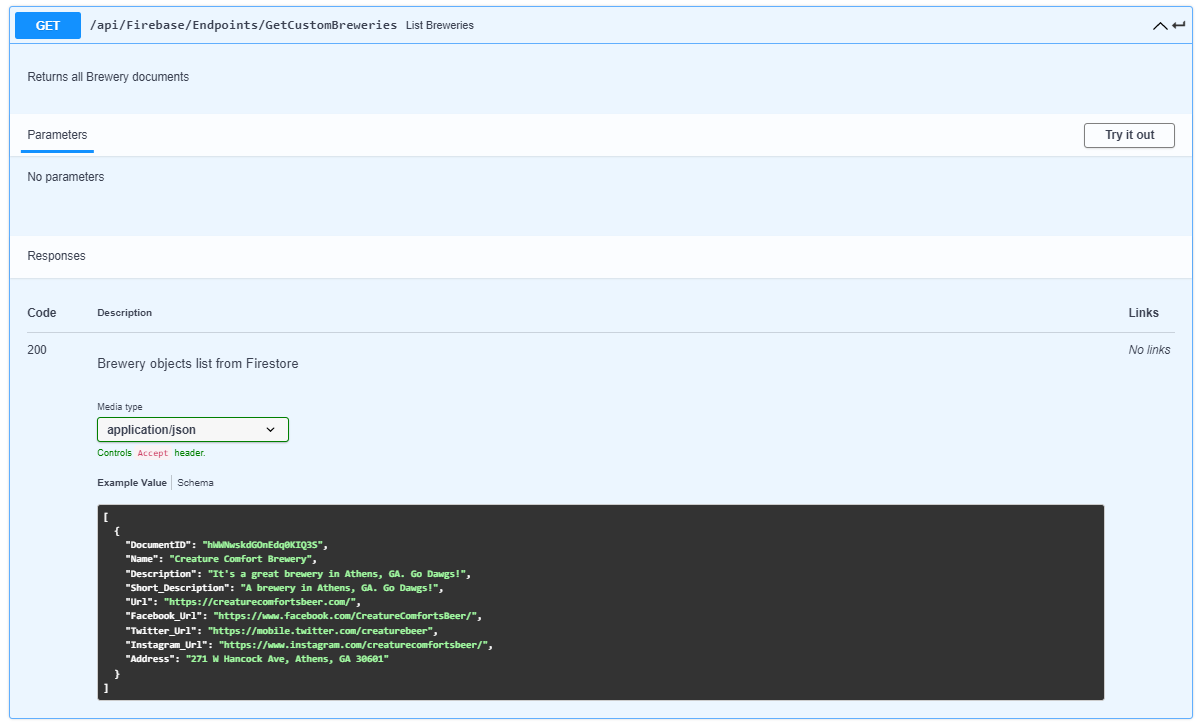
/** * @swagger * /api/Firebase/Endpoints/GetCustomBreweries: * get: * summary: List Breweries * description: Returns all Brewery documents * responses: * '200': * content: * application/json: * schema: * type: array * items: * $ref: '#/components/schemas/BreweryObject' * description: Brewery objects list from Firestore */ const handler = async ( req: NextApiRequest, res: NextApiResponse<BreweryObject[]> ) => { ... } export default handler; -
Note that the desired response in this scenario is an array containing mapped BreweryObject models in JSON format. As such, we will define the response of our successful call’s content to be JSON and the JSON’s schema to be an array containing items whose type references our BreweryObject schema.
-
-
-
Visually, in Swagger, this will translate to…
- POST
- Let’s build a POST request comment to generate a Swagger route.
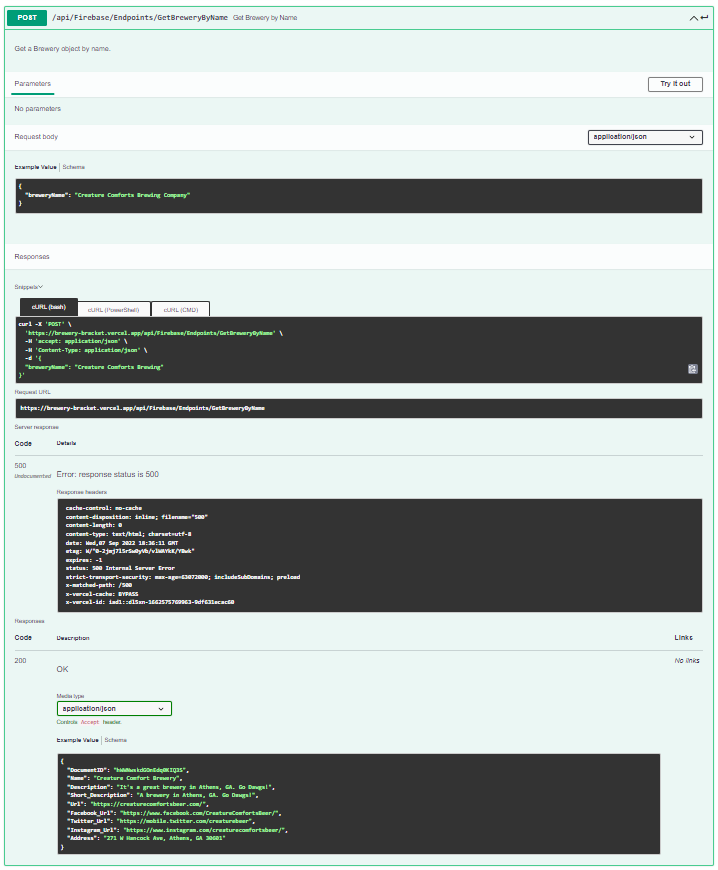
- We’ll continue with our BreweryObject example. We’ll send a POST request to a particular BreweryObject based on its name. For this request, we will use a “breweryName” attribute in the request body to determine the record to receive.
-
/**
 * @swagger
 *  /api/Firebase/Endpoints/GetBreweryByName:
 *    post:
 *      summary: Get Brewery by Name
 *      description: Get a Brewery object by name.
 *      requestBody:
 *        content:
 *          application/json:
 *            schema:
 *              breweryName: string
 *            example:
 *              breweryName: Creature Comforts Brewing Company
 *      responses:
 *        '200':
 *          description: OK
 *          content:
 *            application/json:
 *              schema:
 *                $ref: '#/components/schemas/BreweryObject'
*/
const handler = async (
  req: NextApiRequest,
  res: NextApiResponse<BreweryObject>
) => {
  ...
}
export default handler;
-
- Visually, in Swagger, this will translate to…
- DELETE
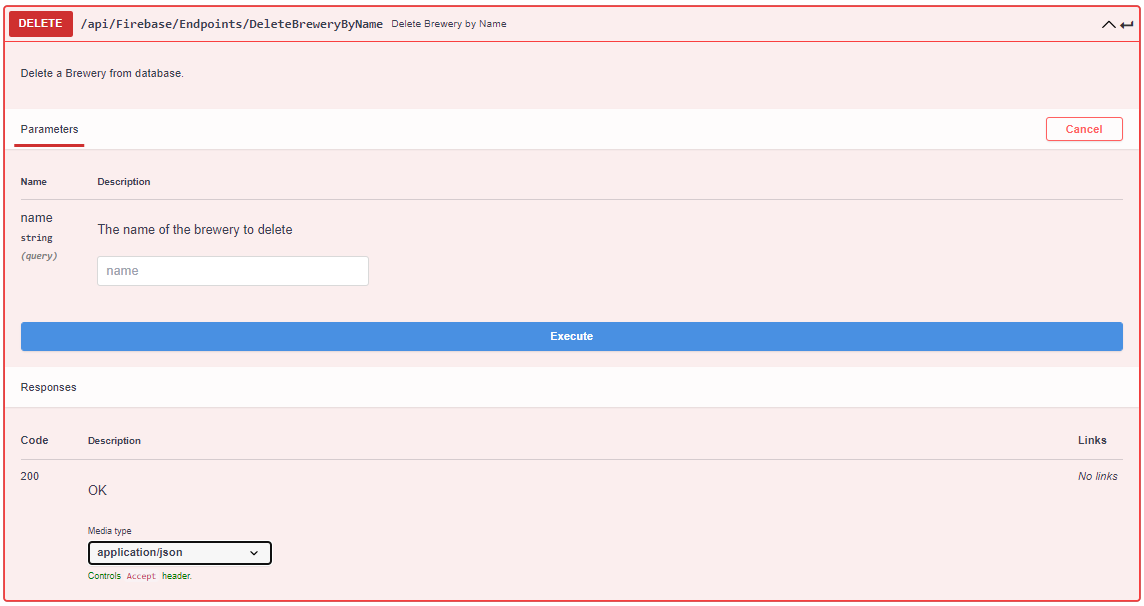
- Let’s build a DELETE request to generate a Swagger route.
- We’ll continue with our BreweryObject example. We’ll get send a DELETE request to a particular BreweryObject based on its name. For this particular request, we will use a query parameter to determine the record to delete.
-
/**
 * @swagger
 *  /api/Firebase/Endpoints/DeleteBrewerybyName:
 *    delete:
 *      summary: Delete BreweryObject by Name.
 *      description: Delete Brewery from database.
 *      parameters:
 *        - in: query
 *          name: name
 *          schema:
 *            type: string
 *          description: The name of the brewery to delete.
 *      responses:
 *        '200':
 *          description: OK
 *          content:
 *            application/json:
 *              schema:
*/
const handler = async (req: NextApiRequest, res: NextApiResponse<{}>) => {
  ...
}
export default handler;
-
-
Visually, in Swagger, this will translate to…
-
- UPDATE
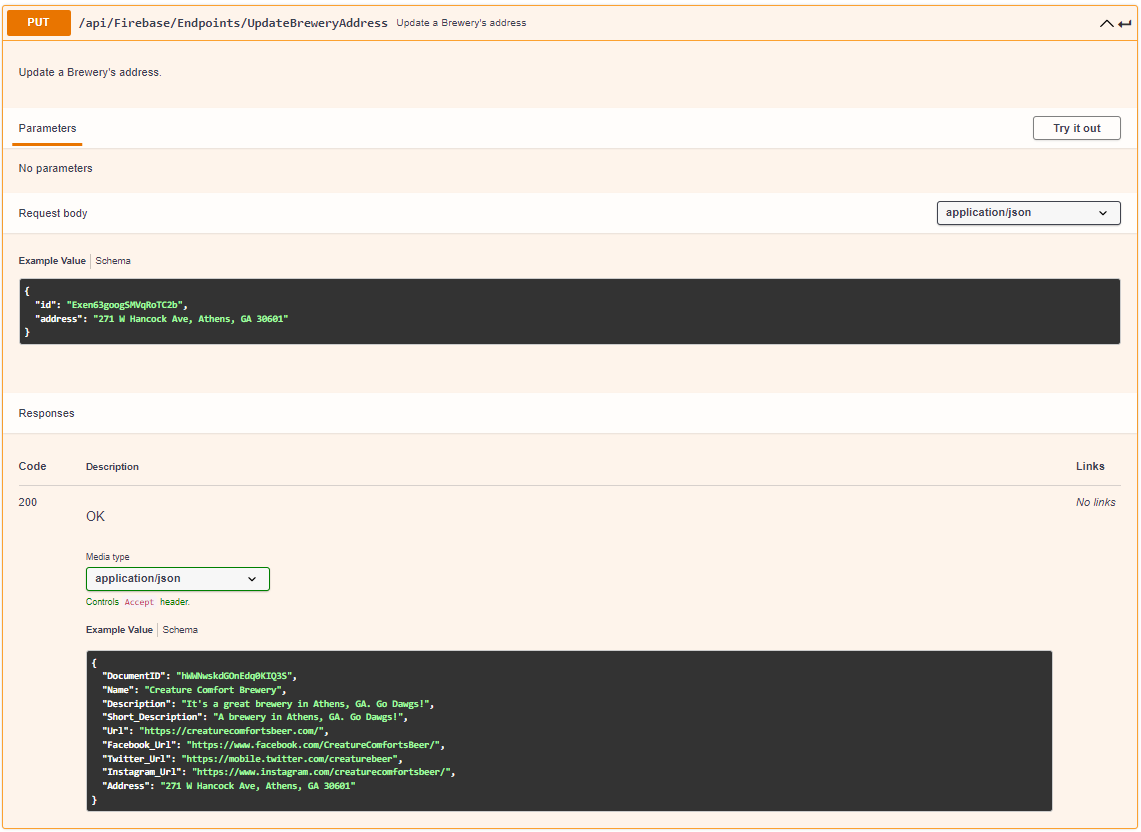
- Let’s build an UPDATE request to generate a Swagger route.
- We’ll continue with our BreweryObject example. We’ll get send an UPDATE request to a particular BreweryObject based on its id to update its address.
-
/**
 * @swagger
 *  /api/Firebase/Endpoints/UpdateBreweryAddress:
 *    put:
 *      summary: Update a Brewery's address.
 *      description: Update a Brewery's address.
 *      requestBody:
 *        content:
 *          application/json:
 *            schema:
 *              id: string
 *              address: string
 *            example:
 *              id: Exen63googSMVqRoTC2b
 *              address: 271 W Hancock Ave, Athens, GA 30601
 *      responses:
 *        '200':
 *          description: OK
 *          content:
 *            application/json:
 *              schema:
 *                $ref: '#/components/schemas/BreweryObject'
*/
const handler = async (req: NextApiRequest, res: NextApiResponse<BreweryObject>) => {
  ...
}
export default handler;
-
-
Visually, in Swagger, this will translate to…
- GET
-
How to leverage your OpenAPI Specification in Swagger
- If you chose method #1 to implement next-swagger-docs with swagger-ui-react, this piece is already done for you. Visit the live swagger page you created and you should see your Swagger UI.
- Else, you’ll need to host your API on SwaggerHub. After you have an account there, create a new API.
-
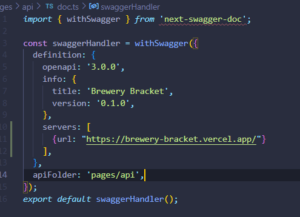
If you followed this guide, you most likely used method #2 to implement next-swagger-docs. Go to the next-swagger-doc documentation route you specified, then copy and paste the page contents into your SwaggerHub API documentation editor.
-
Note that, if you’d like to add hosting servers to your API config, you can do so as an array of objects, each with a url attribute.
-
- If you chose method #3 to implement next-swagger-docs with the next-swagger-doc-cli, use the CLI to generate your .json file. Copy and paste the .json file’s contents into your SwaggerHub API documentation editor.
-
Afterword
- This concludes my article on how to leverage OpenAPI Specification and Swagger to efficiently document your Next.js API.
- All these examples’ Next.js source code and more Next.js examples can be reached here: https://github.com/henryfaulkner/Brewery-Bracket/tree/main/404-brewery-bracket/pages/api
- The Swagger UI and OpenAPI Specification generated from the above code is hosted here: https://app.swaggerhub.com/apis/henryfaulkner/brewery-bracket/0.1.0
- The logo images used are protected under the Creative Commons:


Great article! Visualization of APIs is helpful for quickly understanding them.
Hi,
thanks for your great explanation i have created post method to send email notification with HTML body template in swagger,
How i can call this post API inside my next.js app ? i got a bit confused about how can i approach this implementation!
Thank you in advance