Today, I’d like to walk you through configuring a Jenkins job automation through C jobs and its various choices.
Before jumping in, I’ll shed some light on what Jenkins is.
Understanding Jenkins
Jenkins is an open-source integration tool that allows continuous development, testing, and deployment of newly created codes. Jenkins plugins cover everything from version control systems, build tools, and code quality metrics to build notifiers. Many open-source plugins are available, making Jenkins very easy to use.
What is a CRON Job?
A CRON job is an instruction that repeatedly schedules a task for a particular time. CRON is the ideal option for ongoing tasks and performs non-interactive tasks in the background. A daemon is constantly inactive and awaits a command request to perform a specific task. A CRON job could save time by performing tasks automatically.
Use Cases of CRON
To execute specific instructions automatically, we occasionally need to schedule repetitive tasks. We can schedule any task or job to run after a particular set of hours, a certain number of times per month, on a certain day or date, etc. They are time-based task schedulers, which are utilized for practically all task scheduling.
CRON in Jenkins
In the Jenkins job’s “Configure” option, we’ll want to navigate to the “Build Trigger” tab, where we’ll see the checkboxes for “Poll SCM” and “Build Periodically.” These are the options where we must be familiar with CRON syntax and its function to configure our Jenkins Build.
If we want to execute the job every time something is pushed into the repository from the last build, we will choose the “Poll SCM” option from the “Build Trigger” tab. This could be handled either by writing a CRON job to check the changes in the repository after every 10 or 15 minutes, or we can use a plugin or utility, which will automatically signal our job when our repository changes.
Another scenario would be if something changes in our repository, yet we still want to activate the job at regular intervals. We don’t need to deal with version control system modifications in this instance. Instead, we want to set off our work in accordance with the conditions of our job. If the task is simply about reporting, downloading, and dumping into the database, then we should select the “Build Periodically” option in the “Build Trigger” tab.
Creating the Job
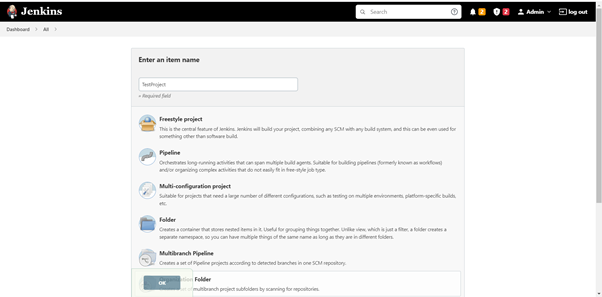
To create a job, go to Jenkins and click on “New Item.” Add the project. It can either be a “Freestyle project” or whatever project we want.


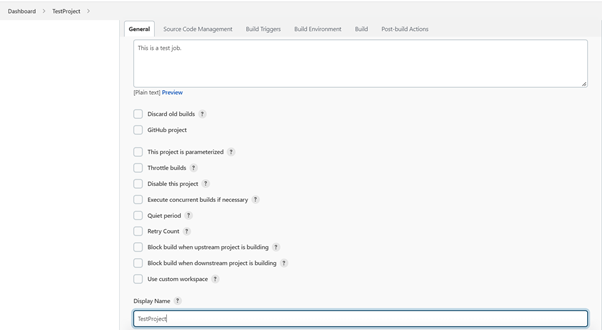
Configure the job by adding the details. Add the job details from the “General” tab.
Configuring the Job
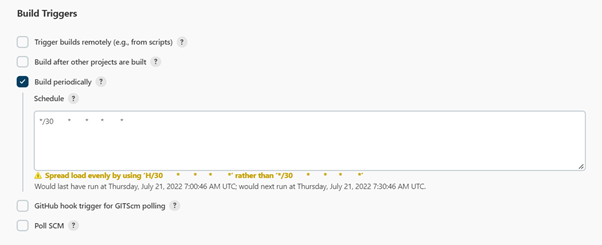
Schedule the build from the “Build Triggers” tab, write the CRON, and check the “Build Periodically” box.

Build the job to test and check if everything is working well. Once we build the job, the results will be as shown below.

CRON Syntax
If we want to run the build every 30 minutes, enter the following CRON schedule.

Below are different syntax to be aware of:
- Minute (0-59) – what minute of the hour the job will run on.
- Hour (0-23, where 0 is midnight) – what hour the command will run in the 24-hour clock.
- Day of the month (1-31) – the day of the month we want the job to run on (g., the first of each month).
- Month (1-12) – tells the month when the job should run. We can number or name the month as well. (i.e., April, May, June, etc., could also be written as 4, 5, 6, etc.).
- Day of the week (0-7, where 0 or 7 are both Sunday) – the day of the week when we want to run our job. It can also be a number or name.
CRON Job Examples
If we want to run the build every day at 10:00 am:

If we want to run the build every 6 hours:

If we want to run the build every Saturday and Sunday at 2:00 pm:

To conclude…
Setting up scheduled jobs will be practical and help us avoid missing the action on time if we have to execute it manually. Utilizing CRON jobs within Jenkins is a great way to automate the jobs.
For more information on Jenkins or CRON, contact our commerce experts today.

