Overview
This article explains how to use a Jenkins job and shell script to activate and deactivate various pages or paths in AEM. Once you have done creating or modifying your page next step is to make that page publish. Then again, navigate to that page’s correct path in the Website Console, then right-click the page and select the “Activate” option. What If you have multiple pages to activate, it’s a little bit time-consuming. So, using a single Jenkins job, you may activate or deactivate several pages simultaneously. Before I continue, let me give a little introduction about the “cURL tool”
What is cURL?
The term stands for “Curl URL Request Library”. A cURL is a command-line tool it is suitably used for transferring and manipulating data to the server or from the server. It Follows the rule REQUEST-RESPONSE, a client that requests something from a server and receives an answer from the server. It can send data using a variety of protocols, including HTTP, HTTPS, FTP, SCP, SMTP, LDAP, etc. It is excellent for automating processes, and if you know how to script, you can develop strong tools that can simplify your work process.
Most of the OS systems now come with cURL pre-installed.
To verify open CMD/TERMINAL and type “curl –help)
cURL use in AEM.
Since AEM is based on REST protocols, you may do a certain task including building, installing, and replicating packages using curl. Additionally, check OSGI configuration, manage users and groups, lock and unlock page, and even more.
You probably have a fundamental understanding of curl. Let’s now turn this blog’s main goal into execution.
What is Jenkins?
Jenkins is a free and open-source automation tool that may be used to automate any kind of task related to building, testing, delivering, or deploying software. Today, CI/CD workflow is frequently implemented by IT firms. It can be installed on any computer that has [Java Runtime Environment] JRE.
How to create a Jenkins job that activate and deactivate multiple AEM pages.
Here, we are choosing the freestyle job.
The freestyle job is a flexible alternative that is simple to set up and use. Also, it gives us more options for other build jobs.
Follow the steps mentioned below to create a job.
1. Log in to Jenkins Dashboard.
Go to your Jenkins URL and sign into the dashboard to create a Jenkins freestyle job. Jenkins is hosted on my localhost http://localhost:8080; you can visit your Jenkins dashboard using the appropriate URL.
2. Generate a new item.
Once you’ve logged in, select “New Item” from the Jenkins dashboard, type the name of your job, choose the “Freestyle Project” and then click “OK”.
3. Enter the Job details.
Choose the option “This project is parameterized” and enter the project description in the General tab as needed. (Parameters permit you to prompt users for one or more inputs that will be used to pass into a build) .
Then click on “Add-parameter” and choose “Multi-Line string parameter” form the drop-down list of add parameter option. Refer to the screenshot below.
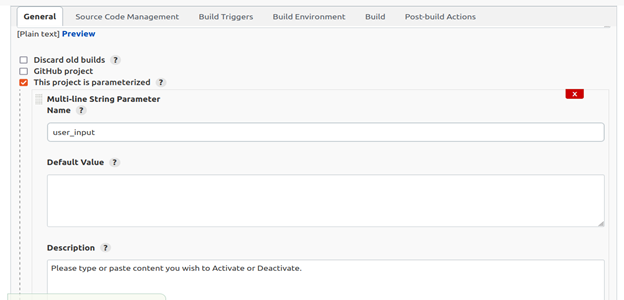
Here, I’ve given the option the name “user_input” and included a description.
4. Add one more parameter.
Click “Add-Parameter” and choose “option parameter” to add a further parameter to our job. After that enter the name of parameter and choice of action to be performed.
Refer to the screenshot below.
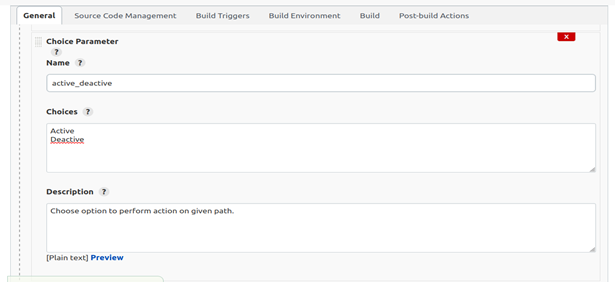
Up to this point, we have just covered the user input field by providing input as the pages’ path using the first parameter. We have specified the action to be taken, whether to activate or deactivate the page, in the second parameter.
5. Add credential details.
After that go to the “Build Environment” under that you will find option named “Use secret text(s) or file(s).” click this option and a new box will be there named as “Binding” and under it Add option.
Click Add button and choose the option “Username and password (separated)”.
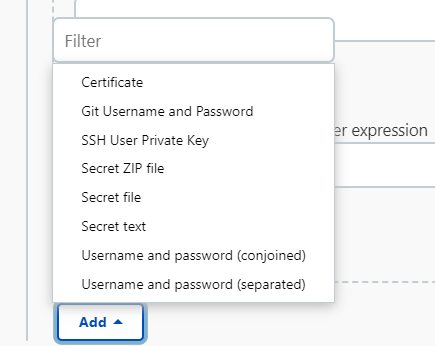
A new prompt will pop up continuing to follow that. Here, you must enter the authentic login and password for your AEM instance in two different variables, one for the username and the other for the password.
Select your credentials from the credentials store after that.
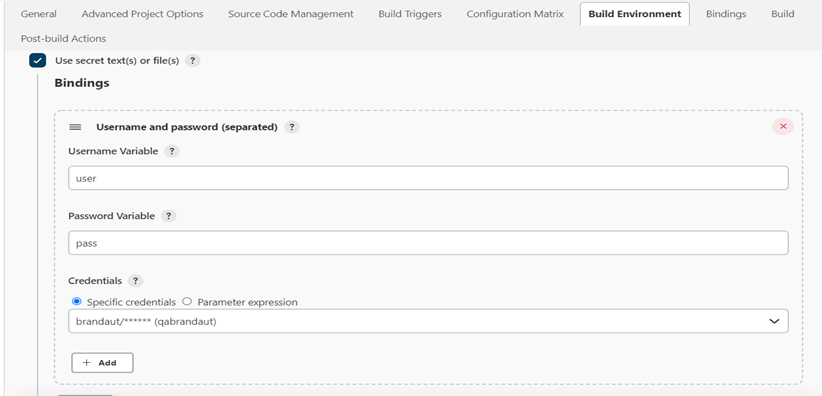
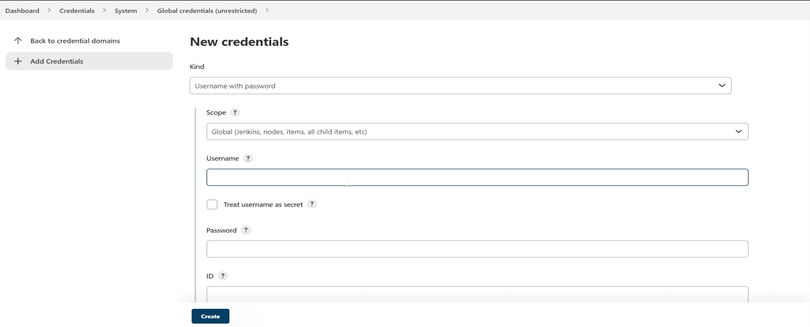
If you haven’t already stored your credential, you have to click on Add button and enter your actual username and password details.
Note: You can manually add credentials from the manage Jenkins’s option, if they do not really appear on the job page. Refer to the screenshot below.
Go to the Jenkins home dashboard > Left panel option> Manage Jenkins >Manage Credentials >system>global Credentials >Add Credentials >Enter real username and password> Click create.
6. Execute shell script.
Now click on “Build Tab” and click the option “add-build step” and choose option “Execute shell” from the drop-down list.
Copy and paste the below script to the Command box.
#!/bin/bash
set +ex
#variable section

url=http://localhost:4502/bin/replicate.json

function content() #Function for user multiple inputs
{
    if [ ! -z "$1" ] &&  [ -f "$1" ]; then
        echo $(<"$1")
    else
        echo "" >&2
        echo "Please type or paste page path you wish to Activate or Deactivate." >&2
        echo "" >&2
 # Press CTRL+D once done with entering input(If script executing from any Linux OS for Jenkins job no need to press CTRL+D).
        IFS= read array '' ${user_input}
        printf '%s\n' "${user_input[@]}"          # Output as a newline-delimited string.

    fi
}

path=$(content "$2")
#echo "$path"

    #Function for activate page
    function activate()
    {
        for i in $path #Iterating pages one-by-one
        do
        #calling Jenkins variable for credentials ${user}:${pass}
        curl -s -u ${user}:${pass} -X POST -F path=$i -F cmd="activate" $url | grep -q "200"
        echo "$i ==> Page has been Activate."
        sleep 5;
        done
    }
    #Function for deactivate page
    function deactivate()
    {
        for i in $path
        do
        curl -s -u ${user}:${pass} -X POST -F path=$i -F cmd="deactivate" $url | grep -q "200"
        echo "$i ==> Page has been Deactivated."
        sleep 5;
       done
    }

#calling Activate choice parameter from Job
if [ ${active_deactive} == 'Active' ];
then
    activate
else
    deactivate
fi
OR The build trigger option in the job’s SCM section allows you to invoke the script.
Your job is now ready to build after you click the save option.
7. Build a job.
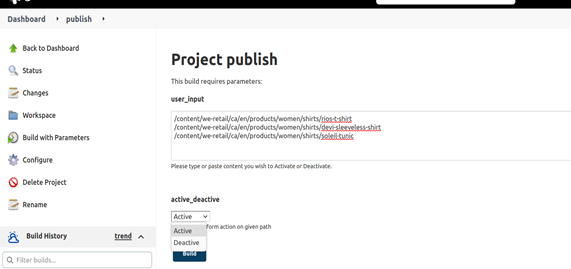
After saving a Jenkins job you will get back to the Jenkins dashboard, on the left panel of dashboard click on the “Build with parameter option”. A new prompt will appear where you have to enter Page paths and select action to perform whether activate or deactivate. After that click on “build”. Refer the below screenshot.
8. Verify Expected output
After building open the browser and enter web console URL i.e. http://localhost:8080/siteadmin#/ and enter the correct path of pages and verify whether it’s activate or not.
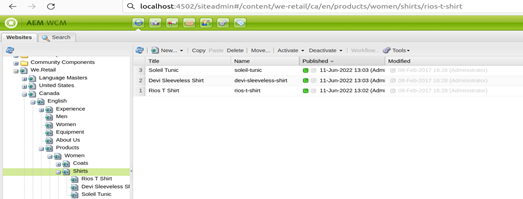
If the page’s published status is Green, it has been successfully activated.
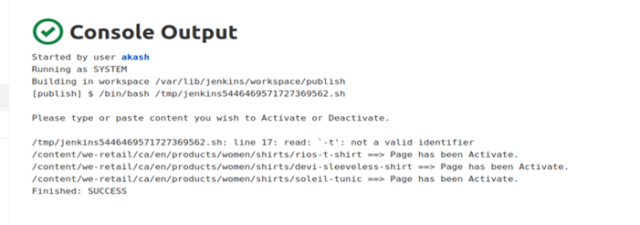
Jenkins Output for activating page:
Likewise, you must follow Step 7 and choose the Deactivate option if you want to deactivate the page.

If the page’s published status is Red, it has been successfully deactivated.
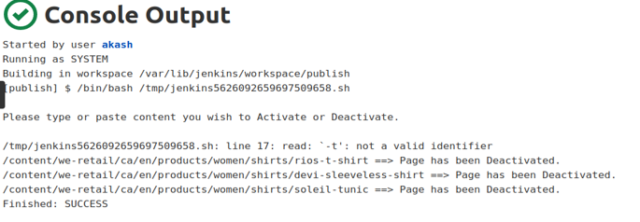
Jenkins Output for deactivating page:
Conclusion
So here it is! You now have a basic understanding of how the curl command works. In using AEM, it can be helpful to automate several daily tasks. Things like managing packages, bundles, node, pages, users and groups, etc. In addition, Jenkins is a great CI/CD tool with customization options, and the best part is that this is free to use and very beneficial when it comes to reducing workloads through automation. Thank you for reading, and I hope you find this blog to be useful.


A very good knowledge shared & well explained.
Thank you Lalit learned from you, sir.
Thanks so much lalit.
Could you please help me to take the content from one env to pushed it to another env