When planning to implement Teams within your environment, governance and compliance should be at the forefront of your planning process. This means that protecting your organization’s data without hindering their ability to collaborate should be of utmost importance. Sensitivity labels will give you the ability to classify and regulate access to sensitive content created during while collaborating in not only Teams, but Office 365 Groups, and SharePoint as well. In this article, we’ll be discussing what sensitivity labels can do and how to create them within each container (Microsoft Teams sites, Office 365 Groups, and SharePoint sites). In a subsequent blog, we’ll show you how you can audit sensitivity labels for sites that use SharePoint Online and Teams sites.
What can I do with sensitivity labels?
This is quite a loaded question because sensitivity labels can be used across many different applications. For this blog, we’ll just be discussing the public preview piece of sensitivity labels which allows you to configure sensitivity labels for site and group settings. This includes:
- SharePoint Online
- Teams
- Outlook on the web
- SharePoint admin center
- Azure AD admin center
We won’t be covering sensitivity labels within Office apps, but if you want to learn more about that, you can check it out here. So let’s get back to sensitivity labels as it relates to Teams, SharePoint Online, and Office 365 Groups.
With the latest updates for sensitivity labels, you can now protect content for specific containers. These containers include:
- Microsoft Teams sites
- SharePoint sites
- Office 365 Groups
To properly protect the content in these containers you’ll need to consider the following settings:
- Privacy (public or private) of Office 365 group-connect team sites
- External user access
- Access from unmanaged devices
I’ll show you how to configure the sensitivity labels in each of these containers shortly but for now just know that once this label is applied to a container, the label will automatically apply your configured options to the connected site or group.
Note: Any content in those containers will not inherit the labels for settings (i.e. label name, visual markings, or encryption). To label documents in SharePoint sites or team sites, you’ll need to check out the process here.
Seeing as this is a public preview, this means that Microsoft is gradually rolling this out to tenants and may be subject to change before the final release. Below is an example of how to apply sensitivity labels before the preview and after the preview.
Now that you know what the public preview for sensitivity labels includes, let’s start looking at how to enable this preview and synchronizing our labels.
Enabling public preview
- To enable this public preview for sensitivity labels, you’ll need to enable this feature within Azure AD.
- After that’s done, you’ll need to connect to the Security and Compliance center via PowerShell.
- After you’re connected, you’ll run the following command to synchronize your sensitivity labels to Azure AD, so that way they can be used with your Office 365 Groups: Execute-AzureAdLabelSync
Creating a sensitivity label
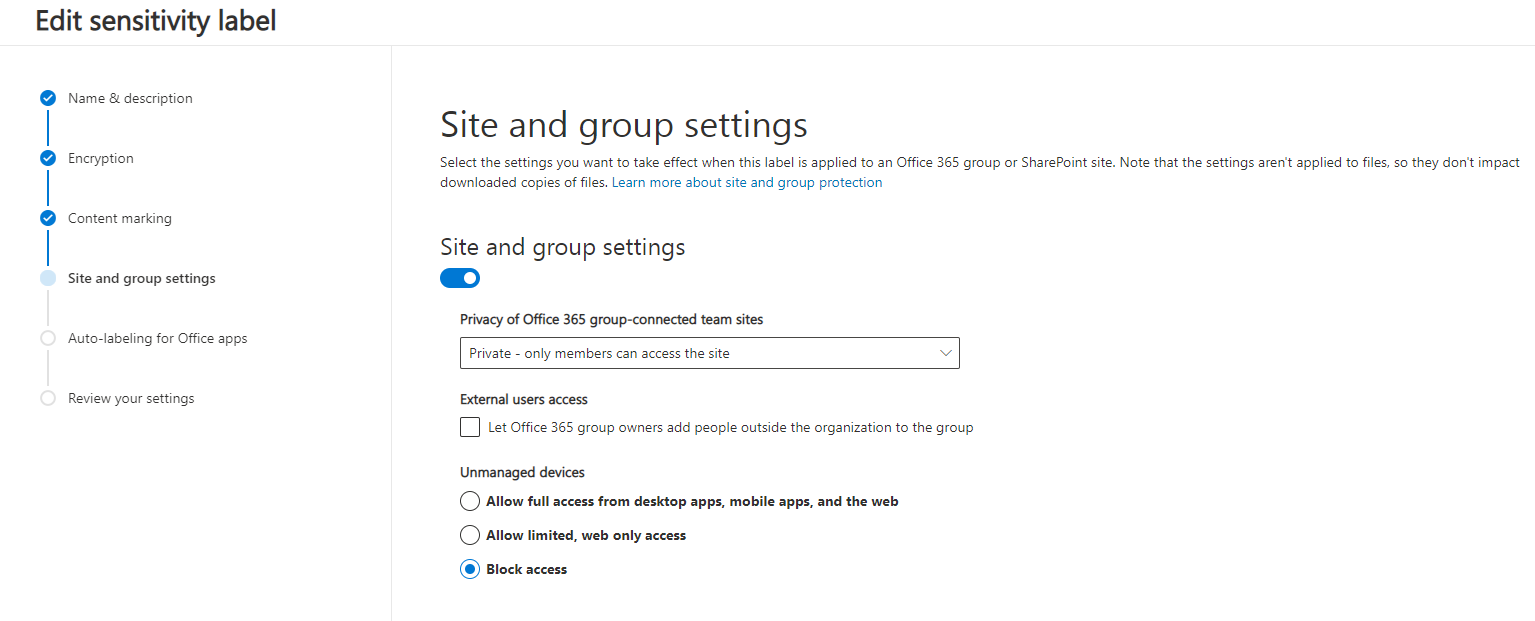
We’re now ready to create/edit sensitivity labels that you want to be available for your sites and groups. Once this is enabled you’ll notice that there is a new page visible in your sensitivity labeling wizard entitled Site and group settings. Once you get to that step in the sensitivity labeling wizard you’ll have the following options:

- Privacy of Office 365 group-connected team sites
- None – let users choose who can access the site (default)
- Use this setting when you want to protect content in the container by using the sensitivity label, but still let users configure the privacy settings themselves
- Public – anyone in the organization can access the site
- Use this setting when you want anyone in your organization to access the team site or group where this label is applied
- Private – only members can access the site
- Use this setting if you want access to be restricted to only approved members in your organization
- None – let users choose who can access the site (default)
- External users access
- Unmanaged devices
- Allow full access from desktop apps, mobile apps, and the web
- Allow limited, web-only access
- Block access
Important note: Only these site and group settings take effect when you apply a label to a team, group, or site. Other label settings, such as encryption and content marking, aren’t applied to the content within the team, group, or site. Only labels with the site and group settings will be available to select when users create teams, groups, and sites. If you can currently apply a label to a container when the label doesn’t have the site and group settings enabled, only the label name is applied to the container.
Publishing a label
Great job, you’ve created a label and applied the site and group settings within the label, now comes the fun part of publishing the label so we can start using it! In order to publish the sensitivity label, we will need to create a label policy. Depending on which labeling admin center you’re in, you’ll need to navigate Sensitivity labels. Use one of the options below to properly navigate to Sensitivity labels:
- Microsoft 365 compliance center:
- Solutions > Information protection
If you don’t immediately see this option, first select Show all.
- Microsoft 365 security center:
- Classification > Sensitivity labels
- Office 365 Security & Compliance Center:
- Classification > Sensitivity labels
Once you’re in Sensitivity labels in the respective labeling admin center the following steps will be the same regardless of which admin center you’re in:
- Select the Label policies tab.
- Select Publish labels to start the Create policy wizard.
- Select Choose sensitivity labels to publish. Select the labels that you want to make available in apps and to services, and then select Add.
- Review the selected labels and to make any changes, select Edit. Otherwise, select Next.
- Follow the prompts to configure the policy settings.
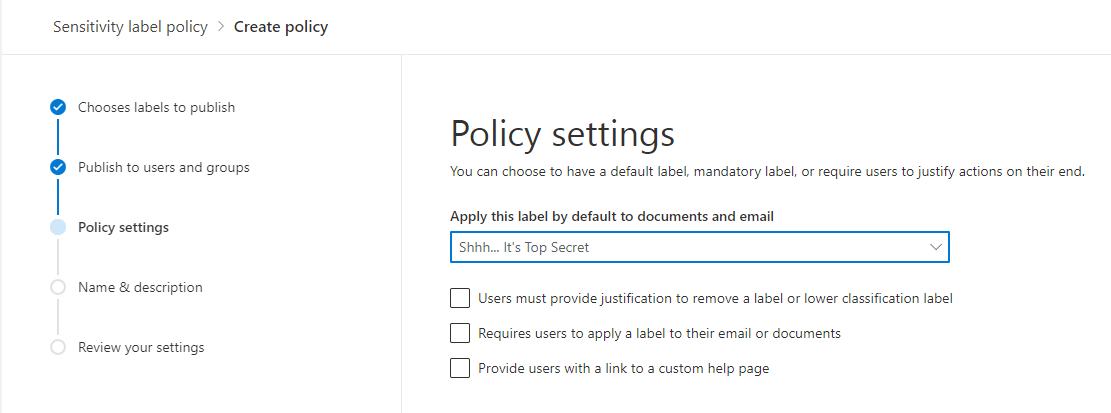
In your policy settings, you’ll see the option of Apply this label by default to documents and email. This will only be applicable when you apply this label to containers. The other policy settings will not be applied, which includes mandatory labeling, user justification, and a link to a custom help page.
Repeat these steps if you need different policy settings for different users or locations. For example, you want additional labels for a group of users or a different default label for a subset of users.
Note: If you create more than one label policy that might result in a conflict for a user or location, review the policy order and if necessary, move them up or down. To change the order of a label policy, select … for More actions, and then select Move up or Move down. Yes, order matters…. for more on label policy priority, check out a full breakdown of label policy priority here.
Applying a sensitivity label to a new team
Awesome! You’ve published the label! Typically, users see the labels in their Office apps within a couple of hours. However, allow up to 24 hours for your label policies and any changes to them to replicate to all users and services. Now that the label has published (and we’ve given it the proper time to replicate), you’ll notice that the users who are assigned the sensitivity label policy that includes this label will be able to select it for sites and groups. Let’s create a new team in Microsoft Teams to experience it first-hand! Let’s say we have a sensitivity label where the Privacy of the Office 365 group-connected team site is set to Private – only members can access the site. In addition, we’ve unchecked the option to allow External User Access meaning Office 365 group owners won’t be able to add people outside of the organization to the group. Lastly, we’ve chosen to Block Access for any unmanaged devices.
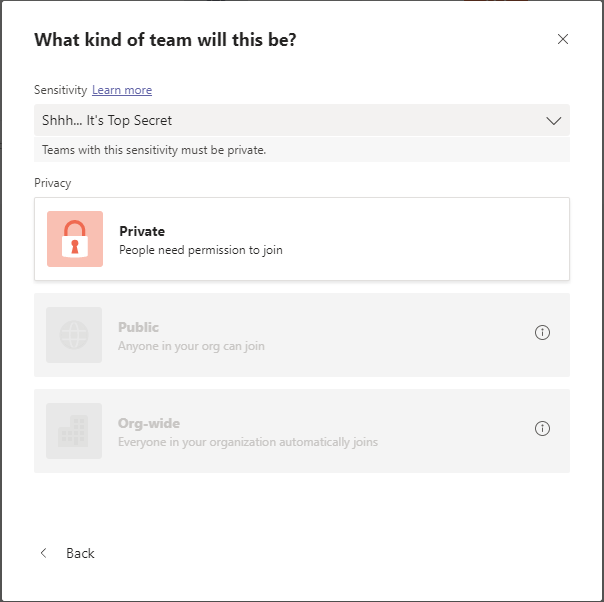
Given the settings above, when we go to create a team we’ll have the option of applying this sensitivity label to our new team in Microsoft Teams. Once we select our label from the Sensitivity dropdown, the privacy settings will change to reflect the label configuration. You’ll notice that the option of making the team Public is grayed out since our Site and group settings have the privacy of the Office 365 group-connected team site set to Private.
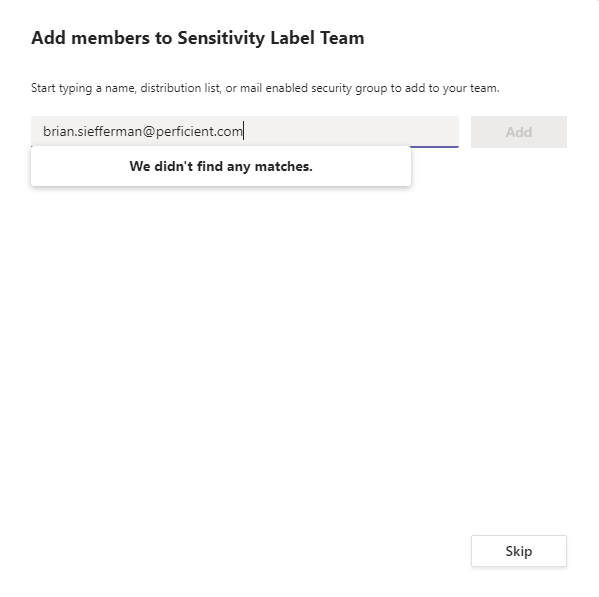
In addition, if we tried to add a guest to the team, you’ll notice the search for the guest user won’t return any results.
Once the team has been created, you’ll notice that the sensitivity label applied to the team will appear in the upper right-hand corner of the channels in the team.

When the sensitivity label is applied to the team, this means that the label will also be applied to the Office 365 group and the connected SharePoint team site.
Applying a sensitivity label to a new group in Outlook on the web
Office 365 groups can also be created within Outlook, so let’s take a look at this from Outlook on the web. In the picture below you’ll notice that we have the option of selecting a sensitivity label. Given that this sensitivity label we’ve chosen restricts guest access and is set to private, you’ll see these settings reflected once that label has been chosen.
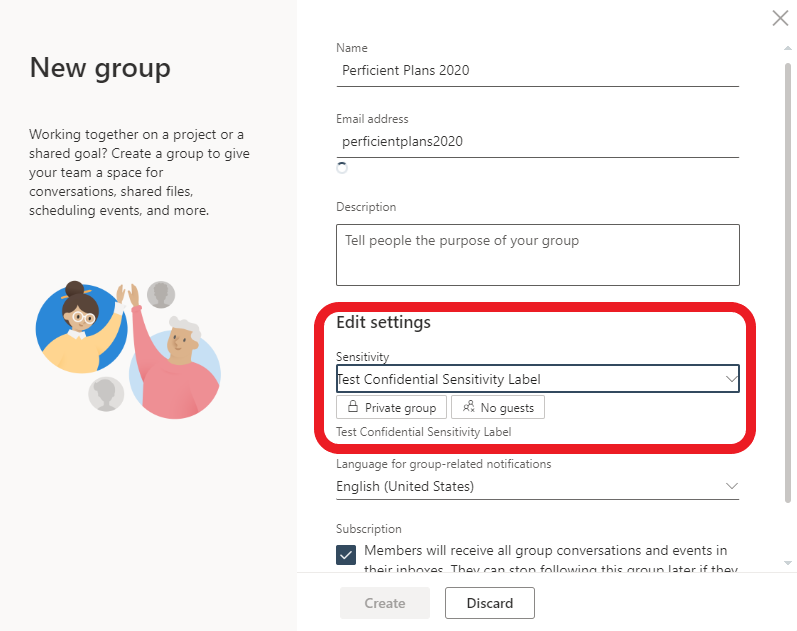
In addition, if we tried to add external guests to the Office 365 group, you’ll see we get an error message indicating that company policy restricts the adding of guests.

Applying a sensitivity label to a new site
Last but not least, let’s take a look at adding a sensitivity label to a modern team site or communication site. When creating a new team site or communication site in SharePoint you’ll notice that there will be an option to apply a sensitivity label to the site.
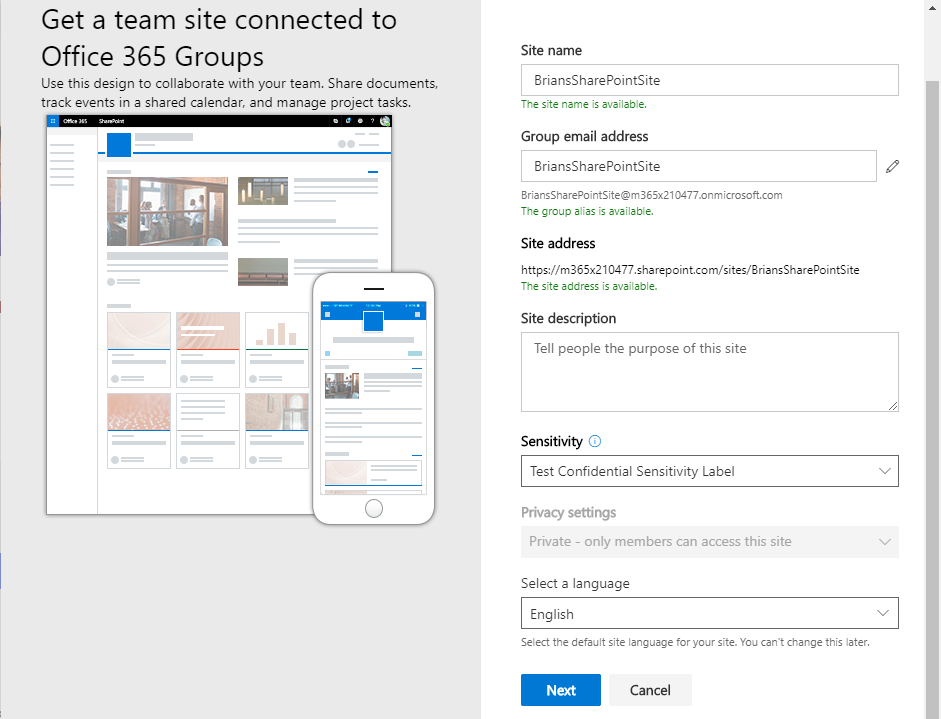
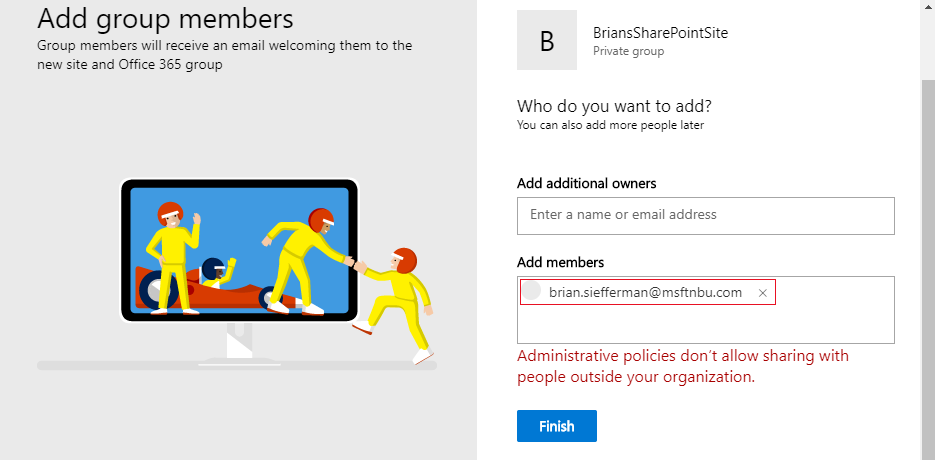
If we choose one of the sensitivity labels that was used earlier, you’ll notice that the privacy settings will automatically be set to Private – only members can access this site. Additionally, if we try to add an external guest to the team site you’ll receive an error indicating that sharing with people outside of the organization is restricted due to administrative policy.
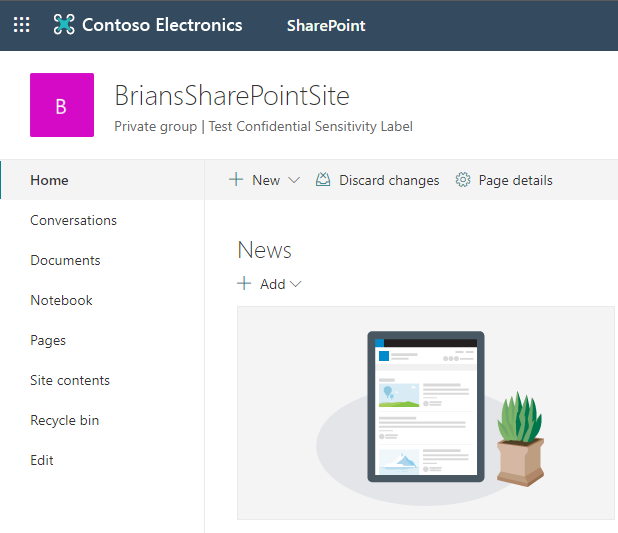
Once the label is applied and the site has been created, users that browse to the site will see the name of the label and the applied policy settings.
As you can see, there are many different ways to apply sensitivity labels to containers within Office 365, whether it be within Teams, Office 365 Groups, or SharePoint. Next time we’ll explain how you can audit all of these sensitivity label activities so you can better identify misalignments of label priority and take action if needed. Until then, I hope you have found this guide helpful and I encourage you to start experimenting with sensitivity labels early on and on a small scale before implementing it org-wide. I hope you are all staying safe and healthy and wishing everyone the best!


