Last week Microsoft announced general availability of auto attendants and call queues in Skype for Business Online in Office 365. These features have been in preview for several months, and I know many people are excited to finally have them released. The lack of auto attendants and call queues have prevented many organizations from utilizing Skype for Business Online Cloud PBX functionality as they require these features to full replace their on-premises legacy PBX. In this blog article I’m going to cover the basics of the auto attendant including configuration and limitations.
First, what is an auto attendant? An auto attendant allows the ability to answer inbound calls and to route them to another person or queue based on dial pad inputs or speech recognition. Think of it as an automatic switchboard directing callers to the appropriate person or group (i.e. “1 for sales, 2 for technical support, 3 for customer service”).
To get started with creating an auto attendant, you will need an available service number. Service numbers are configured to handle several hundred calls simultaneously, such as dial-in conferences and now auto attendants. Service numbers can be provisioned directly from Microsoft’s pool of available numbers, or you can port an existing number from your telephone carrier to Microsoft. If you have never provisioned a service number before, I recommend checking out this Office Support Article before continuing.
Once you have an available service number, navigate to the Skype for Business admin center and select Call Routing on the left side. If Call Routing is not available, this probably means the tenant does not have any Enterprise E5 or Cloud PBX licenses available. You will need to acquire these licenses before continuing. In the Call Routing menu, make sure Auto Attendants is selected at the top, then click + Add New.
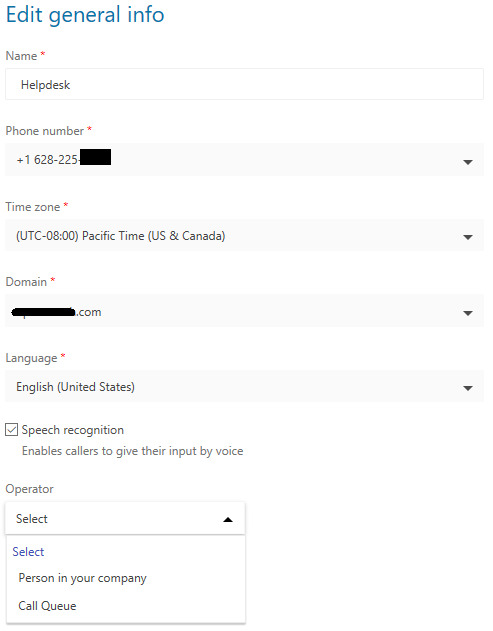
The first screen is for General Info on the attendant, such as name, service number to use, time zone, domain, language, enable/disable speech recognition, and operator options (person or call queue). In this example I’m creating an attendant for the Helpdesk in a San Francisco office.
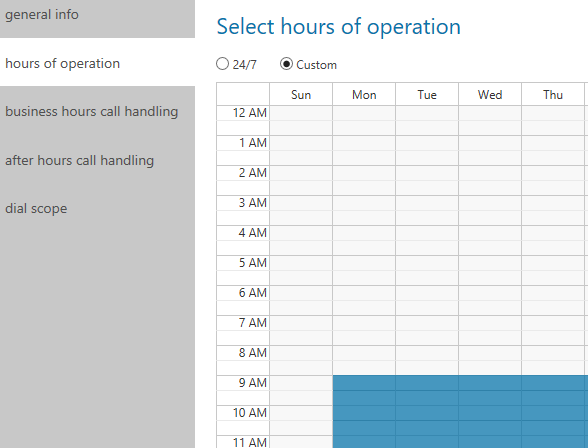
Next select the Hours of Operation menu on the left. This will set up the hours the attendant is available. If selecting Custom, this enables an additional menu option on the left for After Hours Call Handling as you might want after hours calls to have a different action.
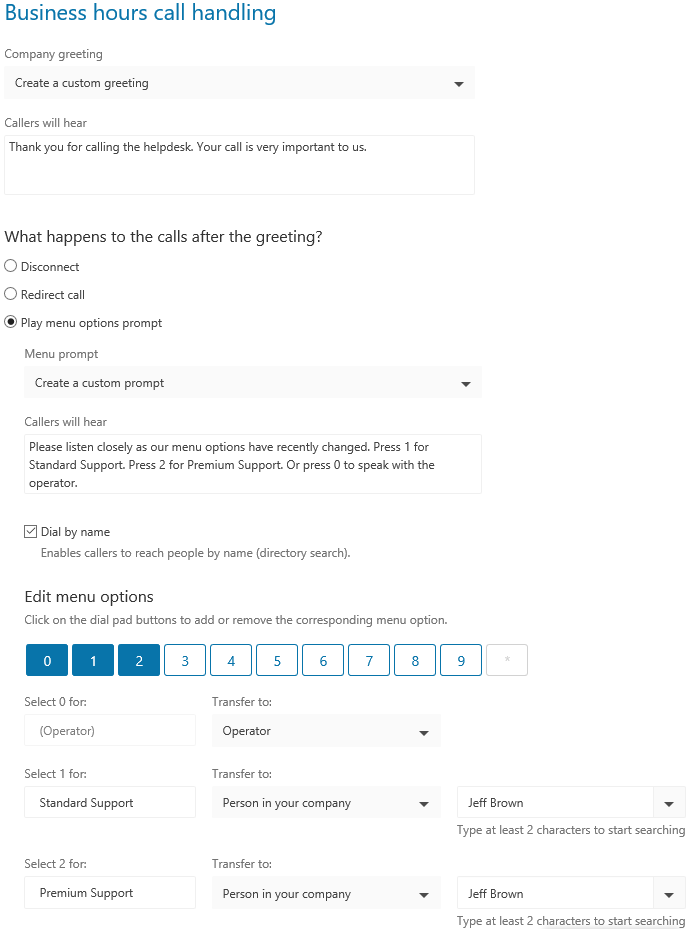
Next is setting the options for Business Hours Call Handling. This includes setting a company greeting (upload an audio file or use text-to-speech). After the greeting are several options, such as Disconnect the call, Redirect the call to another person, call queue, or auto attendant, or play a menu options prompt. The menu prompt can also use an uploaded audio file or text-to-speech option. Whether you are creating a custom menu prompt or using an audio file, you will need to list the menu options that are available to the caller (i.e. “1 for sales, 2 for technical support, 3 for customer service”). To build the menu options, select a dial pad number and choose the Transfer To options of Operator, Person in Company, Call Queue, or Auto Attendant.
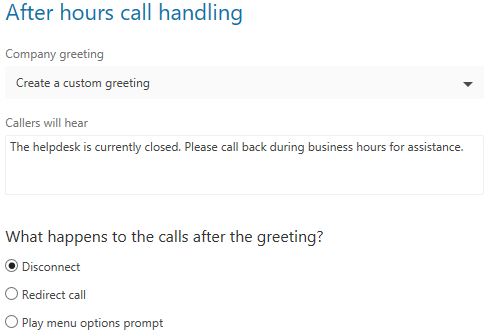
If business hours are enabled, also set the greeting for After Hours Call Handling and choose how to handle the call (Disconnect, Redirect Call, or Play Menu Options).
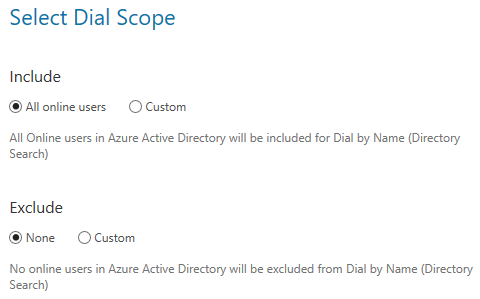
Next, if allowing the caller to search for users by name, you can set who is included in the search by setting Include and Exclude groups.
And that’s it! Your auto attendant is now configured. After saving the changes, there is handy “Test” button that will open a call in your Skype for Business client to test the auto attendant. In my testing on changing things like menu prompts or dial pad options, the changes are pretty instantaneous, so kudos to Microsoft for that. The biggest limitation I’ve been able to find is there is no option to set up a holiday schedule, so when those occur, the business hours would need to be changed for the upcoming holiday.
Did you find this article helpful? Leave a comment below or follow me on Twitter (@JeffWBrown) for more information on Skype for Business.
First, what is an auto attendant? An auto attendant allows the ability to answer inbound calls and to route them to another person or queue based on dial pad inputs or speech recognition. Think of it as an automatic switchboard directing callers to the appropriate person or group (i.e. “1 for sales, 2 for technical support, 3 for customer service”).
To get started with creating an auto attendant, you will need an available service number. Service numbers are configured to handle several hundred calls simultaneously, such as dial-in conferences and now auto attendants. Service numbers can be provisioned directly from Microsoft’s pool of available numbers, or you can port an existing number from your telephone carrier to Microsoft. If you have never provisioned a service number before, I recommend checking out this Office Support Article before continuing.
Once you have an available service number, navigate to the Skype for Business admin center and select Call Routing on the left side. If Call Routing is not available, this probably means the tenant does not have any Enterprise E5 or Cloud PBX licenses available. You will need to acquire these licenses before continuing. In the Call Routing menu, make sure Auto Attendants is selected at the top, then click + Add New.
The first screen is for General Info on the attendant, such as name, service number to use, time zone, domain, language, enable/disable speech recognition, and operator options (person or call queue). In this example I’m creating an attendant for the Helpdesk in a San Francisco office.

Next select the Hours of Operation menu on the left. This will set up the hours the attendant is available. If selecting Custom, this enables an additional menu option on the left for After Hours Call Handling as you might want after hours calls to have a different action.

Next is setting the options for Business Hours Call Handling. This includes setting a company greeting (upload an audio file or use text-to-speech). After the greeting are several options, such as Disconnect the call, Redirect the call to another person, call queue, or auto attendant, or play a menu options prompt. The menu prompt can also use an uploaded audio file or text-to-speech option. Whether you are creating a custom menu prompt or using an audio file, you will need to list the menu options that are available to the caller (i.e. “1 for sales, 2 for technical support, 3 for customer service”). To build the menu options, select a dial pad number and choose the Transfer To options of Operator, Person in Company, Call Queue, or Auto Attendant.

If business hours are enabled, also set the greeting for After Hours Call Handling and choose how to handle the call (Disconnect, Redirect Call, or Play Menu Options).

Next, if allowing the caller to search for users by name, you can set who is included in the search by setting Include and Exclude groups.

And that’s it! Your auto attendant is now configured. After saving the changes, there is handy “Test” button that will open a call in your Skype for Business client to test the auto attendant. In my testing on changing things like menu prompts or dial pad options, the changes are pretty instantaneous, so kudos to Microsoft for that. The biggest limitation I’ve been able to find is there is no option to set up a holiday schedule, so when those occur, the business hours would need to be changed for the upcoming holiday.
Did you find this article helpful? Leave a comment below or follow me on Twitter (@JeffWBrown) for more information on Skype for Business.
