Have repetitive tasks that you perform on a regular basis? You may be able to complete them more efficiently and save time by automating workflows on the web.
It’s simple with Zapier – a web automation tool that can be used to create workflows for common tasks between popular web apps such as Gmail, Trello and Salesforce. Each automation is called a “Zap” and is composed of a series of triggers and actions between connected apps.
First Things First: Conceptualize Your Zap
Take a minute to brainstorm a list of popular web apps you use daily. By thinking about what they do, you’ll identify some of the connections that can be made using a tool like Zapier. For instance, when you publish a post in WordPress, you may want the same content posted to your Facebook page at the same time. It’s as simple as that!
Of course, there are some limitations. For instance, you can’t perform an action that isn’t already native to the app you are connected to. But with the use of built-in apps that Zapier provides, you can begin to do some things you may not have thought possible.
Anatomy of a Zap
So how does it work? Here’s an example of steps that comprise a Zap:
- Choose a Trigger App
- Choose App: Google Forms
- Choose Trigger: New Response in Spreadsheet
- Connect or Select Google Account
- Edit Options: Spreadsheet, Worksheet
- Test this step
- Choose an Action App
- Choose App: Todoist
- Choose Action: Create Task
- Connect or Select Todoist Account
- Edit Template: Title, Note, Assigned To
- Test this step
- Turn on Your Zap
The Built-in Zapier Code App
Over the past year, I’ve been using Zapier for various online automations to save time and make some aspects of running a business more efficient. But until recently, I didn’t have a reason to use the built-in Zapier Code app. Then I ran into a problem while setting up a Zap that I initially thought would be easy.
The Problem
In my WordPress site, I was using the Custom Post Types UI and Advanced Custom Fields plugins. Within my WordPress post type, I have a custom file upload field for posting a photo – and I wanted to map this same photo to the Facebook photo field, available in the New Page Stream Post trigger. Unfortunately, my custom WordPress field didn’t directly map to the photo field with my Facebook action template in Zapier. The result? I couldn’t add a photo to my Facebook post.
The Solution
Luckily, Zapier provides a built-in Code app that can be utilized in your tasks to really get creative. Now, I must admit, the solution to my problem is not quite as elegant as I’d like. But it works, and it’s saved me a ton of time.
Once you’re a bit more familiar working with Zapier, just follow these easy steps:
Step 1
Trigger (WordPress): New Post
- Be sure your WordPress post contains a Link field.
- This URL will go to a single entry web page set up to display the custom post type photo and only the photo.
Step 2
Action (Code – Zapier): Run JavaScript
- Edit Template:
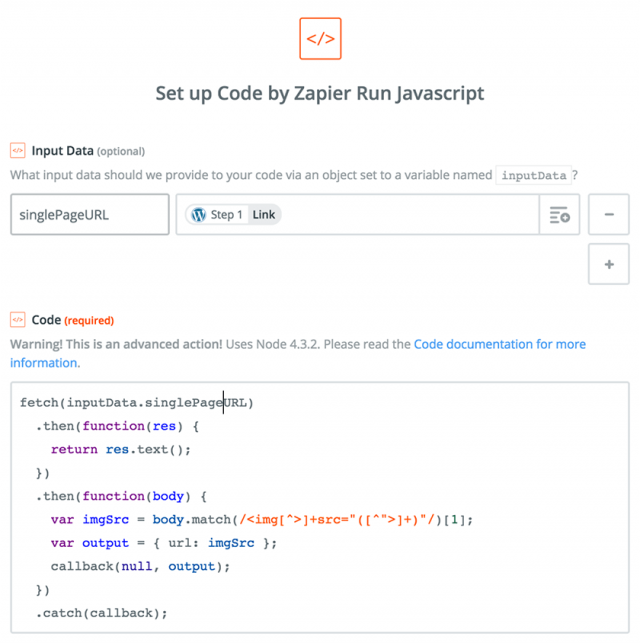
- Select the WordPress Link field identified in the previous step for optional Input Data field for your Code action.
- Enter your custom JavaScript code in the Code field in your action.
- The JavaScript code snippet is set up to fetch a WordPress page and glean an image path from its HTML. If an <img> tag is found and an absolute path to that image is returned, it can be passed to the next step
Step 3
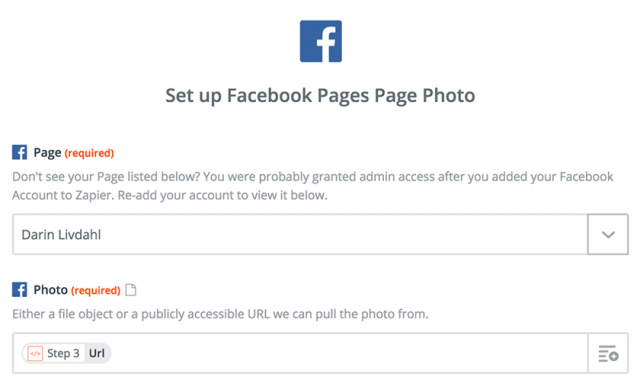
Action (Facebook): Create Page Photo
- Edit Template:
- Select the Url variable obtained from the previous Code action for the value of the Facebook Photo field. This field accepts a file object or an absolute path to an image.
And there you have it! When my WordPress post is published, my Facebook Page post will also be published without even logging into the Facebook website. All the work has been done once in WordPress. Zapier has saved me from a time-consuming process of posting the same content manually to multiple sites online, and it can do the same for you.


