One of the daily & major tasks of a front end developer is to write HTML prototyping. And when it comes to writing reusable, editable and modularized html for a large enterprise application, we are often lost as to where the different fragments of code are and a small change made to a div classname in the footer of the html, needs to be done across all the html pages its included in.
One solution to solve this agony is to rely on PHP and use of its ‘includes’ for static html prototyping. But is that what we want to do ? All the filename extensions are then .php while it does not contain a single line of php code and we need to depend on either a LAMP, MAMP or an XAMPP server running locally and also on the server where the site needs to be hosted. Thing of the past. Enter JEKYLL – a simple,blog-aware, static site generator that takes a template directory and spits out a complete, ready-to-publish static website suitable for serving with your favorite web server. This post details about how easy it is to setup Jekyll on your local environment and convert an existing php based prototype or start writing a new html prototype based off the Jekyll tool.
INSTALLATION
Setting up Jekyll is easy and straightforward if you have Ruby and RubyGems installed on a Linux, Unix or Mac OS X machine. For details on installing Jekyll on a windows machine, please follow this link for instructions – Jekyll windows setup.
Open up a terminal window and enter sudo gem install jekyll.
Now navigate to the folder where you want your new prototype to be created and enter jekyll new test-site
Go the test-site folder and type jekyll serve. The Jekyll server stars running, open up a browser and go to http://localhost:4000/. You will see a page that says ‘Your New Jekyll Site’. Congrats! You have setup your first Jekyll site.
PROTOTYPING WITH JEKYLL
We will now take the example of creating a static html page containing a header, footer and some content in the body.
Open up the test-site folder. Create an _includes folder inside your test-site folder. You may delete the _posts folder as we are not using Jekyll to create a blog site. Now, create four html files, header.html, footer.html, styles.html and scripts.html inside the _includes folder. Enter the html code relevant for these four components of our site- header, footer, styles (all the css includes go here) and scripts (all js includes go here). We now have all our includes ready!
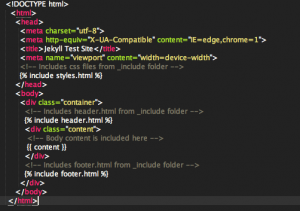
Inside _layouts folder, create another html file called home.html and its contents would be a standard html document as below (click on the image to enlarge):

We have our layout html ready which now can be included in any html file.
Inside index.html of the test-site folder, include the home.html layout at the top of the file as below:
---

layout:home

---
And then write any html that has to go inside the body of index.html here.
Restart the Jekyll server and you should be able to see the new index.html for test-site at http://localhost:4000/. Sweet!
Any changes can be now done to the _includes and _layout folders without making any change to the actual html file they are included in. To avoid starting the Jekyll server after making each edit to an html file, start the Jekyll server using jekyll serve --watch. We need not restart the server every time an edit is made. The server automatically detects the changes and refreshes the browser page with the new changes. All the compiled code goes into _site folder, whose contents will go for deployment into the production server.
We now learnt how to create a static html prototype using Jekyll and how easy it is to make changes, with the different html components modularized and residing in their own space. More details on Jekyll and its features can be found on its site –http://jekyllrb.com/
Put in a comment below if you find any issues setting up Jekyll or if you used any other html prototyping tool and how different that is from Jekyll.
