[su_note note_color=”#fafafa”]Now available in the Sitecore Marketplace[/su_note]
In part 1 I set to implement a custom field type for Sitecore that would seamlessly support both Content and Page Editor and would provide an interactive “picker” experience for selecting the value. In this part I will show you a working HTML prototoype of the picker dialog. That’s probably the largest single piece of code we will need to write. And probably the most straightforward one too.
A complete prototpye is available on github. A small note before we dive into it. Whenever I play with standalone HTML/JS I use node’s Connect as my local web server so that’s why server.js in the root. I am yet to see something more succinct than this.
Let’s begin.
Preview Thumbnail
There’s nothing special we need to do for the thumbnails. With the ID of the video as the field’s raw value all we need to do is:
<img src="//i.ytimg.com/vi/{id}/{quality}default.jpg"></img>
where quality is either empty (for small), mq for medium and hq for large. You will later see this code in our field’s implementation.
The picker dialog has more to it.
Dialog Layout
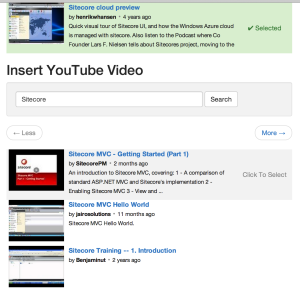
The dialog is a single page OK/Cancel experience so I put together a simple layout:
<div class="container video-main">
<div class="video-results" id="video-selected-preview">
<!-- display currently selected video here -->
</div>

<h2>Insert YouTube Video</h2>
<div class="well">
<input id="search-query" type="text" class="form-control" placeholder="Search"/>
<button id="search-button" disabled="true" class="btn btn-default">Search</button>
</div>

<ul class="pager">
<li class="previous disabled"><a href="#">← Less</a></li>
<li class="next disabled"><a href="#">More →</a></li>
</ul>

<div class="video-results" id="results">
<!-- video-results-template will render here -->
</div>

<ul class="pager">
...
</ul>
</div>

<script id="video-results-template" type="text/dust-template">
{#items}
...
{:else}
No video found. Please refine your search and try again.
{/items}
</script>
I am using Bootstrap to quickly style it (we will factor it out for the XML control), Dust.js for templating, and Fancybox for video preview..
YouTube API Driver
To abstract away YouTube Data API and to provide a nice controller abstraction I created a driver:
var Driver = function() {
};

Driver.prototype.init = function(args) {
// ...
this.view = args.view || {
// ...
}
};

Driver.prototype.render = function(response) {
// ...

this.view.render(response);
this.view.highlight(this.video);
};

Driver.prototype.select = function(id) {
this.video = id;
this.view.highlight(this.video);
};

Driver.prototype.search = function(q) {
this.query.q = q;
// ...

return this._paginate(1);
};

Driver.prototype.next = function() {
return this._paginate(1);
};

Driver.prototype.prev = function() {
return this._paginate(-1);
};

// pass -1 to paginate back or +1 to paginate forward.
Driver.prototype._paginate = function(direction) {
var self = this;
$.ajax({
url: 'https://www.googleapis.com/youtube/v3/search',
type: 'GET',
// ...
success: function(response, status, xhr) {
self.render(response);
}
});

return false;
};
If you made it this far you may wonder why I decided to interact with the YouTube HTTP ednpoints directly instead of using the JavaScript abstraction layer. Here’s my unanswered (so far) question on Stackoverflow that will clarify why.
View
The view is basically two functions – one to render() the results and another one to highlight() user selection. I implemented a view using JS templating so we will also need a template markup. An object encapsulates the view interface so that I could also use it to render the current value (not that I couldn’t do it with pure functions but with driver as an object it just made more sense):
var DustView = function(args) {
// ...
};

DustView.prototype.render = function(response) {
var self = this;
dust.render(this.template, response, function(err, out) {
if (err) {
self.placeholder.html('Internal error. Please try again');
response = null;

} else {
self.placeholder.html(out);
}

self.activatePreview(response);
self.activateSelection(response);
self.activatePagination(response);
});

return false;
};

DustView.prototype.highlight = function(videoId) {
$('.selected').removeClass('selected');

if (videoId) {
$('.' + videoId).addClass('selected');
$('.' + videoId).find('.video-selected-mark').addClass('selected');
}
};

// ...
And the illustrative bits of the template:
{#items}
<div class="video-result {id.videoId}" data-id="{id.videoId}">
...
</div>
{:else}
No video found. Please refine your search and try again.
{/items}
When we will be converting this prototype into an XML control I will explain why I put the ID of the video into the class and into the data- attribute and not into the element’s id attribute directly.
The Last Piece
The last piece is the main.js to glue it all together:
(function($) {
$(document).ready(function() {
var driver = BrainJocks.YouTubeSearch.Driver;

driver.init({
key: '<Your Google API Key>',
view: new BrainJocks.YouTubeSearch.DustView({
template: 'video-results-template',
placeholder: $('#results')
})
});

$('#search-button').click(function(e) {
driver.search($('#search-query').val());
});

$('.pager > .next').click(function(e) {
driver.next();
});

$('.pager > .previous').click(function(e) {
driver.prev();
});

// ...

dust.compileFn($('#video-results-template').html(), 'video-results-template');

$('#search-button').attr('disabled', false);

// ...
});
})(jQuery);
That’s basically it:
Clone into it on github or just read the source online if you want to follow along. In Part 3 we will get back to Sitecore and implement all the little pieces that make Sitecore aware of our field’s existance and also make our field a good Sitecore citizen.


