Introduction
This article addresses the DFDL message modelling feature in IBM® WebSphere® Message Broker (also known as IBM® Integration Bus). It contains step by step instructions for creating a DFDL schema for a flat file using WMB tool-kit.
Data Format Description Language, commonly known as DFDL is an open standard based modelling language which is using in Websphere message broker V8 onwards for modelling data. DFDL is based on the XML schema and is the recommended way of modelling over the proprietary MRM domain. DFDL is using a subset of the constructs in XML schema to modell the non-XML messages.
DFDL can be used to describe legacy data files, record-oriented text or scientific and numeric computations. DFDL is more flexible than the MRM modelling and provides better performance.
Objective
To Parse a Tab separated flat file using DFDL in Websphere Message Broker v8. This flat file contains a repeating structure having optional records as well.
Input data:

A ‘Show all characters’ view from notepad++ as below.

Note : The last record is not terminated with a new line.
Below are the steps to create a DFDL model for the above test data.
1. Create a library named EmployeeDFDLLib, right click-on it, and select New => Message Model:

2. Select Record-oriented text and click Next:


3. Select Option-2. Create an empty DFDL schema (we can choose option 1 as well. Here we are using the second option).

4. Create folder named ‘TabSeperated’ and schema named ‘TabSeperatedSchema’ and Click Finish.

5. Here is the empty model schema we have created:

Now we are going to define two complex types here (For ‘address’ and ‘name’).
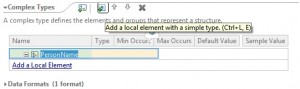
a). Click the ‘Add a complex Type to the Schema’ option on Schema Tab.
b). And give the complex type name as ‘PersonName
c). Add two local elements to this complex type as ‘FirstName’ and ‘LastName’.
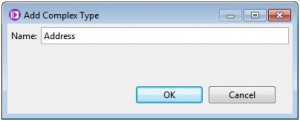
d). Similarly create another complex type as ‘Address’ and add local elements to it.


Now we are going to create our message. Here we should have a root element, followed by a repeating message structure of Header (Name) and Body (Address).
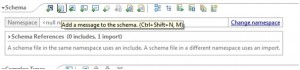
i). Create a Message named ‘Employee’. Use the ‘Add a message to the schema’ option as below:
ii). Add a local element to the message Employee and name it as ‘EmployeeDetails’.
iii). Change ‘EmployeeDetails’ type from String to Anonymous.
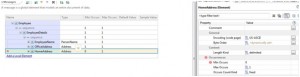
iv). Add 3 local elements to EmployeeDetails.
v). Change the Type of element to the comlextTypes we already created.
vi). HomeAddress is Optional. Change the Minimum Occurrence to ‘0’. You may get an error. Change the ‘Occurs Count Kind’ property to ‘implicit’ and save.
vii). It is been noted that the Separator ‘,’ is been applied for all sequence by default if we have not defined any separator.
To reset this, please follow the steps
Click the ‘Show all sections’ on top.
Go to the data format and click on the ‘<default format>’. Remove the separator and save.
viii). Now define a separator for the message sequences. Define separator ‘CRLF’ for the EmployeeDetails sequence.
ix). Change the Employeedetails Maximum occurrence to ‘unbounded’ (Repeating structure).
x). Click on the sequence of EmployeeDetails. Update the separator policy from ‘Suppressed’ to ‘SuppressedAtEndLax’ and save(SuppressedAtEndLax means there is no clash with delimiters from the containing structure –Refer here).
xi). Define the initiator ‘H%HT’ (H followed by Horizontal TAB) for EmployeeName
xii). Similarly define the initiator for other two elements as below:
xii). Define the element sequence as ‘%HT’ (Each element separated by TAB).
xiv). We do not have a ‘CRLF’ as last record terminator. Hence update the property to avoid parser exceptions.
‘Document Final terminator can be missing’ property can be found on Data Formats<default format> properties. Update this to ‘yes’.


Now the DFDL is ready for testing. Websphere Message Broker V 8 provides a feature to test our message model using DFDL before it can actually be using in any message flow.
Click on the ‘Test Parse Model’ on top and it will show the wizard.
Select the input file and click OK. It will prompt to switch to DFDL Test perspective. Click Yes.
It will parse successfully and produce the output as below.
(You can check the DFDL Trace to see the details of message parsing).


If we have to produce the Tab separated message as output (serialise) from an XML, we can use the ‘Test Serialize Model’ option to test it. For this we should have an XML sample message generated as per the DFDL Schema.
Below is the input sample XML to be serialized as a Tab separated flat text.
Click on the ‘Test Serialize Model’ and provide the input XML in the wizard.
It will produce the Tab Separated output as below.


Appendix
DFDL can be used in message flows to parse (input) or serialise (Output) message.
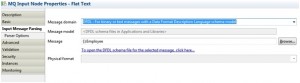
- For input parsing, you can set the parser option as DFDL and select the message (Employee) using the browse option.

- For output serialising, use the ESQL to set the DFDL domain and set the message type as below:
CREATE LASTCHILD OF OutputRoot DOMAIN ‘DFDL’ NAME ‘DFDL’;
SET OutputRoot.Properties.MessageType= ‘{}:Employee’; — Employee is the message name.
Resources & References
Websphere Message Broker resources
What’s next?
If you’re still using WebSphere Message Broker, it might be time to think about upgrading your ESB. Whether you’re using an unsupported version of WMB or want the features of the newest IIB release, use our best practices compiled over the course of countless migrations to ease the process and maximize your IBM investment.
