Hyperion Planning comes pre-packaged with two Utilities that are quite beneficial when the following situations arise:
- You are creating security for Planning objects in a new application
- Large quantities of security changes need to be made to an existing application
- You need a quick way to view security settings for all objects in your Planning application
- You need a backup for current Planning security settings to Dimensions/Members, WebForms, Business Rules & Task Lists
- You need to migrate Planning security from one environment to another
The dialogue and screen shots that follow will step through the location of the Export & Import Security utilities and executing them.
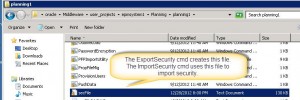
The ExportSecurity and ImportSecurity utilities are typically located on the planning server in oracle\Middleware\user_projects\epmsystem1\Planning\planning1 and are executed via the command prompt
Snapshot of the Location of the ExportSecurity, Import Security & secFile….
(Click snapshot to see a larger view)
ExportSecurity Utility
The ExportSecurity command will export security for the entire Application or for a specific user or group based on the parameters passed at the command prompt.
The utility will create a file named secFile.txt in the same directory as the ExportSecurity utility.
To execute the ExportSecurity command, open a command prompt and navigate to the directory containing the ExportSecurity command.
The utility has several parameters which can be passed to the utility retrieve the desired information.
/A=ApplicationName
/U=username
/S=User or Group (must match Hyperion Shared Services)
The following examples use an application named HypPlan2, the admin username and a group or user named GroupX or UserX respectively.
The first bullet is the syntax to enter at the command line and the second bullet is the result the secFile will hold. Upon execution of the utility you will be prompted to enter the password matching the user you passed. In our example you would enter the admin password.
- For entire Application
- ExportSecurity /A=HypPlan2,/U=admin
- secFile.txt will be for the entire application
- For a user
- ExportSecurity /A=HypPlan2,/U=admin,/S=UserX
- secFile.txt will be for UserX security only
- For a group
- ExportSecurity /A=HypPlan2,/U=admin,/S=GroupX (Group in Hyperion Shared Services)
- secFile.txt will be for the GroupX group only
The beauty of using the ExportSecurity utility is the resulting secFile will contain all the information requested with the required syntax in place. Thus, you can simply make modifications to the file and use it with the ImportSecurity utility to update or migrate your security.
ImportSecurity Utility
The ImportSecurity command will import the security contained in the secFile.txt. Using the command prompt, navigate to the directory containing the ImportSecurity utility.
The ImportSecurity utility has its own set of parameters which can be viewed by simply executing the ImportSecurity without any parameters at the command line.
The syntax used to execute the utility is
ImportSecurity.cmd “Application,username,SL_COMMA,,,”
You will be prompted for the Password matching the username you passed. The utility will run and import the secFile.txt. A message will appear notifying you if the import failed or was successful.
NOTE: The secFile.txt must be the name of the import file and it must be in the same directory as the ImportSecurity utility.
Example of syntax entered at the Command Prompt:
![]() (Click snapshot to see a larger view)
(Click snapshot to see a larger view)
Tip: Use Comma as the Delimiter. Although the command allows for other delimiters, I found it would not work when importing the file back in. Also, keep in mind, the import does not delete existing security; it only modifies or adds to it. To delete existing security, use SL_CLEARALL in the command line.
NOTE: The number of commas included in the syntax is critical. I found that we needed what appeared to be an extra comma at the end of the command otherwise the utility would not run. In the above screen shot there are a total of 5 commas used to separate the various parameters. If you don’t use a particular parameter you simply leave that parameter blank.
Example Format for Import File:
 (Click snapshot to see a larger view)
My preference is to use excel to build the columns for the text file, which made the process very speedy. I then copied my concatenated column into a text file and uploaded all the security. The client I was working with had a very detailed security model. These two utilities made life much easier when building out the security for the project.


Thanks on your marvelous posting! I certainly enjoyed reading it,
you happen to be a great author.I will be sure
to bookmark your blog and will eventually come back from now
on. I want to encourage continue your great
job, have a nice day!
my site: Google
I just used this utility to migrate a very long list of detailed security settings for 20+ user groups from a 9.3 Planning app directly to 11.1.2.3.500. I couldn’t believe it was compatible but it worked! Thanks for documenting this! It saved me hours of manual work.
Eric
Thank you for this very well written posts! Much appreciated!
DS
As new Hyperion users, this will assist us greatly! Thank you!
awesome, simple steps to migrate/back up of security.
Excellent Post..every thing is explained very clearly in such a simple way!!