The basic steps in data analysis might be simplified into (1) Identifying data, (2) Selecting an analysis and summarization method and (3) Presenting the results. Over the next couple of weeks I will look at using IBM SPSS version 20 to accomplish these tasks.
Today, I want to focus on loading a data set into SPSS and preparing it for analysis.
Identifying Data
When identifying or creating a data file, it is important to ensure that the structure of your data allows for all the analyses you need. Examples of common errors include: failure to include key variables; requesting yes-no answers to complex; including many variables without a clear dependent variable to identify the objective; or having a clear dependent variable but no independent variables that are designed to influence it.
SPSS gives us plenty of options to load data. We can:
- Open a previously saved SPSS Statistics (.sav) formatted data file,
- Read a spreadsheet, database, or text data file, or…
- Enter data directly in the SPSS Data Editor.
Upon starting IBM SPSS Statistics version 20, a wizard screen (that can be turned off) asks “What would you like to do?” is displayed:
 By default, “Open an existing data source” is selected and any recent files you have worked with are listed.
Opening a data file makes it your “active dataset” (if you already have one or more open data files, they will remain open and available and clicking anywhere in the Data Editor window for an open data file will make it the active dataset).
For this exercise, I’ll click “Type in data” and then OK. The wizard screen disappears and I find myself looking at the Statistics “Viewer” and “Data Editor”.
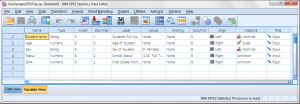
The SPSS data viewer provides the ability to select between 2 views – a data view and a variable view. Since I’m entering data here, I go to the variable view first. This view looks like a simple spreadsheet. Starting in row 1 and column 1, I can start assigning names and attributes for the variables that I will want to exist in my data file.
Data Variables
Each variable you setup in the data editor will include the following attributes (and most provide a convenient popup to help you enter specifics for attribute):
A name, type, width, decimals, label, values, missing, columns, align, measure and a role.
Name Mostly, names must begin with a letter and be unique in your data file.
Type If you’re a programmer type, then “type” will make sense. It defines a variable as numeric, comma, dot, scientific notation, date, dollar, custom (currency), and string or restricted.
Width and Decimals Simply sets the number of numeric places in your variables.
Label Here is where you can add a caption or note to your variable.
Values You can use “value labels” for your variables (such as a 1=female and 2=male) for clarity in interpretation of output as SPSS can display these labels in your data file and in Output following your analyses.
Missing Its purpose of the “missing column” is to designate missing values in your data.
Columns This allows you to set the amount of room to be used for your data columns – to see the entire variable name or to truncate the name and get more variables within a single view.
Align With “Align” you can select left, right or center to for each variables display within a cell.
Measure With measure, SPSS provides a drop down selector where you can select Scale, Ordinal or Nominal.
Role Allows you to indicate either Input, Target, Both, None, Partition or Split.
After we have set up our variables we can enter the actual data in two different ways: by variable or by case or subject.
By Variable (vertically)
To enter your data by variable, you can just click on the first empty cell under the first variable and type in your data, press the enter key and continue typing. When you finish one variable, scroll up to the top of the file and repeat!
By Case or Subject (Horizontally)
To enter your data by case or subject, you can just click on the first empty cell for the first subject under the first variable, type your data, press the TAB key, type your data, press the TAB key, and so forth. When you finish one subject (or case), scroll back to the first column and enter data for the next subject.
Saving your Data
Once you have entered your data it is a good idea to save the data file before beginning any operation on that data. (In fact, the documentation recommends that you save your data file early and often).
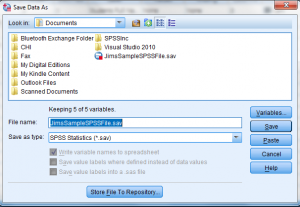
The easiest way to do this is simply by clicking “File” and then “Save As” from the statistics data editor menu:
The default format for saving a data file is “.sav” (SPSS Statistics formatted), but there are a variety of other options available to you as well (by clicking on the “Save as type” drop-down selector), including comma or tab delimited, Excel, dbase and SAS.
An interesting feature to note is the ability to save only selected variables from the Data Editor to the saved file (click on the “Variables…” button). The “Save” and “Paste” buttons might confuse, as they both seem to do the same thing – save the file or overwrite the file if it is already saved.
Finally, the button “Store File To Repository…” can be used to save your data file to a (previously configured) collaboration and deployment repository.
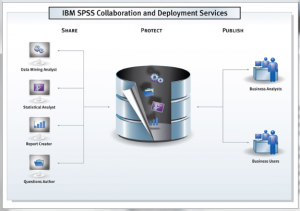
SPSS Collaboration and Deployment Services (CDS)
 IBM SPSS Collaboration and Deployment Services allow analysts and business users to work together and share critical business information more easily. It protects the business by storing analytical assets (i.e. my saved data file) in one place, and automatically tracking changes made to them. Analysts can easily publish information, allowing business users easy access to it when they need it.
(More about CDS in my next blog…)
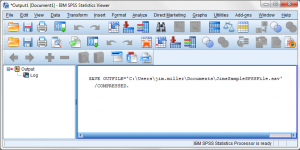
Now that I have saved my data file, I see that the IBM SPSS statistics viewer is ready to process your file -as the log displays the saved file “transaction” including the file name and saved location. It also indicates that the “IBM SPSS Statistics Processor is ready” (in the Statistics Viewer status bar).
Next time I will move on to analyzing and summarizing my data… Can’t wait!
“No doubt they’ll sing in tune after the revolution…” – Viktor Komarovsky (Dr. Zhivago)


