
Optimizely, a leading provider of digital experience optimization solutions has introduced an exciting new Spire CMS version that includes enhanced features and improvements. Optimizely has introduced a fresh set of Typescript handlers (as opposed to the previous C# implementation in Classic CMS) for extending the front end with Spire.
Within Spire, handler chains play a pivotal role in managing various user actions performed on the storefront. These handlers take charge of tasks such as data loading and adding items to the cart. Behind the scenes, handlers may interact with APIs and dispatch Redux actions to facilitate seamless functionality.
Spire allows overriding the handler by copying the handler file from the base path into the “Overrides” folder with the same path, and this works fine. But this Is not the recommended way to override the handler.
When it comes to overriding a core handler file in Blueprint, there are several disadvantages and potential issues that you should consider:
1. Upgradability
Overriding a complete file means modifying the core handler file by adding it to your blueprint with the same path. This approach can make it challenging to upgrade to newer versions of the handler file. Upgrading may require additional effort to merge your custom changes with the updated code in the handler chain or file.
2. Maintenance
By overriding core files in your custom blueprint, you assume the responsibility of carefully maintaining those modifications. Updates or bug fixes released by the framework may not automatically apply to your overridden file. It becomes your task to ensure compatibility and address any conflicts that may arise.
3. Compatibility Issues:

Frameworks often rely on well-defined structures and inter-dependencies between files. Overriding a complete file can inadvertently disrupt these dependencies or introduce compatibility issues with other parts of the framework or third-party libraries. Such issues can lead to unexpected behavior or errors.
Injecting custom code directly into handlers by overriding core files in Optimizely Spire is not the recommended approach. Optimizely Spire provides a well-structured framework that promotes best practices for modifying handlers through adding, removing, or replacing them. In this blog, our main focus will be on customizing the handler or handler chain to meet specific requirements.
In Optimizely, you have the flexibility to customize the React handler chain using several different approaches. Here are the various ways you can achieve customization:
1. Injecting a method/code at the beginning of the handler chain.
2. Injecting a method/code at the end of the handler chain.
3. Injecting a method/code before the handler chain method.
4. Injecting a method/code after the handler chain method.
5. Replacing the method in the handler chain.
Things to make sure of before you start customizing the handler chain:
1. Check if you have a Handlers folder inside the “blueprint/src/” directory. Create one if not exist
2. Check if you have added the below line of code in Start.tsx, so that handlers are included In the bundle and will be available for use.
Steps to Customize the Handler
1. In order to demonstrate how to customize the handler we need to create .ts file in “blueprint/src/Handlers” folder.
i.e. blueprint/src/Handlers/LoadOrdersHandler.ts
2. Next step is to import the core handler path which we have to customize.
3. After that, add below code snippet to enable the HMR (Hot Module Replacement) for custom handlers.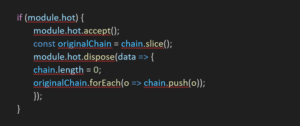
4. By adding the below code, we can confirm whether the overriding handler chain is working or not.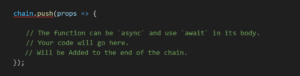
Now let’s explore the ways of customizing the handler chain by adding, removing, and replacing the handler chain methods:
1. Injecting a method/code at the very beginning of the handler chain. The code inside the “addToStartOfChain“ method will execute at the very beginning of the handler chain. 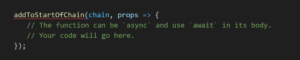
2. Injecting a method/code at the end of the handler chain. The code inside the “addToEndOfChain” method will execute after completing the execution of the core handler chain methods.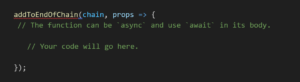
3. Injecting a method/code before the handler chain method. The code will execute just before the “RequestDataFromApi” handler chain method.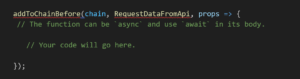
4. Injecting a method/code after the handler chain method. The code will execute just after the execution of the “RequestDataFromApi” handler chain method.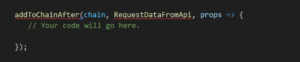
5. Replacing the method in the handler chain. With the below code, we can replace the “RequestDataFromApi” method in the core handler chain with a custom code/method.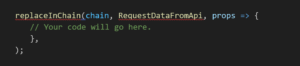
Conclusion:
By following these best practices and leveraging the features of Optimizely Spire, you can create robust and tailored applications that strike a balance between customization and compatibility, leading to a more efficient and effective development and maintenance process.
Awesome blog, very practical to use in day to day customization.