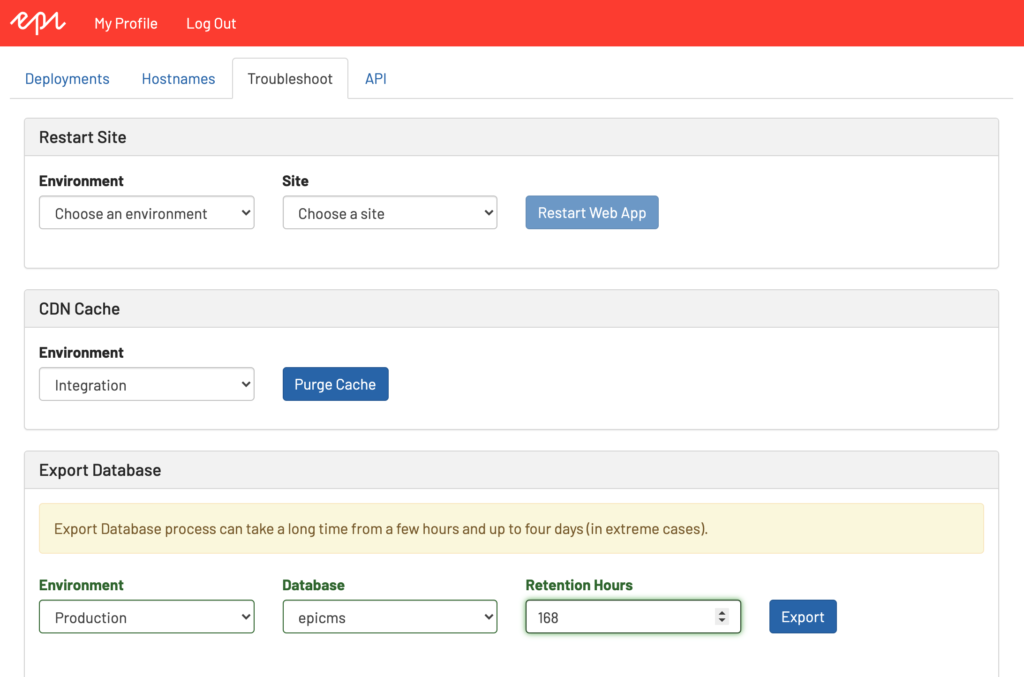
While developing new features in Episerver CMS, it can be incredibly useful to have a local copy of the production content. Here are the steps required for extracting content from Episerver’s DXP platform and restoring it into your local environment for development.
Step 1: Request a database backup from the PaaS portal
The first step in the process is the only one you can’t fully control. You need to initiate a database export from the PaaS portal. Navigate to paasportal.episerver.net, select the appropriate account, and initiate a production export from the Troubleshoot tab.

This process takes anywhere from a few minutes to a few days. I personally like to initiate this after a successful production deployment, or after we do large content manipulation efforts. Once it’s complete, you’ll see a link to download a .bacpac file in this same section.
Step 2: Import backup into your local SQL Server
Once you receive the .bacpac file, you’ll need to import it into your local development environment. I always run Episerver under IIS with SQL Server, so these instructions are tailored to that setup (as opposed to IIS Express and SQL Express). I usually start by turning off IIS, closing existing connections to my current database, and deleting it. From there, run a Data Tier import to restore the production .bacpac with the same name as your local dev setup.

Another tip here: All developers working on the same solution share a SQL Alias called “episerver” resolving to their local SQL installation. We all use a local SQL account called “episerver” which is an admin on the local SQL installation, all with the same password. From there, we usually call the database episerver.projectname. Regardless of your setup, just make sure you import the production database and configure your connection string in your web.config accordingly.
Step 3: Run SQL command to update versioning
This is a little hidden step that I think trips a lot of people up. We automate the installation of code through our devops platform of choice (e.g., Azure Devops). As part of this setup, we always introduce assembly versioning, so each new version of the application gets an automatically assigned and incrementing version number. These version numbers get stored within Epi’s database, and Epi will avoid updating ContentTypes which have a lower version than those found within the database. To correct this, set the version back to 1.0.0.0 (or whatever is in your local AssemblyInfo.cs file). Here’s the SQL script to do it (replace MySite and x.y.z.0 accordingly):
UPDATE [episerver.mysite].[dbo].[tblContentType]
SET
  ModelType = REPLACE(ModelType, 'x.y.z.0', '1.0.0.0'),
  Version = '1.0.0.0'
WHERE ModelType like '%MySite%'
Step 4: Export/Import Blobs from production
Now that you have the content, you need the Blobs to go with it. This step is fairly simple- we typically opt to store Blobs in the “For This Site” or “For All Sites” area. Login to production, navigate to the admin tab, and initiate a content export of the necessary roots. From here, log back into your local environment, and import these roots.
You can read about exporting and importing from here.
Don’t forget, because you restored the production database on your local environment, you need to login with your production credentials.
Step 5: Update your site configuration
Finally, log back into your local Episerver instance, navigate to the Admin tab, and configure your Site definition with the appropriate hostnames. If you have a wildcard hostname in production, you may not need to do this- but I recommend doing this to be thorough.
Step 6: Profit!
And that’s it! Keeping your local environment in sync with production is vital to being an effective developer on an Epi project. Hope this helps, happy coding.

