
Overview
Everyone knows that you should implement processes to backup your Salesforce data. But what about an unexpected mass change to your data? In this post, I will focus on using Chatter Feed Tracking to reverse the unexpected deletion of first names on 250,000 Salesforce leads. This post mentions some tools and skills such as Data Loader, Excel VLookup, and Data Scrubbing. I don’t go into details on how to use these tools/skills in this post. However, I do include links to Salesforce articles where you can find more information.
Background
Recently, a friend contacted me in a panic, they said: “Scott, We just lost the first name on ALL of our leads in Salesforce, do you know how I can get them back?!” Understandably, this is an unsettling situation and would cause me to panic as well. I calmed them down and found that a marketing automation integration caused the problem. A poorly written workflow incorrectly nullified the first name on all 250,000 leads in Salesforce. Now that we knew why it happened I had my friend turn off the problem workflow. Next, I had them check some features in Salesforce that, if enabled, would provide an easy way to restore the data.
- Data Export
- You will find this under Setup | Data Management | Data Export. Or, just use the setup quick find for “Data Export”.
- This feature allows you to schedule an export of your Salesforce data to be downloaded and stored.
- The export can be scheduled up to once per week,
- Salesforce will email you when the export is ready to download.
- Field History Tracking
- You will find this under Setup | Customize | [object] | Fields; then click the button for Field History Tracking.
- You can track changes of up to 20 fields for most standard and custom objects in Salesforce.
- You can run a report and see what changes were made to the tracked fields, by whom and when.
- NOTE: This is not retroactive, only from the point you turn it on.
Unfortunately, these features were off… Big bummer, I thought “now what?” My friend then mentioned they could see chatter posts on the affected leads that showed what the first name changed from and what it changed to. Eureka, this might be the answer! That prompted me to check Chatter Feed Tracking for the leads object. And Chatter Feed Tracking was on for the Leads object! Hooray! But this was more luck than planning… You see when the feature is activated some fields are automatically selected for tracking. The Name field happens to be one of those fields. The simple fact that my friend turned on Chatter Feed Tracking for the Lead object might be the answer to restoring the data.
Restoring The Salesforce Data
After some research, I found that when you turn on Chatter Feed Tracking the changes to the fields that are tracked are stored in the FeedTrackedChange object. However, to my chagrin, you cannot access this object through the Data Loader (or similar tool). You can access this object through the API but, since I am not a developer, I did not investigate this option any further.
After more research, I found the FeedTrackedChange object is included in a Data Export. This was good news because we could use this file to restore the data. This is how I did it.
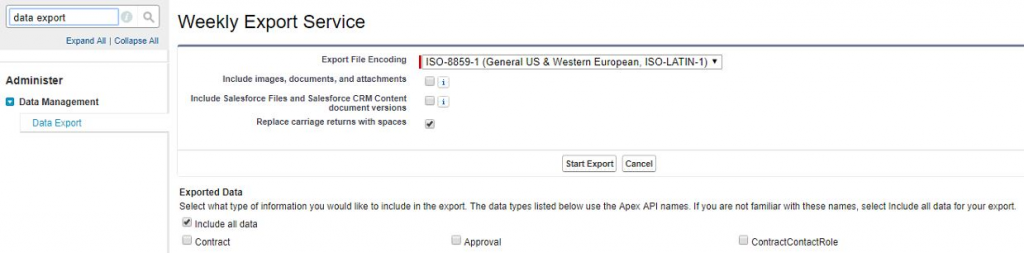
- I requested an immediate Data Export. Depending on the size of your Salesforce database this may take a while. In our situation, we had to wait until the next day for the export to be available. I selected the “All Data” option since I am only interested in the object FeedTrackedChange.
- You will receive an email notification when the export is ready. Then, log in to Salesforce and download the compressed file to your computer.
- Extract the compressed file to a location of your choosing.
- Within the extracted files, find the FeedTrackedChange.csv, open it and save a copy of it. I save a copy of the file in case I mess something up when scrubbing the file. Then, I can always go back to the original if necessary.


- Open your copy of the data export file. Sort the rows by FieldName. Then, find all the rows that do not reference the first name and delete them.

- Next, you will need to use the Data Loader to export the object; “LeadFeed”.You will need to select the checkbox “Show all Salesforce objects” to see this object.
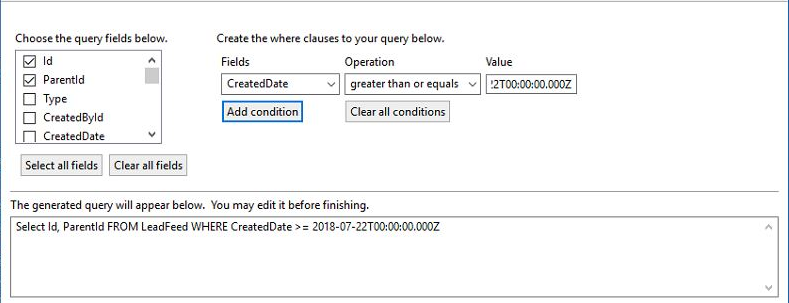
- The two fields you need in this export are ID and PARENTID, but you can select all fields if desired.
- You will save yourself some time if you can filter this export to the date range of the data issue. If you filter by a date, you will have to enter it in date, time, timezone offset format; YYYY-MM-DDThh:mm:ssZ
- for example, 2018-07-22T00:00:00.000Z
- I created a new column and used the Excel VLookup function to lookup the FeedItemId in the FeedTrackedChange.csv and match to the ID in the LeadFeed export, returning the PARENTID to my new column.
- Then I used Data Loader to perform an update to the Lead object; mapping the PARENTID to the ID and the Old Value mapped to the First Name.
- NOTE: In our case, the data problem also impacted the contact object as well. But this was not a problem because I just processed the same file twice. First, an update to the leads, knowing I would receive errors involving contacts. Then, to the contacts, using only the errors from the first update.
Summary
With unexpected Salesforce data updates, check to see if you have data exports or field history tracking on. If not, you may be able to restore data from a Data Export with the FeedTrackedChange.csv. For this to work, you must have Chatter Feed Tracking on with the problem field tracked prior to your data problem.
Finally, to safeguard your data and make your life easier in the future, be sure to turn on these features now:
- Weekly Data Export
- This is simple to do under Setup | Data Management | Data Export. Or, just use the setup quick find for “Data Export”.
- Schedule a weekly export of your Salesforce data, download the export, and save it with your other data backups.
- Field History Tracking
- Turn Field History Tracking on for your most critical fields on each object. Remember, you are limited to 20 tracked fields per object so you may need to consult cross-functional users to come up with your list of critical fields.
And of course, triple check any integration workflows, in a sandbox, before activating in production.
Cheers!