

A User interface test involves interacting with multiple apps and verifying that the app behaves fine when the flow passes through other apps or through the System UI. An excellent example of this would be the Android messaging app where the user can enter the message which then launches the contact picker so that the users can select the recipients to send the message and then returns to the app to submit the message.
This blog covers how to write UI tests using UI automator testing framework which is provided by Android Testing Support Library. The UI Automator API interacts with the visible elements of the device irrespective of any activity on focus. We can test all the UI components by using the convenient descriptors such as the text displayed in that component. UI automator runs tests on devices using Android 4.3 (API level 18) or higher.
The UI Automator testing framework is an instrumentation-based API which works with AndroidJunitRunner test runner.
Setting up UI Automator:
Before writing tests with UI automator we have to configure our test source code and project dependencies.
A dependency reference to the UI automator library has to be set in the build.gradle file of our Android app module
dependencies {
…
androidTestCompile ‘com.android.support.test.uiautomator:uiautomator-v18:2.1.1’
}
Optimizing UI automator testing involves inspecting the target app’ UI components and ensuring if they are accessible.

Inspecting UI on a device:

The first step would be inspecting the UI components visible on the device. We can check the components which have visible labels, content description values or both.
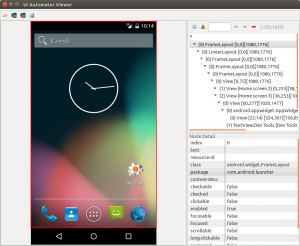
To do this, a tool called UI automator viewer is used. This tool provides a visual interface and inspects the properties of UI components that are visible on the foreground of device. Using the data given by the UI automator viewer tool we can create fine grained tests with UI automator.
Steps to use UI automator viewer tool:
- Launch the target app on device.
- Connect the device to the development machine
- Open a terminal window and navigate to <android-sdk>/tools/ directory.
- Use the below command to run the tool.
$ uiautomatorviewer

Steps to view the UI properties of application:

- Click Device Screenshot Button in uiautomator viewer interface.
- Mouse hover the snapshot in the left panel which shows the list of UI components identified by UIautomatorviewer tool.
- To see the UI components which cannot be accessed by UI automator click on Toggle NAF nodes button however only limited information may be available for these components.
Ensuring whether the activity is accessible:
The UI automator test framework works better on android apps. There is no need to implement accessibility support when UI elements of type view is used from SDK as these classes have already done that.
Some apps using custom UI elements won’t provide accessibility support. If the app contains instances of a subclass of view which is not from SDK, then we can add the accessibility features to these elements by doing the following steps:
- Creating a concrete class that extends ExploreByTouchHelper.
- Associating the instance of new class with a custom UI element by calling setAccessibilityDelegate().
How to create a UI Automator class:
UI automator test class should be written as a Junit 4 Test class. We have to add the @RunWith(AndroidJUnit4.class) annotation at the beginning of the test class definition. We have to implement the following programming model in UI automator test class:
- To get an UIDevice object to access the device we want to test, we have to call the getInstance() method and pass it an Instrumentation object as an argument.
- To get an UIObject object to access the UI component displayed on the test device, we have to call findObject() method.
- To Perform a user interaction on that UI component, we have to call uiObject method. If we want to perform a multi touch gesture we have to call performMultiPointerGesture(). If we want to edit a text field we have to call setText() method.
- We can also repeatedly call getInstance() and findObject() repeatedly in order to test complex interactions which involves multiple UI components or multiple user actions.
- We have to check if the UI reflects the expected behavior after peforming the user interations.
Running UI Automator Tests on Emulator:

We can run the UI Automator tests from Android Studio by specifying the AndroidJUnitRunner as a default instrumentation in our project.
This is a good article. Does it integrate with any test management tools?
Thank you Swapnil. No it doesnt integrate with any test management tools.
Hi Gayathri Venkat,
UIAutomationViewer displays Target screen but not displaying element information.
How to debug this ?