The regulatory landscape for asset managers is shifting beneath our feet. It’s no longer just about filing forms; it’s about data granularity, frequency, and the speed at which you can deliver it. As we move into 2026, the Securities and Exchange Commission (SEC) has made its intentions clear: they want more data, they want it faster, and they want it to be more transparent than ever before.
For financial services executives and compliance professionals, this isn’t just a compliance headache—it’s a data infrastructure challenge. The days of manual spreadsheets and last-minute scrambles are over. The new requirements demand a level of agility and precision that legacy systems simply cannot support. If you’re still relying on manual processes to meet these evolving standards, you’re not just risking non-compliance; you’re risking your firm’s operational resilience.
The Shifting Landscape: More Data, More Often
The theme for 2026 is “more.” More frequent filings, more detailed disclosures, and more scrutiny. The SEC’s push for modernization is driven by a desire to better monitor systemic risk and protect investors, but for asset managers, it translates to a significant operational burden.
Take Form N-PORT, for example. What was once a quarterly obligation with a 60-day lag is transitioning to a monthly filing requirement due within 30 days of month-end. This tripling of filing frequency doesn’t just mean three times the work; it means your data governance and reporting engines must be “always-on,” capable of aggregating and validating portfolio data on a continuous cycle.
The “Big Three” for 2026: Form PF, 13F, and N-PORT
While there are numerous reports to manage, three stand out as critical focus areas for 2026: Form PF, Form 13F, and Form N-PORT. Each has undergone significant changes or is subject to new scrutiny that demands your attention.
Form PF: The Private Fund Data Deep Dive
The amendments to Form PF, adopted in February 2024, represent a sea change for private fund advisers. With a compliance date of October 1, 2026, these changes require more granular reporting on fund structures, exposures, and performance. Large hedge fund advisers must now report within 60 days of quarter-end, and the scope of data required—from detailed asset class breakdowns to counterparty exposures—has expanded significantly. This isn’t just another new report. It’s a comprehensive audit of your fund’s risk profile, delivered quarterly.
Form 13F: The Institutional Standard
For institutional investment managers exercising discretion over $100 million or more in 13(f) securities, Form 13F remains a cornerstone of transparency. Filed quarterly within 45 days of quarter-end, this report now requires the companion filing of Form N-PX to disclose proxy votes on executive compensation. This linkage between holdings and voting records adds a new layer of complexity, requiring firms to seamlessly integrate data from their portfolio management and proxy voting systems.
Form N-PORT: The Monthly Sprint
A shift to monthly N-PORT filings is a game-changer for registered investment companies. The requirement to file within 30 days of month-end means that your month-end close process must be tighter than ever. Any delays in data reconciliation or validation will eat directly into your filing window, leaving little margin for error.
The Operational Burden: Hidden Costs of Manual Processes
It’s easy to underestimate the time and effort required to produce these reports. A “simple” quarterly update can easily consume a week or more of a compliance officer’s time when you factor in data gathering, reconciliation, and review.
For a large hedge fund adviser, we at Perficient have seen a full Form PF filing taking two weeks or more of dedicated effort from multiple teams. When you multiply this across all your reporting obligations, the cost of manual processing becomes staggering. And that’s before you consider the opportunity cost—time your team spends wrangling data is time they aren’t spending on strategic initiatives or risk management.
The Solution: Automation and Cloud Migration
The only viable path forward is automation. To meet the demands of 2026, asset managers must treat regulatory reporting as a data engineering problem, not just a compliance task. This means moving away from siloed spreadsheets and towards a centralized, cloud-native data platform.
By migrating your data infrastructure to the cloud, you gain the scalability and flexibility needed to handle large datasets and complex calculations. Automated data pipelines can ingest, validate, and format your data in real-time, reducing the “production time” from weeks to hours. This isn’t just about efficiency; it’s about accuracy and peace of mind. When your data is governed and your processes are automated, you can file with confidence, knowing that your numbers are right.
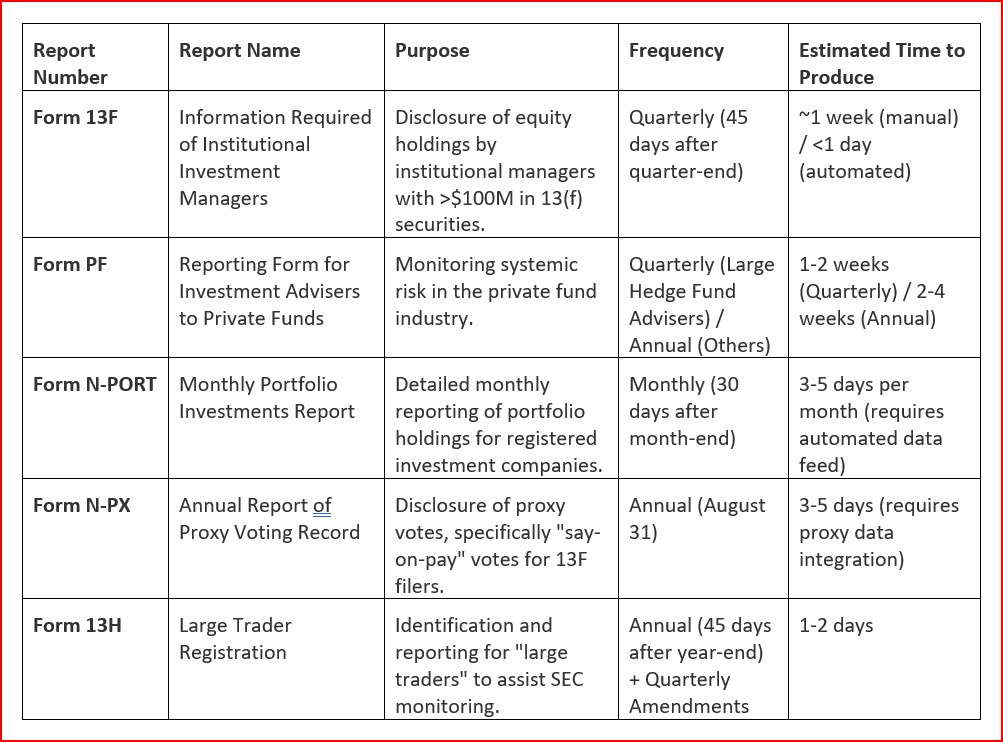
Key Regulatory Reports at a Glance
To help you navigate the 2026 reporting calendar, we’ve compiled a summary of the key reports, their purpose, and what it takes to get them across the finish line.
Your Next Move
If your firm would like assistance designing or adopting regulatory reporting processes or migrating your data infrastructure to the cloud with a consulting partner that has deep industry expertise – reach out to us here.