Why
During Android mobile testing, we will think about various tools to implement UI automation. Here we talk about Espresso, but why Espresso? The basic thinking here, we know IDE-Android studio is most popular which mobile developer is using. And Espresso is a UI test framework within Android studio. And google released the Espresso framework in Oct. 2013. Since its 2.0 release Espresso is part of the Android Support Repository. This tool allows us to create automated UI tests for our Android app. Espresso tests run on actual device or emulator (they are instrumentation based tests and could support different pixels devices) and behave as if an actual user is using the app.
How
1. Setup Espresso UI automation in Android Studio:
Let’s change to the Project perspective in the Project Window. This will show us a full view of everything contained in the project. The default setting (the Android perspective) hides certain folders:
Make sure we have an app/src/androidTest/java folder. This is the default location for instrumentation tests.
We’ll also need to make sure we have the Android Support Repository version 15+ installed.
It’s recommended to turn off system animations on the device or emulator we will be using. Since Espresso is a UI testing framework, system animations can introduce flakiness in our tests. Under Settings => Developer options disable the following 3 settings and restart the device:
Finally, we need to pull in the Espresso dependencies and set up the test runner in our app build.gradle:
2. One basic Espresso Automation Script:basic Espresso Automation Script:
- Espresso– This is the entry point. Mostly of the time we’ll be using onView(…) to specify us want to interact with a view.
- ViewMatchers– This is how we find views. ViewMatchers contains a collection of hamcrest matchers that allow us to find specific views in our view hierarchy. Above, we’ve used withId(R.id.etInput) to specify we are looking for an EditText with id = R.id.etInput.
- ViewActions– This is how we interact with views. Above we’ve used the typeText(…) method to type Hello into our EditText.
- ViewAssertions–Tests assert that certain conditions are satisfied during code execution. We use ViewAssertions to validate specific properties of views. Most of the time we’ll be using ViewAssertions that are powered by ViewMatchers underneath.
So the standard pattern for an Espresso test is to find a view (ViewMatchers), do something to that view (ViewActions), and then validate some view properties (ViewAssertions). There’s a handy cheat sheet that’s a great reference to see what’s available in each of these classes.
3. Two run ways in Espresso Tests:
3.1 Run a single test through Android Studio:
- Right click on the test class and select Run:
- Note: If we are presented with two options as in the diagram below, make sure to select the first one (designating to use the Gradle Test Runner instead of the JUnit Test Runner). Android Studio will cache our selection for future runs.
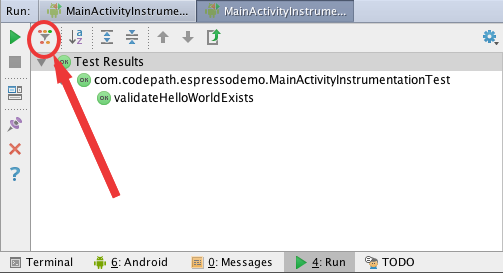
- View the results in the Console output. We may need to enable Show Passed as in the diagram below to see the full results.
3.2 Run all the tests through Gradle:
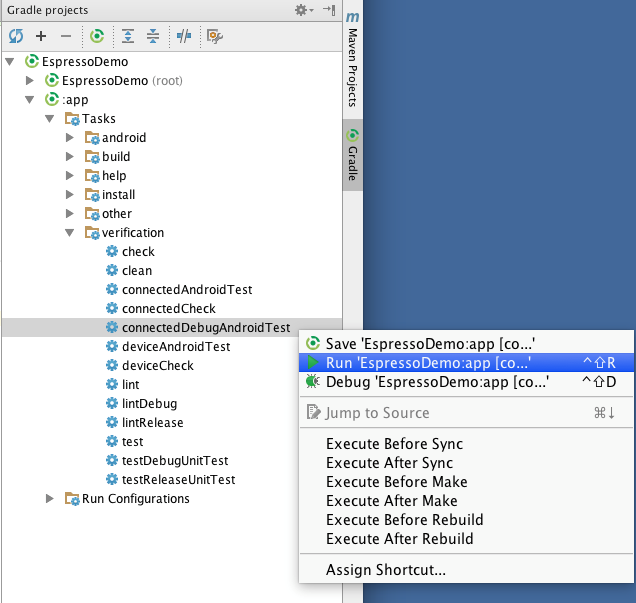
- Open the Gradle window and find connectedDebugAndroidTest under Tasks => verification.
- Right click and select Run
4. Automation report:
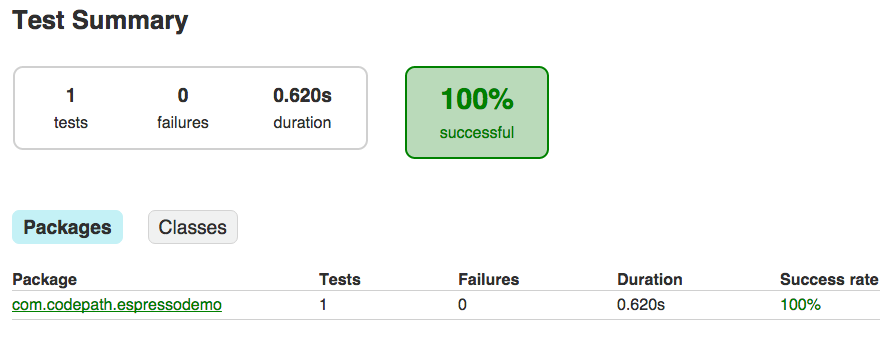
This will generate an html test result report at app/build/reports/androidTests/connected/index.html
Conclusion:
Espresso is Google’s open source automation testing framework. Espresso waits for UI events in the message queue of the current process and waits for the end of the AsyncTask to perform the next test in any test operations. This can solve most of the thread synchronization problems in the program. It is small, concise, accurate and extensible API, support recording, write test code is simple, easy to get started quickly. It makes a great choice for UI automation testing.


