This post is a follow-up to my previous post: OBIEE Collaborative Analytics Enables Decision Making & Action

Guide to Oracle Cloud: 5 Steps to Ensure a Successful Move to the Cloud
Explore key considerations, integrating the cloud with legacy applications and challenges of current cloud implementations.
In this blog, I provide detailed instructions and design aspects of implementing OBIEE Dashboard Commentary levergaing the Write Back feature. There are several steps involved, at the database, middleware and dashboard levels.

- Database Level Setup: Oracle provides the following warning on enabling Write Back capability in OBIEE: “The template mechanism takes user input and writes it directly to the database. The security of the physical database is your own responsibility. For optimum security, store write-back database tables in a unique database instance.” Consequently, a separate database instance is to be created to be used exclusively for commentary data. The database user to connect to it from OBIEE needs to have access to run DML SQL statements like Insert and Update. In my example, I am using an Oracle database, but other databases may be used.The following table needs to be created in the commentary database to store comments. After the table is created, insert a record into the table with NULL values for all the columns. Table Name: WC_COMMENTS (The table name may be any name you come up with based on your naming convention.)
Column Name Data Type Nullable? Description CREATED_DATE DATE Yes Date a comment is inserted UPDATE_DATE DATE Yes Date a comment is updated DASHBOARD_PAGE VARCHAR2(100) Yes The name of the dashboard page associated with the comment record USER_ID VARCHAR2(50) Yes The login userid of the user who entered the comment USER_NAME VARCHAR2(100) Yes The username of the user who entered the comment FEEDBACK VARCHAR2(600) Yes The comment text as entered on the dashboard COMMENT_KEY1 VARCHAR2(100) Yes The first identifier column that corresponds to a comment record COMMENT_KEY2 VARCHAR2(100) Yes The second identifier column that corresponds to a comment record COMMENT_KEY3 VARCHAR2(100) Yes The third identifier column that corresponds to a comment record COMMENT_KEY4 VARCHAR2(100) Yes The fourth identifier column that corresponds to a comment record COMMENT_KEY5 VARCHAR2(100) Yes The fifth identifier column that corresponds to a comment record - OBIEE Security Setup: In order to allow a limited group of users to be able to enter comments on the OBIEE Dashboards, a new Application Role is added. The users who are granted the ability to enter comments, will be added to this new Application Role. Follow these steps to add an application role:
- Login to Enterprise Manager as an administrative user and select Business Intelligence > coreapplication from the navigation tree menu.
- With coreapplication selected, right-click on it and select Security > Application Roles
- You are now presented with a list of application roles. To create a new application role called “Comments Entry User”, press the Create… button.
- The Create Application Role page will then be displayed. Enter a name and description for the application role, and then press OK to create it.
- Now you can create the corresponding LDAP group, and assign any required users to the group. Navigate with a browser to the WebLogic Server Administration Console, log in as an administration user, and select Security Realms >myrealm from the application menu.
- When the Settings for myrealm page is displayed, click on the Users and Groups tab, and then select the Groups sub-tab when it is displayed. Then, create the new group called “Comments Entry Users”. Finally, add any required users to this LDAP group, and then exit the WebLogic Server Admin Console.
- Now log back into Enterprise Manager and bring up the Application Roles page again. Click on the new Comments Entry User application role, and press the Edit button. To grant this new application role to its corresponding LDAP group, within the Members section press the Add button, and then select the LDAP group from the Searched Principals group. Once complete, you should see the LDAP group listed as one of the members granted this application role.
Users who need to enter comments require the privilege: “Write Back to database”. From the OBIEE Home Page, navigate to Settings->Administration->Manage Privileges. Grant the “Write Back to Database” privilege to the permitted Application Role: “Comments Entry User”.
Note that OBIEE developers who setup commentary on pages will need to be granted the “Manage Write Back” privilege in addition to the “Write Back to database” privilege mentioned above.
- OBIEE Repository Configuration: Following are the steps to configure the RPD in the Admin Tool:
- Import the WC_COMMENTS table from the write back database and disable caching on this table by unchecking the Cacheable checkbox on the table properties in the physical layer. Make sure that the CREATED_DATE and UPDATE_DATE are of type DATETIME in the RPD physical layer.
- Take note of the Connection Pool name as this will be needed for the SQL DML Statement template file setup under the OBIEE Server Configuration section of this document. Make sure there is no other connection pool in the whole RPD physical layer that has the same connection pool name.
- Users that need to do write back require the direct execute access to database. In the Admin Tool go to the Menu: Manage -> Identity.
- Double click the Application Role that allows commentary “Comments Entry User” which was created earlier in this document under OBIEE Security Setup.
- Click on Permissions.
- Under the Query Limits tab, and for the specific database that will store the comments, switch the value of “Execute Direct Database Requests” to “Allow”. Grant the privilege: “Execute Direct Database Requests”.
- Move the WC_COMMENTS table over to the logical layer under a new subject area called: “Comments”. It will have to be added to 2 folders: one for dimension and another for fact.
- Check the Writeable checkbox on the Logical Column “COMMENTS”, which allows data entry. This needs to be done on the logical folder which represents the dimension.
- Move the same table over to the Presentation layer under a new subject area called: “Comments”.
- Double click the presentation column, “COMMENT”, which will enable write back and then click on Permissions. Check the Read/Write option for the Application Role that will allow write back.
- OBIEE Server Configuration:To enable write backs, there are the following OBI Server configurations that are needed.
- Update the instanceconfig.xml file: Update the configuration file instanceconfig.xml by adding the following. Locate the ServerInstance section and add the LightWriteback element under it as follows and restart the OBIEE Services for the change to take effect.
<WebConfig>
<ServerInstance>
<LightWriteback>true</LightWriteback>
</ServerInstance>
<WebConfig> - Define SQL DML Statements in a Write Back Template File:
- Navigate to the OBIEE server directory of customMessages as setup for the analyticsRes directory. For example: ORACLE_INSTANCE/bifoundation/OracleBIPresentationServicesComponent/coreapplication_obipsn/analyticsRes/customMessages
- Create a write-back template file from the template and name it “Commentary_Writeback”. (You can create a seperate template file for each commentary writeback on different dashboard pages or include them all into one file with different WebMessages.)
- Set the name property of the WebMessage tag to a unique name:
For example: SetExecutivePLActualComment - Set the connetionPool property of the writeBack tag to the name of the connection pool from the physical layer of the RPD. (Refer to the OBIEE Repository Configuration section earlier in this document where the connection pool was created.)
- Enter the following SQL Statement in the insert xml tag. Note that the following query requires the criteria of the Comment Entry report to consist of the same columns and in the same order as described under the “Dashboard Design” section of this document.
<insert>INSERT INTO WC_COMMENTS VALUES (sysdate, sysdate, ‘Dashboard Name Goes Here’, ‘@4’, ‘@5′,’@6′,’@7′,’@8’, null, null, null)</insert>
- Enter the following SQL Statement in the update xml tag. Note that this Update statement doesn’t get used at runtime since this Commentary setup only allows inserting new comments and therefore the Insert SQL will always be triggered.
<update>UPDATE WC_COMMENTS SET UPDATE_DATE = sysdate, FEEDBACK=’@6’ WHERE DASHBOARD_PAGE = ‘Dashboard Name Goes Here’ AND COMMENT_KEY1 = ‘@7’ AND COMMENT_KEY2 = ‘@8’ AND USER_ID = ‘@4’ AND CREATED_DATE = to_date (@1, ‘DD-MON-YYYY HH:MI:SS PM’) </update>
Restart the OBI Presentation Service for the new custom message file to be active.
- Update the instanceconfig.xml file: Update the configuration file instanceconfig.xml by adding the following. Locate the ServerInstance section and add the LightWriteback element under it as follows and restart the OBIEE Services for the change to take effect.
- Dashboard Design
Two analysis are needed on the dashboard page to support comments: the first is for comments entry, called Comments Entry and the second is for listing comments, called Comments Listing.- Comments Entry Analysis:
- Make the dashboard prompts store the selection in a Presentation Variable. For example, Org Prompt into OrgPresVariable and Account Prompt into AccountPresVariable. These will be the Column Keys that go into the WC_COMMENTS table.
- Create a new analysis from the Comments subject area and pull in the following columns in the listed order:
CREATED_DATE
UPDATE_DATE
DASHBOARD_PAGE
USER_ID
USER_NAME
FEEDBACK
COMMENT_KEY1
COMMENT_KEY2Note that the column order under Criteria will have to match with what is defined in the DML SQL Statements in the template xml file. If the xml file column numbers don’t match with the column order showing in Answers under Criteria, then the SQL statements in the xml file will need to be updated to match with Answers.
- Change the formula of the following columns to match the following:
Column Formula USER_ID VALUEOF(NQ_SESSION.USER) USER_NAME VALUEOF(NQ_SESSION.DISPLAYNAME) COMMENT_KEY1 ‘@{OrgPresVariable}{-}’ COMMENT_KEY2 ‘@{AccountPresVariable}{-}’ - Hide all columns under Criteria except for the FEEDBACK column.
- Add an “is not null” filter on the FEEDBACK column.
- Click the Options button on the FEEDBACK column.
- On the Write Back tab, click on the Enable Write Back box and set the column width to 50.
- Add a “Table” view.
- In the Table view editor, click the Table View Properties.
- Click on the Write Back tab.
- Check the Enable Write Back box.
- Enter the following for Template Name and hit OK: SetExecutivePLActualComment. (Note that the Template Name here needs to match with what is specified in the SQL DML Statement template file for the name property of the WebMessage tag in the xml file.)
- You can rename the edit buttons in here for Revert, Apply and Done if necessary.
- Save this analysis and add it to the dashboard page that allows commentary.
- Comments Listing Analysis
- Create a new analysis with the following columns listed in the same order:
CREATED_DATE
USER_NAME
FEEDBACK- Sort CREATED_DATE in descending order under Criteria.
- Add the following filters:
- FEEDBACK is not null
- COMMENT_KEY1 is equal to the Presentation Variable (OrgPresVariable) that is passed from the corresponding dashboard prompt.
- COMMENT_KEY2 is equal to the Presentation Variable (AccountPresVariable) that is passed from the corresponding dashboard prompt.
- Add a narrative view with the following content into the Narrative box:
[b]@2 – @1 [/b][br/]
@3[br/][br/]- After a new comment is entered in the Comments Entry analysis, the Comments Listing analysis will need to be refreshed to reflect the newly added comment. Since the system default Refresh link shows up at the bottom of the analysis and if there are many comments, the Refresh link won’t be easily accessible, adding a custom Refresh link at the top of the analysis makes it easier to find. To add a custom Refresh link, add a Static Text view to the Comments Listing analysis and place it above the narrative view. Check the enable HTML checkbox on the Text view and enter the following script:
<a id=”idPageRefresh” class=”NQWMenuItem NQWMenuItemWIconMixin” href=”javascript:void(null)” onclick=”RefreshPage();return false;”><table class=”MenuItemTable” cellspacing=”0″ cellpadding=”0″><tbody><tr><td class=”MenuItemIconCell”><img border=”0″ src=”/analyticsRes/sk_CMG/common/refresh_ena.png” alt=”Refresh Image”> </td><td class=”MenuItemTextCell” colspan=”2″>Refresh</td></tr></tbody></table></a>
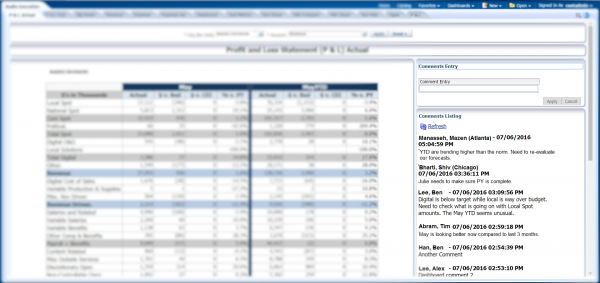
Here is a screenshot of what the final dashboard page looks like with both commentary analyses added to the right column of the page.
For more information, reference this Oracle Documentation.
- Comments Entry Analysis:
Superb explanation