
Last week Microsoft moved Skype for Business Online tenant dial plans from preview into general availability. As I have previously written about, dial plans are a great addition to those considering Cloud PBX for their organizations. Dial plans allow administrators to accommodate end-user dialing habits, such as dialing 7 digits for a local number. Dial plans not only allow customization when making outbound calls but also apply to dialing out for PSTN conferencing (the call-me-at feature). Let’s walk through creating a dial plan with a normalization rule and how it affects making calls and joining PSTN conferences.
By default, a Global dial plan exists for your tenant. This is a blank dial plan with no normalizations rules that is automatically assigned to all users. This Global plan can be used to create normalization rules that will apply to every user (and as pointed out in my previous blog, the rules here will combine with the user’s default service country rules). If you have a common dialing pattern that you want to apply to everyone, creating and adding a rule to the Global plan will accomplish this. However, if you have a large international user base, creating a one-size fits all dial plan may not fit your use cases. Instead of modifying the Global dial plan, you can create additional dial plans with normalization rules to accommodate a particular region. These are the tenant-user level plans and can be assigned to individual users. When assigning the tenant-user dial plans to a user, the normalization rules in the Global plan will no longer apply; however, the rules in the service country dial plan will always apply.
Let’s start out by creating a new dial plan that will be applied to users in a particular region to accommodate 7-digit dialing for local numbers. First, create a blank dial plan using the New-CsTenantDialPlan cmdlet using the parameters Description and SimpleName:

Next, create a variable and assign it a value using the New-CsVoiceNormalizationRule cmdlet. In the rule, we will specify the 7-digit pattern to match and how the pattern should be translated. If you need a refresher on regex patterns, check out Phone Number Normalization Rule Regular Expressions. Give the rule a name and description. Once the rule is create, add it to the dial plan using the Set-CsTenantDialPlan cmdlet:

You can now view the updated dial plan with the normalization rule by using the Get-CsTenantDialPlan cmdlet. You can also assign the dial plan to a user using the Grant-CsTenantDialPlan cmdlet:

![]()
Once the dial plan is assigned, it can take some time for it to apply. When I first created and applied the policy, it seemed to take several hours before the new rule went into effect. However, subsequent changes have either been immediate or up to 15 minutes. To see if the dial plan is working for the user, use the Get-CsEffectiveTenantDialPlan and pipe it to the Test-CsEffectiveTenantDialPlan along with the number to test. The results will show what the number will translate to and the matching normalization rule (unfortunately it does not say which dial plan the rule came from):

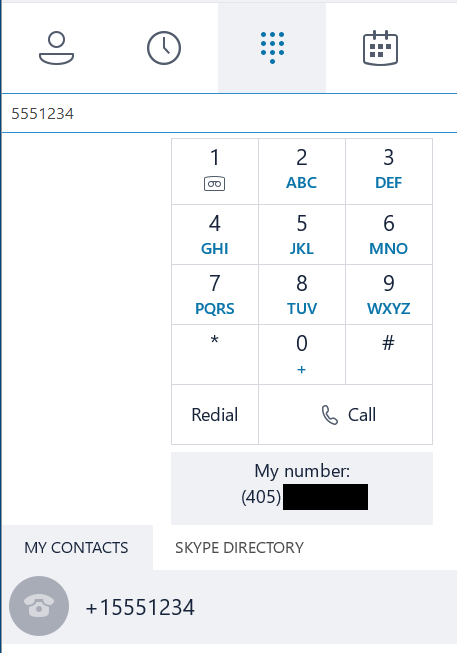
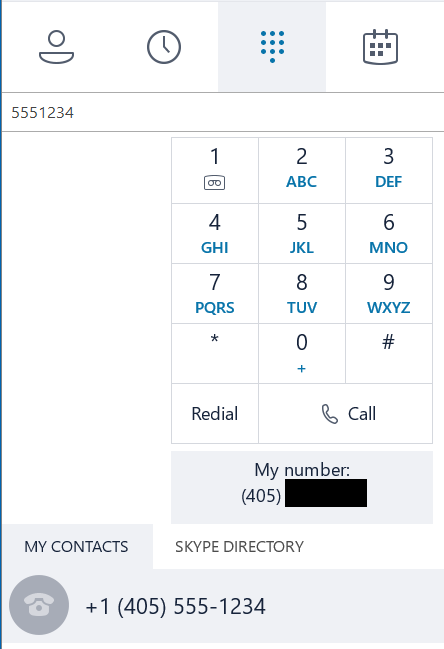
Testing can also be done via the client. If the policy was just applied or a rule modified, be sure to sign-out of the client and sign-in again to make sure the dial plan has been applied to the user. Below is a screenshot of the client behavior when dialing a 7 digit number before and after the creation of the dial plan and normalization rule:
The 7-digit normalization rule will also apply to numbers entered in the call-me-at option when joining meeting audio. Without a normalization rule, the user will need to enter their full number including country and area codes. If they do not, they following error will be displayed explaining that the full number needs to be entered:

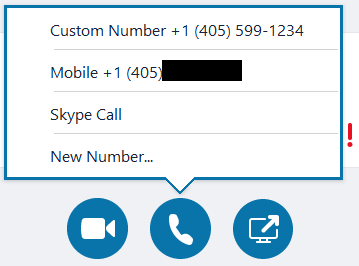
When rules are put into place, entering a matching number will enable the meeting to dial out, and you will be able to see the normalized number if you leave the meeting audio and attempt to re-join:
For additional information, check out Microsoft’s blog and support websites:
Tenant Dial Plans General Availability
Create and Manage PSTN Calling Dial Plans
Did you find this article helpful? Leave a comment below or follow me on Twitter (@JeffWBrown) for more information on Skype for Business.

Can we use dial plan to build 4 digit extension to extension dialing which is very common traditional PBX? Also do they yet support Call Queue?
Absolutely! When creating the normalization rule, the -Pattern and -Translation parameters would need to be changed to fit your scenario. For example:
$4DigitRule = New-CsVoiceNormalizationRule -Parent Global -Description “4 Digit Dialing” -Pattern ‘^(\d{4})$’ -Translation ‘+1555123$1’ -Name “4DigitDialing” -IsInternalExtension $false -InMemory
\d{4} would look for 4 digits being entered by the users, and the translation rule would require the first 7 digits (in this example, 1555123) that make up the full 11 digit phone number.