The previous article in this series covered how to define database Connection Strings for an App Service Web App within an ARM Template. This article will continue to build on the foundation of deploying a Web App using an ARM Template by exploring how to define Application Settings (aka appSettings) for an App Service Web App.
NOTE: If you need to, please refer to the “Deploy Azure Web App using ARM Template from Visual Studio 2015” article that forms the base foundation this article is building on top of.
While the foundation of this series on deploying Web Apps using an ARM Template is built using an ASP.NET Web Application, the ARM Template configuration is identical if you are deploying an app built on any other platform supported by App Service Web Apps; such as Node.js or Java.
Application Settings can easily be defined within the Azure Portal. However, this approach doesn’t scale very well when deploying to multiple environments. Using the Azure Portal to setup a Web App also is not automated. By using an ARM Template to manage the deployment of an App Service Web App, the app deployment is configured in a way that is easily repeatable without error, as well as setup for later automation from the start.
The main reason to use ARM Templates, other than to be able to automate, is to configure the deployment in a fashion that is easily repeatable, without errors. Most applications need multiple environments (Production, Staging, Testing, Development Testing, etc) so having the deployments scripted using ARM Templates allows for the deployment to multiple environments to be done much faster, easier, and more reliably.
Statically Defined Application Settings
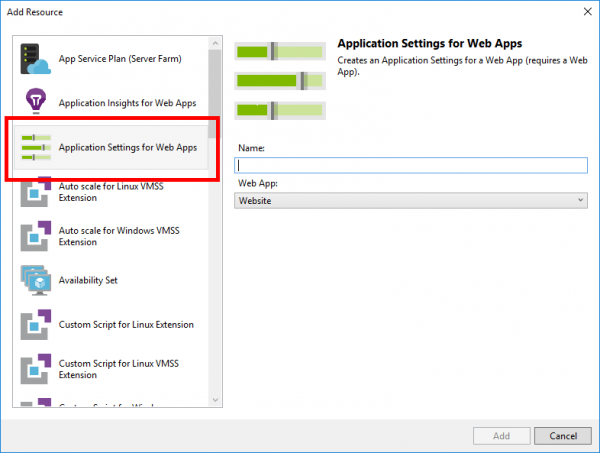
When configuring Application Settings for a Web App using an Azure Resource Group project type within Visual Studio 2015, the simplest way to add the necessary section to the ARM Template for Web App Application Settings is as follows:
- Open the ARM Template file
- Right Click on “Website” within the JSON Outline window
- Click “Add New Resource” within the context menu

- Select the “Application Settings for Web Apps” resource
- Enter a name for the resource
- Click “Add”
The ARM Template will be modified to contain an new section of JSON used to define the Application Settings to apply to the Web App once the above steps have been performed.
Here’s a screenshot of what the UI in Visual Studio and ARM Template JSON will look like:
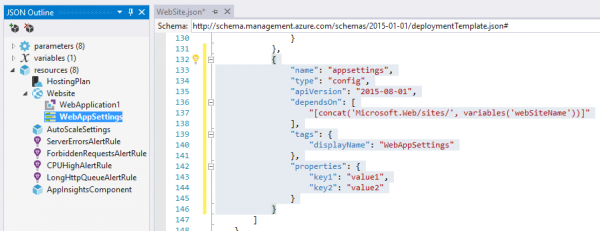
The JSON objects added to the template for Application Settings is added underneath the “resources” section of the JSON for the Web App with a “properties” section that contains Key/Value pairs to define the Application Settings. The Key/Value pairs are defined as a JSON object where the object property is the Key and the value is the Value of the Application Setting.
Here’s the JSON from an ARM Template that will add 2 Application Settings as shown in the above screenshot:
{
    "name": "appsettings",
    "type": "config",
    "apiVersion": "2015-08-01",
    "dependsOn": [
        "[concat('Microsoft.Web/sites/', variables('webSiteName'))]"
    ],
    "tags": {
        "displayName": "WebAppSettings"
    },
    "properties": {
        "key1": "value1",
        "key2": "value2"
    }
}
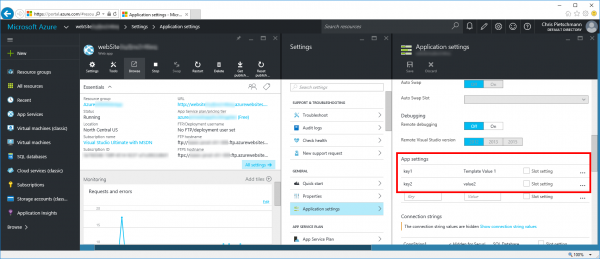
Lastly, here’s a screenshot of what these Application Settings will look like within the Azure Portal once deployed:

The following section of the article will go into detail on how to set specific Application Settings based on ARM Template Parameters.
Parameterized Application Settings

Configuring things within an ARM Template statically works fine, and can be used to help automate deployment. However, most applications will have multiple hosting environments (production, testing, development, etc.) so using an ARM Template Parameter file is necessary to have certain configurations vary for each environment. This is something that is very common with applications, and ARM Templates support this.
To Parameterize Application Settings, the following steps will need to be taken to modify the ARM Template as defined in the previous section of this article:
- Add new Parameter to ARM Template
- Set Web App Application Setting to populate based on the Parameter
- Specify the Parameter in the ARM Template Parameters file
The process for parameterizing Application Settings is very similar to what was covered in the Connection Strings article in this series. This article will cover how it related specifically to Application Settings below.
Add Parameter to ARM Template
The definitions for ARM Template Parameters are located within the “parameters” section of the JSON file. This is located towards the top of the ARM Template JSON file that’s created with a new Azure Resource Group project in Visual Studio.
To add a new Parameter to the ARM Template, a small amount of JSON needs to be added that defines the Parameter. For Application Settings there is only setting necessary in addition to the Parameter name.
Here’s a snippet that defines a single Parameter named “AppSetting_Key1_Value” that can be used to populate an Application Setting. Other parameters defined within this ARM Template have been truncated to make things easier to read.
{
  "$schema": "http://schema.management.azure.com/schemas/2015-01-01/deploymentTemplate.json#",
  "contentVersion": "1.0.0.0",
  "parameters": {
    "hostingPlanName": {...},
    "skuName": {...},
    "skuCapacity": {...},
    "_artifactsLocation": {...},
    "_artifactsLocationSasToken": {...},
    "WebApplication1PackageFolder": {...},
    "WebApplication1PackageFileName": {...},
    "WebApp_ConnString1": {...}
    "AppSetting_Key1_Value": {
      "type": "string",
      "metadata": {
        "description":  "Key1 Application Setting value for Web App"
      }
    }
  }
}
The “type” defines the data type of the Parameter. Since Application Settings are strings, this is the Type that should be used.
Although, “metadata” is not required, it allows a description to be added for parameters. This can help give further information as to what the Parameter is used for.
Populate Application Setting from ARM Template Parameter
Once an ARM Template Parameter has been defined it can then be references to set it’s value to the value of an Application Setting within the template. To set an Application Setting value based on a Parameter, an expression is added to the JSON in place of the Application Setting value. The Expression is simple and looks like a small snippet of JavaScript code that calls the “parameters” method that passes in the String name of the Parameter to use.
The Expression to put into the Application Setting value for the Parameter defined above looks as follows: [parameter(‘AppSetting_Key1_Value’)]
Here’s an example of the “Key1” Application Setting from above with the necessary expression applied to populate it from the “AppSetting_Key1_Value” Parameter for the ARM Template:
{
    "name": "appsettings",
    "type": "config",
    "apiVersion": "2015-08-01",
    "dependsOn": [
        "[concat('Microsoft.Web/sites/', variables('webSiteName'))]"
    ],
    "tags": {
        "displayName": "WebAppSettings"
    },
    "properties": {
        "key1": "[parameter('AppSetting_Key1_Value')]",
        "key2": "value2"
    }
}
Specify the Parameter Value
After the Parameter has been added to the ARM Template and it’s being used to populate an Application Setting, the final step is to define the Parameter value within the ARM Templates Parameter file used for deployments. In the Azure Resource Group project template in Visual Studio the Parameters file for the default deployment is the file that ends with “.parameters.json”.
Here’s a screenshot of the “WebSite.parameters.json” file created in the previous articles in this series with the “AppSetting_Key1_Value” Parameter set to a value:
{
    "$schema": "http://schema.management.azure.com/schemas/2015-01-01/deploymentParameters.json#",
    "contentVersion": "1.0.0.0",
    "parameters": {
      "hostingPlanName": {
        "value": "WebApp1HostingPlan"
      },
      "WebApplication1PackageFolder": {
        "value": "WebApplication1"
      },
      "WebApplication1PackageFileName": {
        "value": "package.zip"
      },
      "WebApp_ConnString1": {
        "value": "Server=myServerAddress;Database=myDataBase;Trusted_Connection=True;"
      },
      "AppSetting_Key1_Value": {
        "value":  "Template Value 1"
      }
    }
}
Web App Application Settings in the Azure Portal
Once the ARM Template is used to deploy the Azure Web App, the Application Settings will be set according to the configuration defined within the template. If the correct, desired Application Setting value in the ARM Template Parameter or as statically defined within the template shows in the Azure Portal, then everything is configured correctly.
What’s Next?
This is the fourth article in this series on Azure Resource Manager. There are many Azure services and customizations that can be managed using ARM Templates. This provides a very flexible system for easily automating environment deployments using an Infrastructure as Code method. Future articles will explore the deployment and management of other Azure services using ARM Templates.
Hi Chris, thanks for those information. Very useful. Do you also know the syntax to turn on logs and ‘always on’?
Thanks
This no longer works. I believe there is a new syntax or something along those lines for the newest “apiVersion” of 2016-08-01. Still looking for the solution.