When configuring the call center experience administrators should keep in mind that long wait times will invariably lead to dropped calls and frustrated customers. An easy way to make sure your callers don’t have to wait on hold for a long time when no agents are available is to make use of the callback feature. This will keep a caller’s position in queue, even after they hang up and have an available agent automatically dial the caller when their turn comes up.
Out of the box Amazon Connect has two examples of contact flows making use of callbacks, but between different IVR types, branching nodes and queue settings things can get a bit confusing. This blog post will walk you through all the steps necessary to set up a customer friendly, easy to manage callback contact flow.
The first step, before diving into the contact flow editor is deciding what should trigger the callback option. It’s not an ideal experience to force callers into a callback if they would rather wait so we will always make sure to offer a menu with multiple options. However, when reaching a menu choice you want to make sure callers have enough information about the queue they are waiting in to make an informed decision.
Here are some of the nodes that we can use to collect current call center status in order to inform our callers how long their wait might be:
Check Queue Status: This node can check if a queue is at capacity or if the wait time in queue is currently higher than a certain threshold (milliseconds, seconds, minutes or hours).
The best way to make use of this node today for callback purposes is to branch based on time in queue. For example, in the screenshot below we are checking the status of a queue and if the wait time is more than 30 seconds we let the caller know and give them the option to ask for a callback or be placed in queue to wait for 30+ seconds. Something to note: make sure you set up a branch for queue time less than 30, otherwise the branch will go down the no match path for any short wait time.
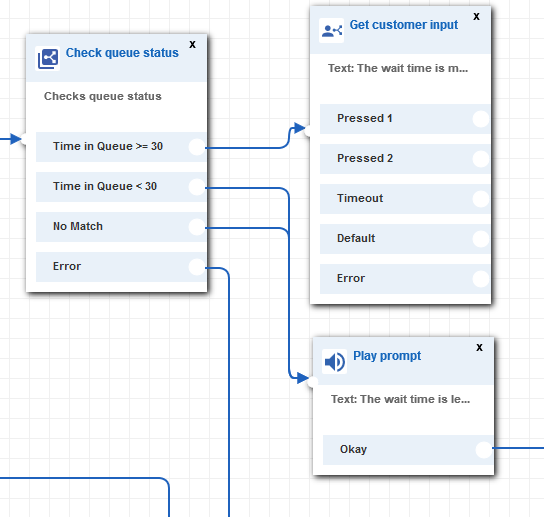
Something to consider is offering a path for wait time over several minutes as well. At that point, you can offer the caller the option of a callback or being transferred to voicemail, since something is clearly going wrong within the queue.
Check Staffing: This node will check how many agents are available or staffed (available, on call, after call work or custom status) within a queue. This node may be more useful in capturing the current queue status compared to the check queue status node as it’s possible the wait time for a queue shows as less than 30 seconds, but only because there is no one waiting in a queue that just closed for the day.
By checking if there are any available agents you can make sure the caller will be able to talk to an agent immediately, otherwise you can offer a menu with a choice for a callback.
Check Hours of operation: This node will look up the current business hours for a queue or can be set up to check if the caller is within a certain time frame. This second option can be useful during particularly busy times of the day. If you know your call center gets a lot of calls between 12 & 1 every afternoon, you can set up a special check to offer all lunch callers the option of a callback.
Transfer to Queue (at capacity): Another good place to offer callbacks is the transfer to queue node. While you can check queue capacity within the check queue status node, transfer to queue is the last node in the IVR and will contain the most recent queue data. Depending on how complex your call flow is this might be a better point in the call experience to route callers to a callback menu option.
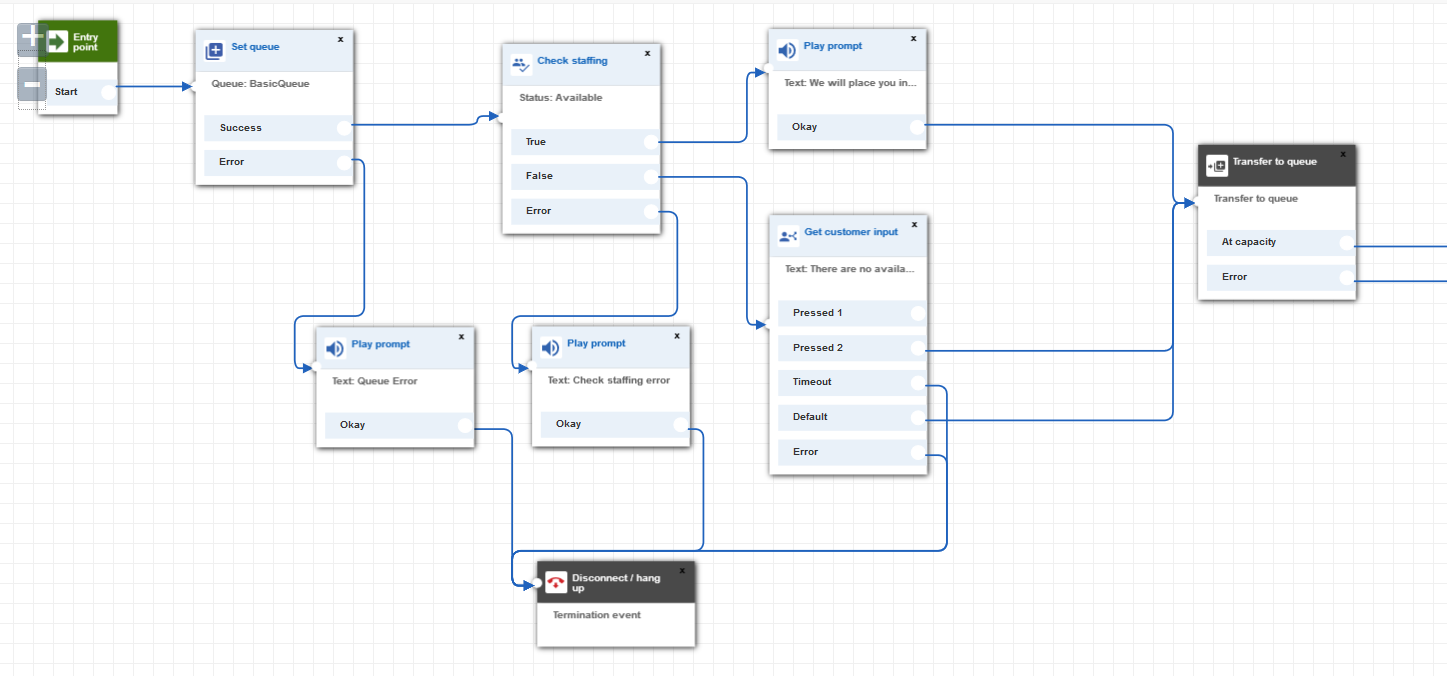
Once we use a branch node to asses the status and the caller is aware there are no immediately available agents, it makes sense to offer them a callback option through a get customer input node. Here is an example on how that might look. In the contact flow shown below we are checking if any agents are in the basic queue and if no one is available right away we let the caller know they have the callback option (this would be path 1 which is not connected to any options below).
Now it’s time to finally set up the callback.
The most important component of the callback flow will be the Transfer to Queue node. At it’s most basic you could set up an entire callback flow just around this node. Try creating a new contact flow, set it up as shown below and connect it directly to an inbound phone number. Make sure you select transfer to callback queue inside the transfer to queue node and play a prompt after a success, otherwise the caller will not hear anything.

Avoid Contact Center Outages: Plan Your Upgrade to Amazon Connect
Learn the six most common pitfalls when upgrading your contact center, and how Amazon Connect can help you avoid them.
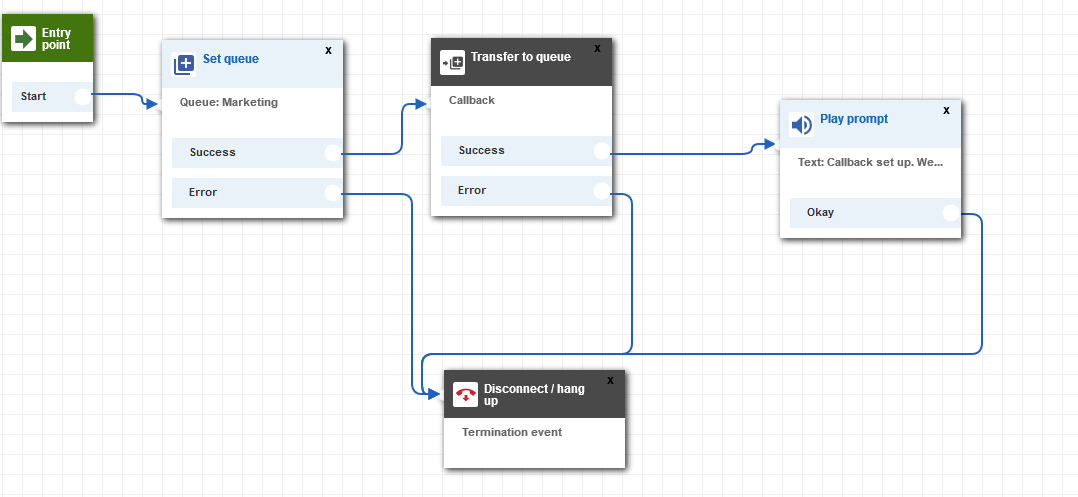
When you dial in Amazon Connect will store your phone number and automatically use it to place a callback once an agent in the queue you set up (in our case Marketing) becomes available.
If you have a very simple use case this should be all you need to get started with callbacks, simply transfer to a callback queue instead of a regular queue and the caller will be automatically called back at the number they used to dial into the system. If you want the caller to hear a message before being connected to an agent create a new Outbound Whisper flow and set it under the optional settings for the queue.
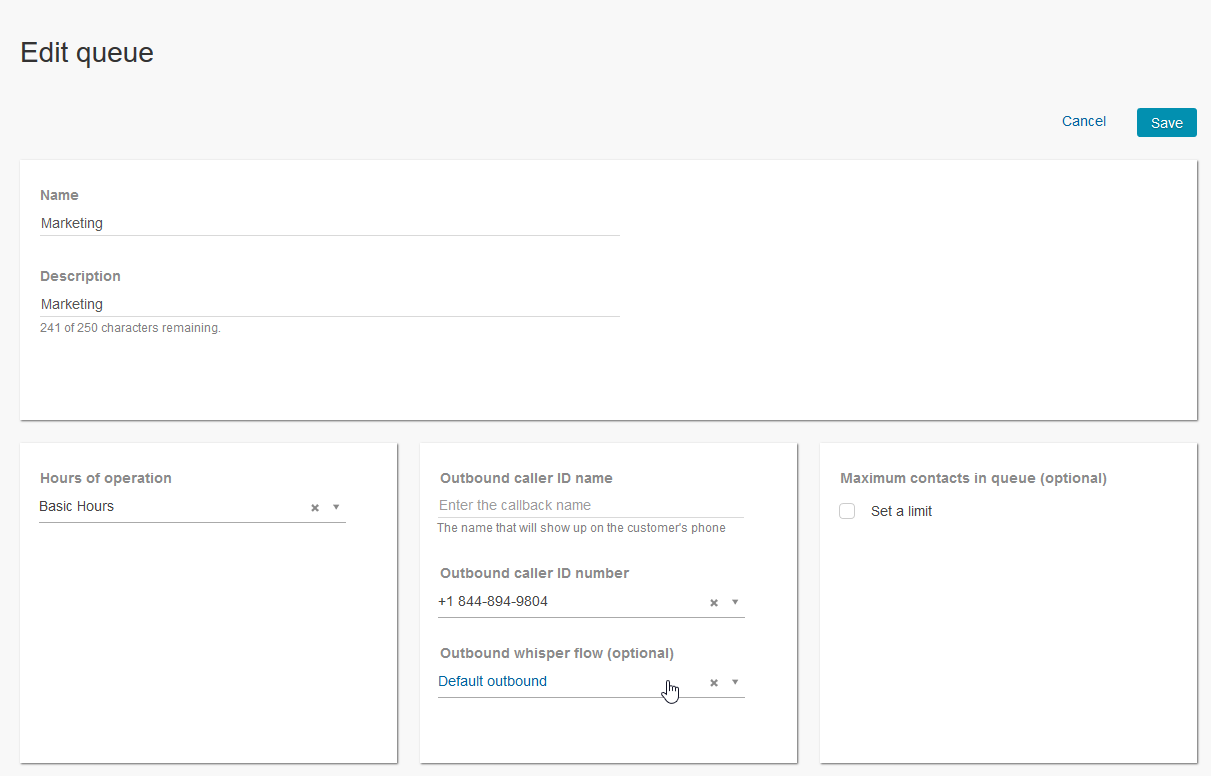
In this case a caller receiving a callback from the marketing queue will hear the default outbound whisper of “This call is not being recorded.”
Something to keep in mind is that today there is no out of the box way to make sure the caller still wants a callback before already assigning an agent to the call. The system works in the following way:
- It assigns an available agent with skills for the appropriate queue to the callback
- The agent needs to accept the callback within the CCP or it will get routed to another available agent
- Once the agent accepts the callback Amazon Connect will dial the customer using the queues outbound settings
- Amazon Connect will play any whisper flow configured for the outbound queue
- Caller and Agent are connected (even if we reached just the caller’s voicemail)
Your agents should expect they may need to leave a voicemail and call back later. They should make note of the callback number if possible or at least the time of the call so a supervisor can look up the session later.
Of course a nice option would be to collect a preferred callback phone number from the caller in case they called from their office but want a call back on their cellphone.
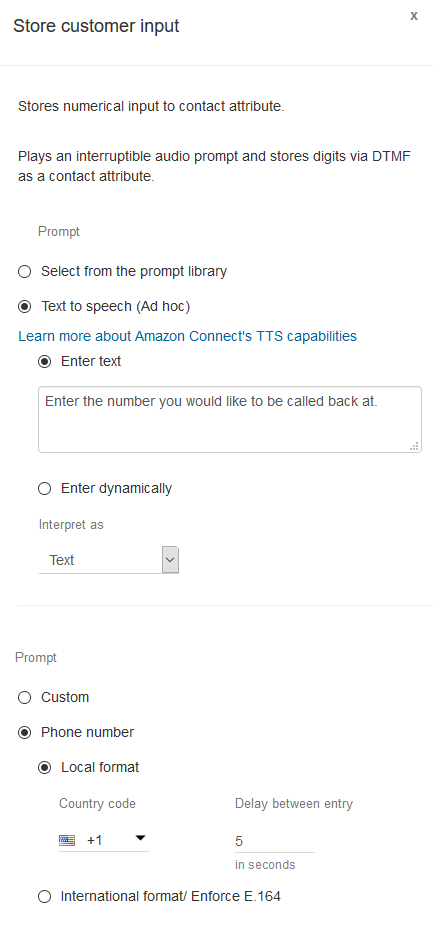
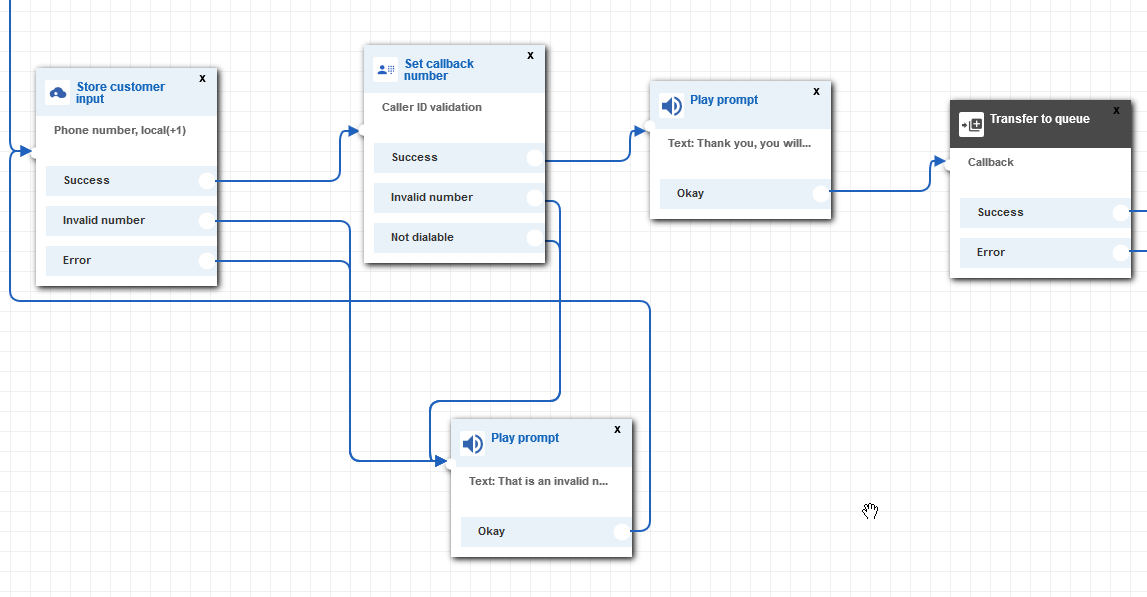
To enhance the basic callback flow the first step should be collecting the caller’s phone number. You can do this by using a store customer input node. Make sure you select phone number format and add a delay between entries so the caller has time to enter each digit. This will store the preferred callback phone number as a customer input variable.
Once the callers preferred number is stored you can make use of the set callback number node. This node will validate the number and store it for callback. Make sure the invalid and “not diable” paths let the caller know their entry will not work and then go back to the phone number collection node. If everything is correct, play a prompt to let the caller know we will call them back and add a transfer to queue node. 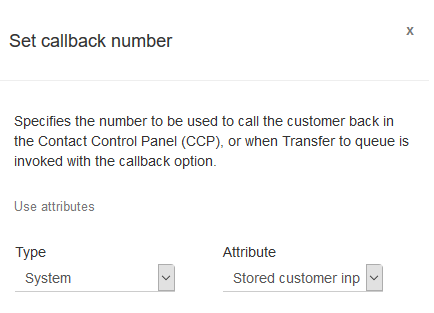
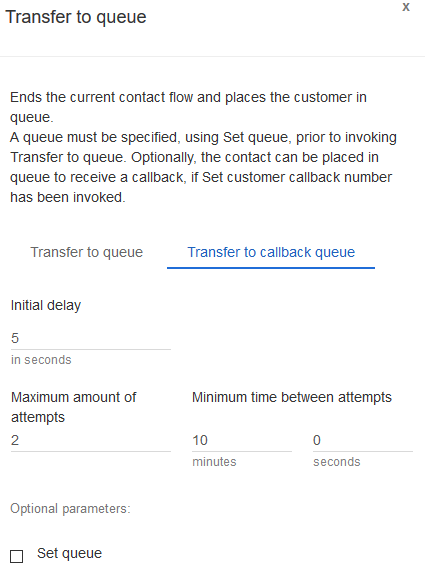
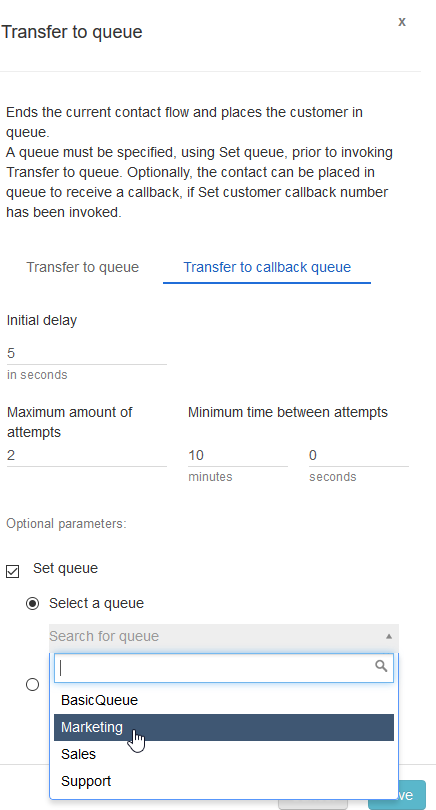
Make sure that after adding the transfer to queue node, you select the transfer to callback queue option. This will open several options relevant only for callbacks. You can select an initial delay and maximum number of attempts from the callback.
One last configuration is choosing the queue to use for the callback. This is an optional setting since best practices recommend you set the queue early in the call flow making use of the set queue node. In either case you need to make sure a queue is set for the callback as the system needs the queue settings to properly handle callbacks.
After the transfer to queue node is properly set up the last step is making sure all error nodes are handled and you hang up the transfer node. The call flow should look similar to this.
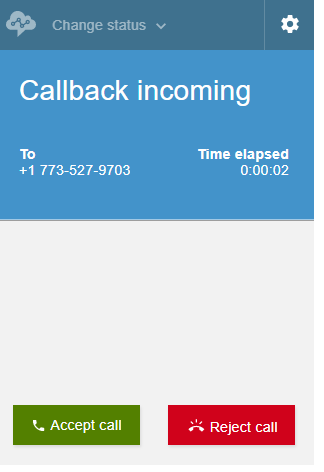
Publish the contact flow and place a test call through, requesting a callback. After the contact flow hangs up it may seem like nothing happened, you will need to sign in as an agent associated to the queue containing the callback and set yourself as available.
The CCP should show a callback is connecting and any whisper flow configured for the queue will kick in. Note that this whisper flow will play for the caller, not the agent. This could be a good opportunity to remind them they requested a call back and let them know an agent will talk to them now.
That should be it, you have set up a callback flow that is easy to update and will improve your callers experience. There are several ways you can expand on this flow, for example you can use the system Customer Number variable to read back the caller’s phone number and ask them if they want to enter a new phone number or would rather use the default.
Hopefully this post gave you some ideas on how you can introduce callbacks into your own call center. Want to talk more with our experts about Amazon Connect solutions? Reach out to Craig Reishus.