
If a business goal is improving customer satisfaction, Amazon Connect can be used with DynamoDB and AWS Lambda to personalize caller experience as well as ensure Agents have all the necessary information needed to provide a premium experience to the caller.
With this article, we will go through three easy steps to create separate contact flows in Amazon Connect designated for Premium callers, store their information in a separate database and use it in the future if they call again.
The following is covered:
- Creating a DynamoDB table for storing customer information
- Creating Lambda functions that will insert and gather the customer information
- Creating Amazon Connect contact flows for both customers and Agents
Please note, the examples used in this article can always be expanded based on the specific use case. As some would say „they are not written in stone“. More on possible expanding ideas later on.
Before we start
Let us get a better understanding of the technology that will be used for this scenario.
For the database, we chose DynamoDB, a NoSQL database service with fast and predictable performance and seamless scalability. Amazon Web Services (AWS) offers the full GUI experience on setting up the database as well as creating tables and their attributes. Terminology can be a little bit confusing if you worked only with SQL databases. So to make things simple: „Attribute“ is column in SQL database and „Item“ is similar to table record.
AWS Lambda is, according to AWS docummentation „A serverless compute service that runs your code in response to events and automatically manages the underlying compute resources for you.“ In this scenario we will use this service as a „bridge“ between Amazon Connect and DynamoDB to gather data from the database about Premium contacts as well as update or create new record if necessary. With it, we will also let the Agents of that Queue know why the contact is calling.
Amazon Connect – cloud-based contact center solution that is easy to setup and manage. With this product we will actually create the flows that callers will hear when dialing the designated number and configure the process before caller is connected to the Agent of that Queue.
With all of this together, the communication between the products is similar to below:
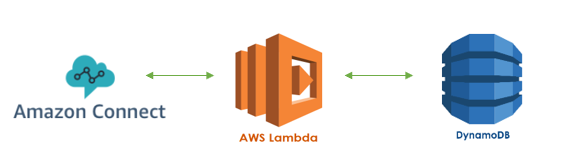
The process can be explained as this:
- Amazon Connect makes a request to designated Lambda function
- When a caller calls the designated number, during the Contact Flow, the caller reaches Lambda Integration node before continuing the call
- Lambda function requests information to DynamoDB table
- Based on the Lambda function, a request is made to the DynamoDB database to either get or update table information with Reason for calling for each calling number
- DynamoDB sends the information requested to Lambda function
- DynamoDB either writes new Reason value or returns the Reason for calling and lets Lambda know the job is completed
- Lambda function goes back to Amazon Connect with the information
- Lambda function returns to Amazon Connect with the data it got from DynamoDB
Now that we got a better understanding of communication, let us start with the steps on achieving the desired scenario.
Step 1. Creating a DynamoDB table for storing Premium contact information
As the business desire is to know what their Premium customers are calling about we need to keep this information stored somewhere safe and easily accessible. This can be achieved by creating a custom DynamoDB table. For the purpose of this article, we named it CustomerDetails and it consists of CustomerNumber, CallDateTime and Reason attributes.
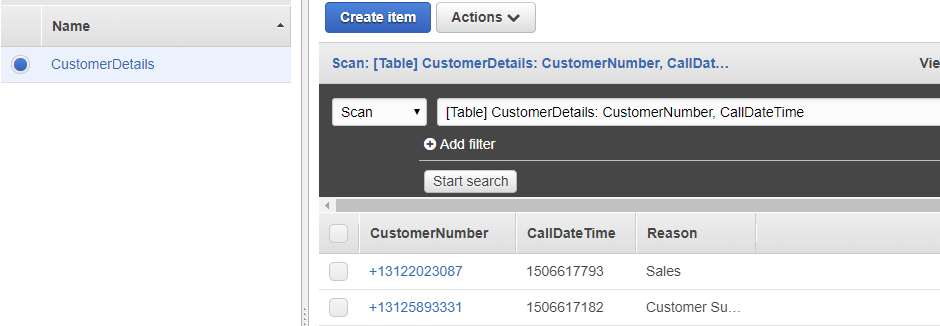
CustomerNumber is the PrimaryKey which is a String and CallDateTime is the Sort Key and its type is Number.
To create this table click on the Create table option from your DynamoDB interface and specify the parameters. For this example, we also used the default table settings.

Please note, the third column, which is in our case named Reason is not specified yet as it is added later on during Lambda execution. DynamoDB allows this behavior where a new attribute can be created if necessary.
Once the table is successfully created, it will be empty. But don’t worry! It will get filled up with data later on.
Step 2. Creating Lambda functions that will insert and get data from the DynamoDB table
For this scenario, we require two Lambda functions. One for inserting the values in the database and another one to retrieve the data from the database. For our examples, we used Python 3.6 and the boto3 and datetime libraries. Boto3 is the AWS SDK for Python which allowed us to make a connection to DynamoDB and Datetime is used to gather the „current“ date and time which will be stored in the database
Here is how the functions will look once created:
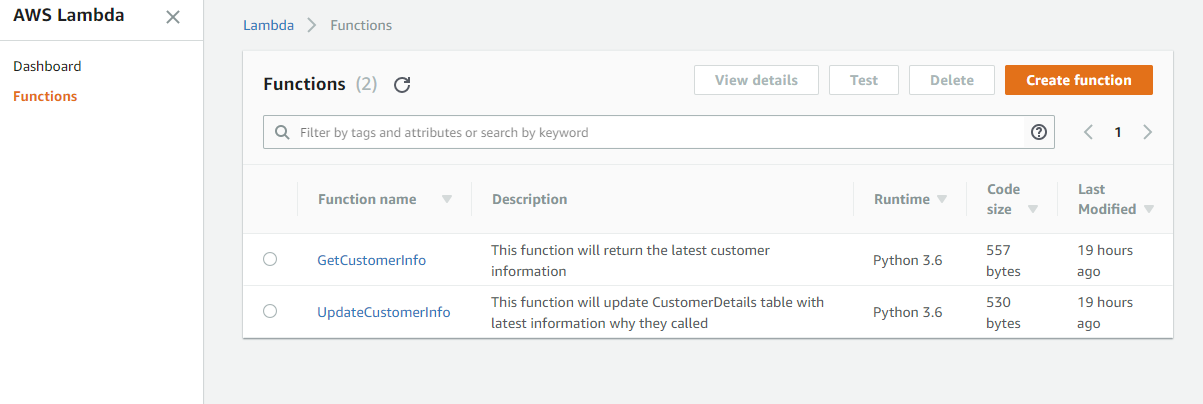
GetCustomerInfo function is used to gather the latest entry for that specific caller and UpdateCustomerInfo is used to store the new values in the CustomerDetails table.
To create a new function, simply click on the Create Function option. Once the tab loads with new data, use Author from scratch option. On Trigger screen, simply click next as we will not add any triggers. This will allow you to create a new blank function without any template.
Under Basic information, chose the name, description and Runtime to use (we used Python 3.6). We also need to define a Role, permissions, that the function will have to excute correctly. If there is no existing role, there is an option Create new role from template(s) where we can specify which permissions this function will have. Please note, in order for the Lambda function to access DynamoDB it must have Lambda full access permissions and DynamoDB full access permissions. Please note, Lambda permissions for the database can be adjusted further based on which resources need to be accessed if the user does not wish to grant full access to the functions.

Avoid Contact Center Outages: Plan Your Upgrade to Amazon Connect
Learn the six most common pitfalls when upgrading your contact center, and how Amazon Connect can help you avoid them.
Now, all that we need to do is create the logic that will either retrieve or input data we need.
UpdateCustomerInfo
This function updates the database table with new values the caller specified. Or, if there is no item for this caller, a new item is created. Please note, under the return section of the function we noted a success because otherwise the result would return ‘null’ and inside the contact flow, the function would navigate through error path.
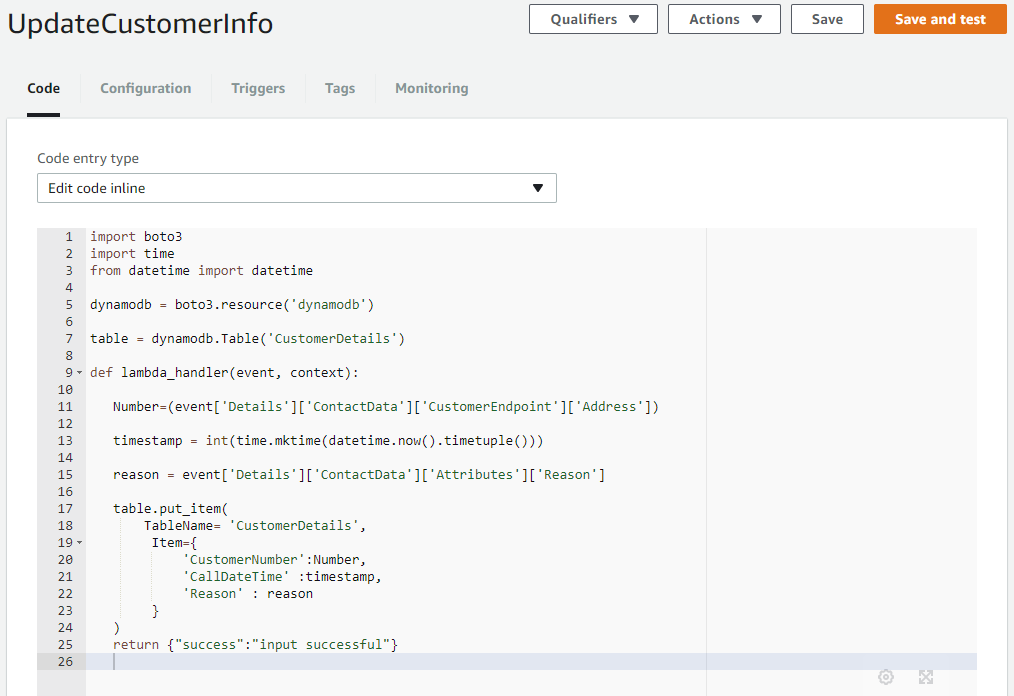
The text of the function is below:
import boto3
import time
from datetime import datetime

dynamodb = boto3.resource('dynamodb')

table = dynamodb.Table('CustomerDetails')

def lambda_handler(event, context):

    Number=(event['Details']['ContactData']['CustomerEndpoint']['Address'])

    timestamp = int(time.mktime(datetime.now().timetuple()))

    reason = event['Details']['ContactData']['Attributes']['Reason']

    table.put_item(
        TableName= 'CustomerDetails',
         Item={
             'CustomerNumber':Number,
             'CallDateTime' :timestamp,
             'Reason' : reason
         }
    )
    return {"success":"input successful"}
What it does is following, take the ‘Address’ field from ‘CustomerEndpoint’ section, take the current time and date, take the ‘Reason’ information from ‘Attributes’ section and use put_item to place all of this information in their corresponding DynamoDB table attributes. Finally, return “input successful”.
To verify the function works as expected configure the test event as follows and click on Save and test option. The following .JSON test event can be used for this function:
{
  "Details": {
    "ContactData": {
       "Attributes": {
         "Reason": "Customer Support"
       },
       "Channel": "VOICE",
       "ContactId": "",
       "CustomerEndpoint": {
          "Address": "+1234567890",
          "Type": "TELEPHONE_NUMBER"
       },
      "InitialContactId": "",
      "InitiationMethod": "INBOUND",
      "InstanceARN": "",
      "PreviousContactId": "",
      "Queue": null,
      "SystemEndpoint": {
        "Address": "1234567890",
        "Type": "TELEPHONE_NUMBER"
      }
    }
  },
  "Name": "ContactFlowEvent"
}
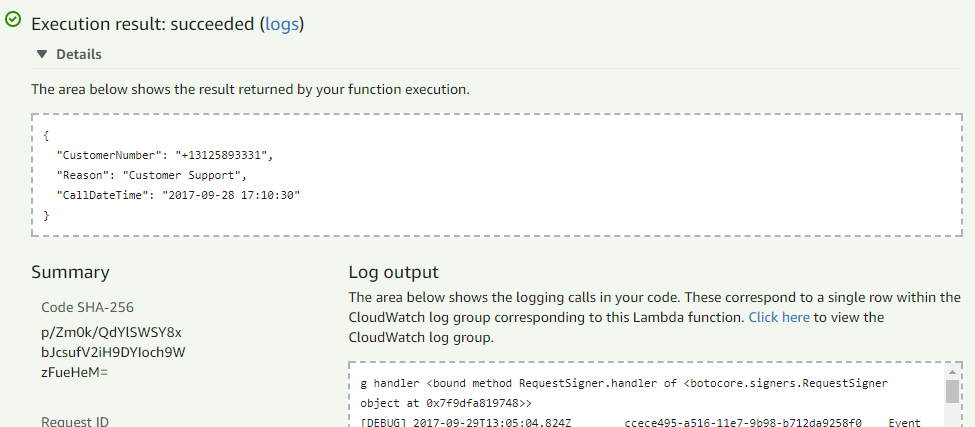
If there are no errors, meaning the update is successful, the execution result will be displayed in the following format:

GetCustomerInfo
This function is pretty self-explanatory as it will return the latest customer information. Let’s take a look of what it consists of:
import boto3
from boto3.dynamodb.conditions import Key, Attr
from datetime import datetime

def lambda_handler(event, context):

dynamodb = boto3.resource('dynamodb')

table = dynamodb.Table('CustomerDetails')

 Number = event['Details']['ContactData']['CustomerEndpoint']['Address']

response = table.query(
 KeyConditionExpression = "CustomerNumber = :v1",
 ExpressionAttributeValues = {
 ':v1': Number,
 },
 ScanIndexForward=False,
 Limit=1
 )

 items = response ['Items']

 now= datetime.fromtimestamp(response['Items'][0]['CallDateTime'])
 items[0]['CallDateTime'] = str(now)

 return items[0]
Number value is gathered from Amazon Connect directly. More information on what Amazon Connect can pass to AWS Lambda can be found here on pages 15-17.
The explanation of this function is: Query the CustomerDetails table on CustomerNumber attribute and save the last item into a list where the CustomerNumber matches the ‘Address’ field of ‘Customer Endpoint’. Finally, return the items of that list.
Please note, it is crucial to return only the items of the list instead of the full list because Amazon Connect will not accept it otherwise and will throw an error which will result in contact flow failure.
The same test event format can be used from the UpdateCustomerInfo function as the values for Reason and Address are already defined there and the successful execution result is following:
Lambda and Amazon Connect permissions
Before we move into creating contact flows, ensure the Amazon Connect has the permission to run the functions created. By using the following command in CMD this will be achievable:
aws lambda add-permission --region your_region --function-name name_of_your_function --statement-id 1 --principal connect.amazonaws.com
--action lambda:InvokeFunction --source-account your_account_id
To be able to run this command from your CMD, AWS CLI needs to be installed. This can be done using the guidance linked here.
To note, if you plan on using Python 3.6, during installation change the folder from Python36-32 to only Python36. If you leave the default path you will receive an [Errno 2] No such file or directory error like below when attempting to invoke the add-permission command even though Python, PIP and AWS CLI are correctly installed:

Step 3. Creating Amazon Connect contact flows for both callers and Agents
Inside the instance of Amazon Connect we need to have a number, Contact Flow, the Queue and Agent for at least one call experience. For our scenario we will create two caller facing contact flows and one Agent whisper contact flow.
Two of the caller facing contact flows will allow the callers to either continue discussing the previous reason they called about or to talk about another topic. For example, if the caller previously called about Sales, they will be asked if they want to continue talking about Sales or if they would like to change the topic to one of the business defined options. In our example, we used Customer Support, IT Support, Sales and Marketing. If the caller is new and we do not have a record of him yet in our DynamoDB table, they will automatically be asked to pick the topic of their conversation.
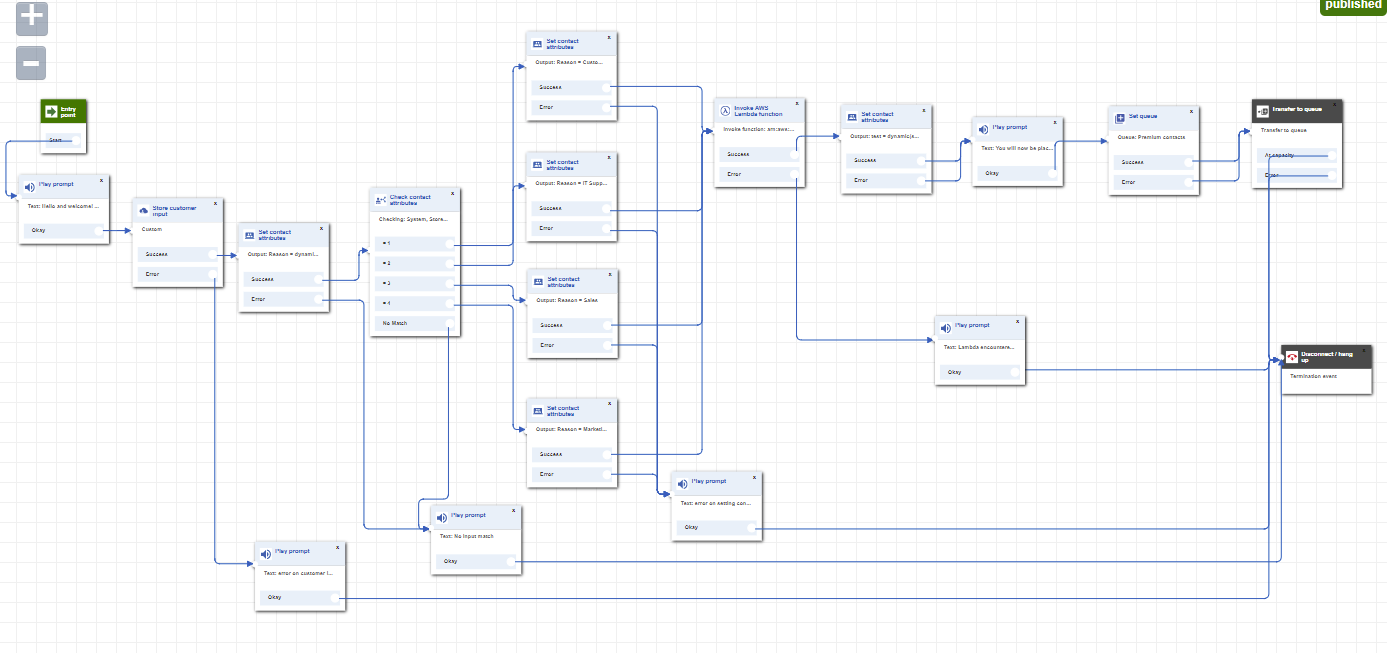
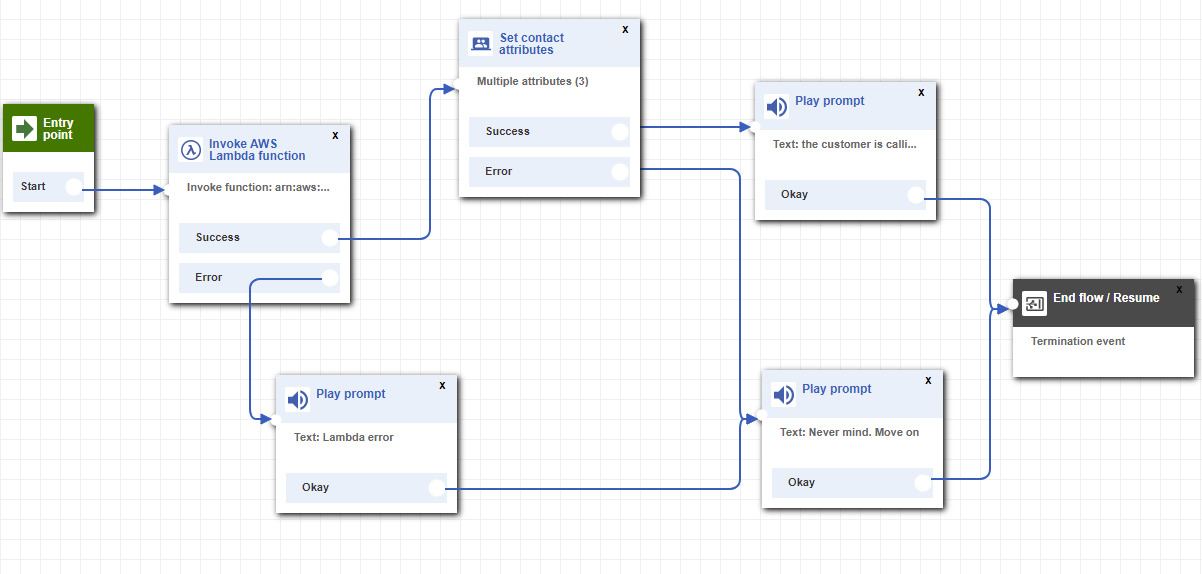
Premium Customer flow – check entry
This is the first contact flow our callers will encounter. The full flow can look as follows:

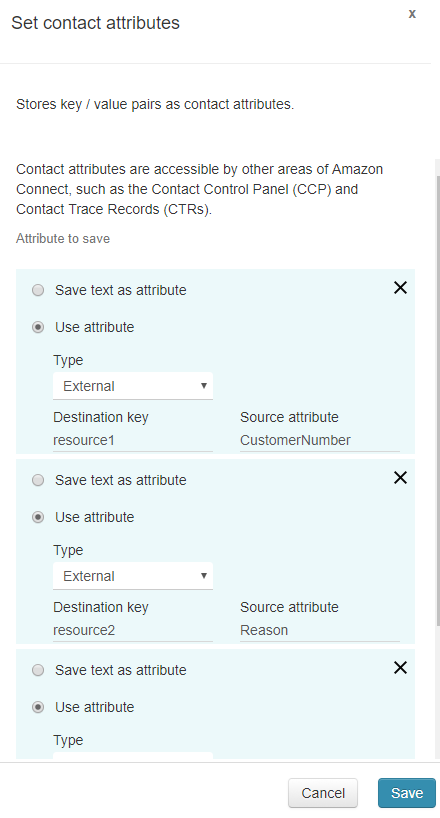
It starts with a Lambda invocation node, where we check the database using GetCustomerInfo function. To achieve this, we do not pass any specific parameters into the node other than the function ARN. This information can be found in the top-right corner of AWS Lambda interface when you navigate to your function. If the result is successful, we gather the data from the function using Set contact attribute node. For example, our GetCustomerInfo function returns three items. To use them further in the flow, we will define them using the Set contact attribute node:
If the function returns an error – meaning no data to be displayed; there is no caller yet and we transfer them to the second call flow which we will go through later on.
Let us, for the time being, return to the success path where there is a known record of the caller. Once we set the attributes, in this example we give the caller an option to either talk about their previous calling reason or if they decide, chose a different reason. With $.External.Reason we can notify the caller about the data we have on our records.

If they do want to talk about the previously called reason, we place the caller into the Queue. However, if not, they are routed to the second customer contact flow.
Premium Customers flow – new entry or existing
If the caller does not wish to talk about a previously discussed topic, they are routed through this call flow where they chose business defined options of their desired topics.
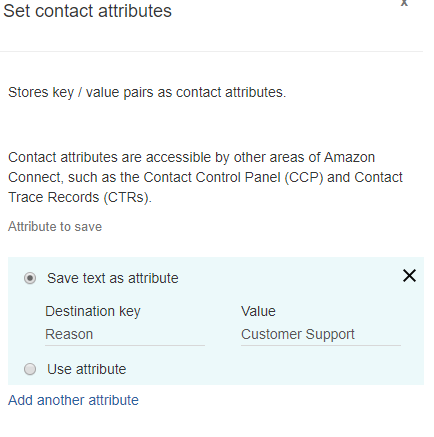
After the flow asks them what they desire to talk about, we store that input though Set contact attribute node.
Moving on we Invoke AWS Lambda function UpdateCustomerInfo only though its ARN. The function at this point will update the database table with given information.
Finally, we place the caller into the Queue.
Premium Agent whisper flow
The purpose of Agent whisper flow is to configure what information the Agent will hear before the caller is connected to them. In our example, the Agent will hear the latest Reason for the call and the Queue they are calling from.
For this contact flow, we will require AWS Lambda function invocation of GetCustomerInfo function. After the information is gathered, through a prompt, the Agent will be given information of the Queue and Reason via $.Queue.Name and $.External.Reason values.
Further customization
As these contact flows are pretty simple, there is always a possibility to enhance them with different values . For example: adding a name to the contact, adding Sub-Reasons, specifying columns for date and time, etc..
All in all, I hope this article has provided useful guidance on how to manipulate Amazon Connect data with DynamoDB, allowing you to further adjust to custom business requirements.
Thank you for staying with me and please feel free to respond with feedback below!
If you’re interested to see more, schedule a demo or contact us here.