In today’s hyper-connected world, the Internet of Things (IoT) is transforming industries, from smart manufacturing to intelligent healthcare. However, the real potential of IoT is to connect continuously with enterprise systems, providing real-time insights and automating. This is where MuleSoft’s Anypoint Platform comes in, a disturbance in integrating IoT units and API to create an ecosystem. This blog explains how MuleSoft sets the platform for connection and introduces a strong basis for IoT and API integration that goes beyond the specific dashboard to offer scalability, safety, and efficiency.
Objective
In this blog, I will show MuleSoft’s ability to integrate IoT devices with enterprise systems through API connectivity, focusing on real-time data processing. I will provide an example of how MuleSoft’s Anypoint Platform connects to an MQTT broker and processes IoT device sensor data. The example highlights MuleSoft’s ability to handle IoT protocols like MQTT and transform data for insights.
How Does MuleSoft Facilitate IoT Integration?
The MuleSoft’s Anypoint Platform is specific to the API connection, native protocol support, and a comprehensive integration structure to handle the complications of IoT integration. This is how MuleSoft IOT does the integration comfortably:
-
API Connectivity for Scalable Ecosystems
MuleSoft’s API strategy categorizes integrations into System, Process, and Experience APIs, allowing modular connections between IoT devices and enterprise systems. For example, in a smart city, System APIs gather data from traffic sensors and insights into a dashboard. This scalability avoids the chaos of point-to-point integrations, a fault in most visualization-focused tools.
-
Native IoT Protocol Support
IoT devices are based on protocols such as MQTT, AMQP, and CoAP, which MuleSoft supports. Without middleware, this enables direct communication between sensors and gateways. In a scenario, MuleSoft is better able to connect MQTT data from temperature sensors to a cloud platform such as Azure IoT Hub than other tools that require custom plugins.
-
Real-Time Processing and Automation
IoT requires real-time data processing, and MuleSoft’s runtime engine processes data streams in real time while supporting automation. For example, if a factory sensor picks up a fault, MuleSoft can invoke an API to notify maintenance teams and update systems. MuleSoft integrates visualization with actionable workflows.
-
Pre-Built Connectors for Setup
MuleSoft’s Anypoint Exchange provides connectors for IoT platforms (e.g., AWS IoT) and enterprise systems (e.g., Salesforce). In healthcare, connectors link patient wearables to EHRs, reducing development time. This plug-and-play approach beats custom integrations commonly required by other tools.
-
Centralized Management and Security
IoT devices manage sensitive information, and MuleSoft maintains security through API encryption and OAuth. Its Management Center provides a dashboard to track device health and data flows, offering centralized control that standalone dashboard applications cannot provide without additional infrastructure.
-
Hybrid and Scalable Deployments
MuleSoft’s hybrid model supports both on-premises and cloud environments, providing flexibility for IoT deployments. Its scalability handles growing networks, such as fleets of connected vehicles, making it a future-proof solution.
Building a Simple IoT Integration with MuleSoft
To demonstrate MuleSoft’s IoT integration, below I have created a simple flow in Anypoint Studio that connects to an MQTT Explorer, processes sensor data, and logs it to the dashboard integration. This flow uses a public MQTT Explorer to simulate IoT sensor data. The following are the steps for the Mule API flow:
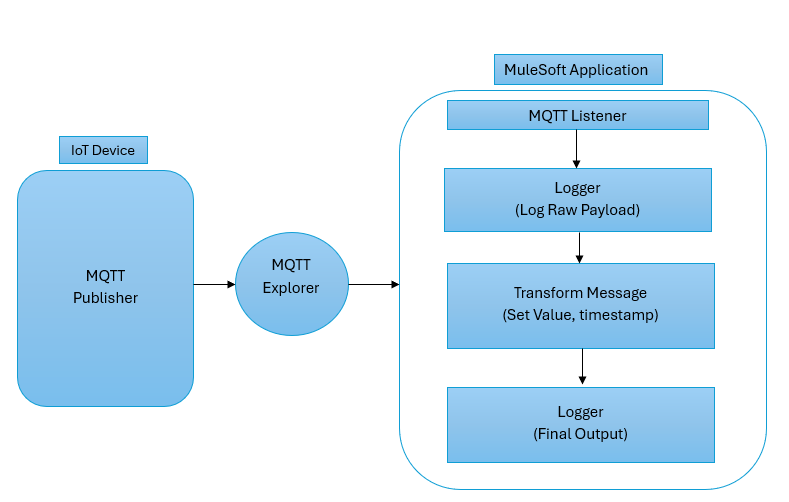
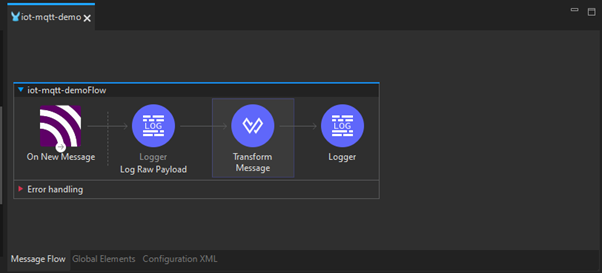
Step 1: Setting Up the Mule Flow
In Anypoint Studio, create a new Mule project (e.g., ‘IoT-MQTT-Demo’). Design a flow with an MQTT Connector to connect to an explorer, a Transform Message component to process data, and a Logger to output results.
Step 2: Configuring the MQTT Connector
Configure the MQTT Connector properties. In General Settings, configure on a public broker (“tcp://test.mosquitto.org:1883”). Add the topic filter “iot/sensor/data” and select QoS “AT_MOST_ONCE”.

Step 3: Transforming the Data
Use DataWeave to parse the incoming JSON payload (e.g., ‘{“temperature”: 25.5 }’) and add a timestamp. The DataWeave code is:
“`
%dw 2.0
output application/json
{
sensor: “Temperature”,
value: read(payload, “application/json“).temperature default “”,
timestamp: now()
}
“`
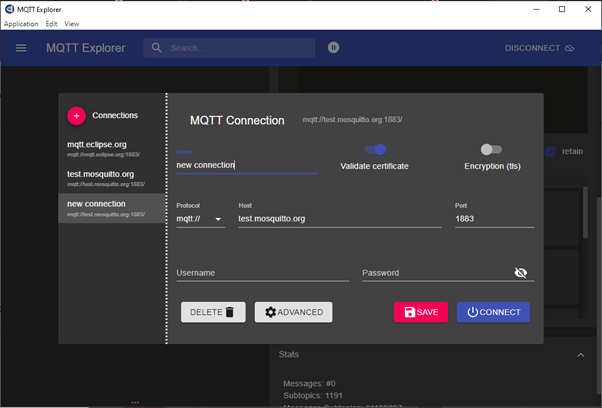
Step 4: Connect to MQTT
Click on the Connections and use the credentials as shown below to connect to the MQTT explorer:
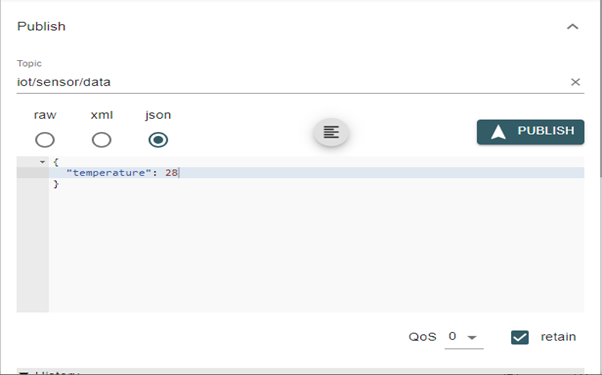
Step 5: Simulating IoT Data
Once the MQTT connects using an MQTT Explorer, publish a sample message ‘{“temperature”: 28 }’ to the topic ‘iot/sensor/data’, sending to the Mule flow as shown below.
Step 6: Logging the Output
Run the API and publish the message from the MQTT explorer, and the processed data will be logged into the console. Below shows an example log:
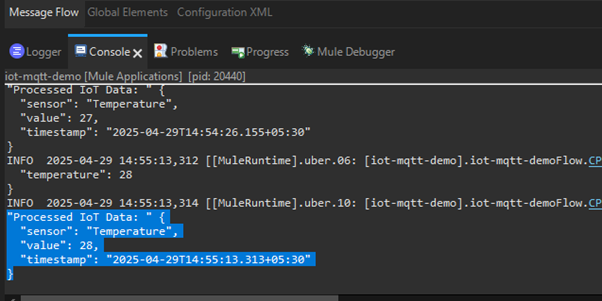
The above example highlights MuleSoft’s process for connecting IoT devices, processing data, and preparing it for visualization or automation.
Challenges in IoT Integration and MuleSoft’s Solutions
IoT integration faces challenges:
- Device and Protocol Diversity: IoT ecosystems involve different devices, such as sensors or gateways, using protocols like MQTT or HTTP with different data formats, such as JSON, XML, or binary.
- Data Volume and Velocity: IoT devices generate high volumes of real-time data, which requires efficient processing to avoid restrictions.
- Security and Authentication: IoT devices are unsafe and require secure communications like TLS or OAuth for device authentication.
- Data Transformation and Processing: IoT data sends binary data, which requires transformation from Binary to JSON and needs improvement before use.
The Future of IoT with MuleSoft
The future of IoT with MuleSoft is promising. MuleSoft uses the Anypoint Platform to solve critical integration issues. It integrates different IoT devices and protocols, such as MQTT, to provide data flow between ecosystems. It provides real-time data processing and analytics integration. Security is added with TLS and OAuth.
Conclusion
MuleSoft’s Anypoint Platform reviews IoT and API integration by providing a scalable, secure, real-time solution for connecting devices to enterprise systems. As I showed in the example, MuleSoft processes MQTT-based IoT data and transforms it for useful insights without external scripts or sensors. By addressing challenges like data volume and security, MuleSoft provides a platform to build IoT ecosystems that provide automation and insights. As IoT keeps growing, MuleSoft’s API connectivity and native protocol support establish it as an innovation, with new smart city, healthcare, and more connectivity. Discover MuleSoft’s Anypoint Platform to unlock the full potential of your IoT projects and set the stage for a connected future.
]]>Microsoft 365 offers several types of groups; each designed for different collaboration and communication needs:
- Microsoft 365 Groups (M365): These are used for collaboration between users both inside and outside your organization. They include a shared mailbox, calendar, SharePoint site, Microsoft Teams and more.
- Distribution Groups: These are used for sending email notifications to a group of people. They are ideal for broadcasting information to a set group of people.
- Security Groups: These are used for granting access to resources such as SharePoint sites. They help manage permissions and access control.
- Mail-enabled Security Groups: These combine the features of security groups and distribution groups, allowing you to grant access to resources and send email notifications to the group members.
- Dynamic Distribution Groups: A Dynamic Distribution List (or DDL) is created to expedite the mass sending of email messages and other information to a set of people. As the name suggests, it does not mean to have static members, and the recipient criteria is defined by the set of filters and conditions that are put on it.
Out of the above group we are interested to know about Microsoft 365 or formerly known as Office 365 group. Let’s start with the following:
How to Create a Microsoft 365 group (M365 group)?
Creating a Microsoft 365 Group can be done in several ways, depending on your role and the tools you have access to. Here are the main methods:
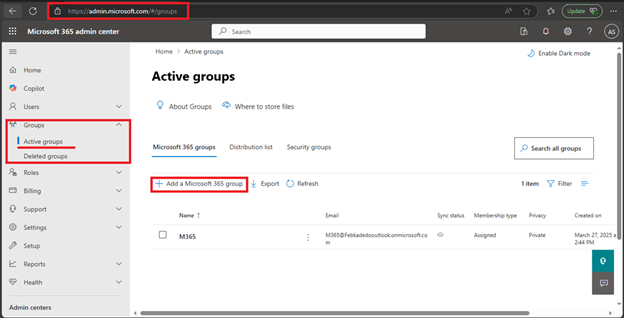
- Using the Microsoft 365 Admin Center
- Go to the Microsoft 365 admin center.
- Expand Groups and select Active groups.
- Click on +Add a Microsoft 365 group.
- Fill in the group details, such as name, description, and privacy settings.
- Add owners and members to the group.
- Review your settings and click Create group.
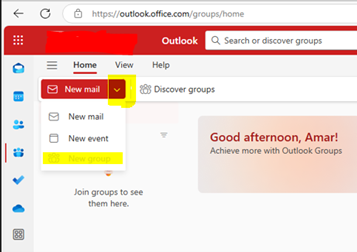
Outlook on the Web
- Open Outlook on the web.
- In the left pane, select Go to Group >> New mail drops down as shown below:
- Enter the group name, description, and privacy settings.
- Add members and click Create.
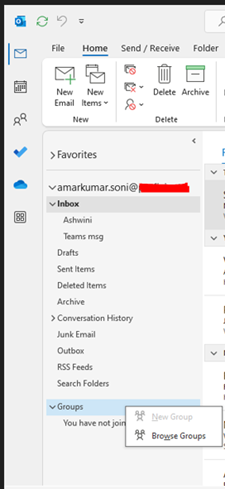
Outlook Desktop App
- Open Outlook.
- Go to the Home tab and select New Group.
- Enter the group name, description, and privacy settings.
- Add members and click Create.
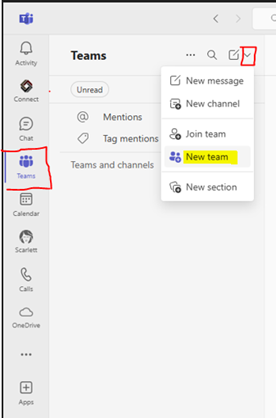
Using Microsoft Teams
- Open Microsoft Teams.
- Click on Teams in the left sidebar.
- Select Join or create a team at the bottom of the Teams list.
- Choose Create a team and then from scratch.
- Select Private or Public and enter the team’s name and description.
- Add members and click Create.
Using PowerShell
For more advanced users, you can use PowerShell to create a Microsoft 365 Group:
- Open PowerShell and connect to your Microsoft 365 account.
- Use the New-UnifiedGroup cmdlet to create the group. For example:
| New-UnifiedGroup -DisplayName “Group Name” -Alias “groupalias” -EmailAddresses “groupalias@yourdomain.com” |
- Manage Microsoft 365 group using PowerShell:
Add-UnifiedGroupLinks (ExchangePowerShell) | Microsoft Learn
Collaboration Features of M365 Group:
Microsoft 365 Groups offer a variety of collaboration features designed to enhance teamwork and productivity. Here are some of the key features:
- Shared Mailbox: Each group gets a shared inbox in Outlook where group conversations are stored. This makes it easy to keep track of discussions and ensures everyone stays in the loop.
- Shared Calendar: Groups have a shared calendar for scheduling and managing events. This helps coordinate meetings and deadlines.
- SharePoint Document Library: A SharePoint site is created for each group, providing a central location for storing and sharing files. This ensures that all members have access to the latest documents
- Planner: Microsoft Planner is integrated with groups, allowing members to create, assign, and track tasks. This helps in managing projects and ensuring that tasks are completed on time
- OneNote Notebook: Each group gets a shared OneNote notebook for taking and organizing notes. This is useful for brainstorming sessions, meeting notes, and more
- Microsoft Teams Integration: Groups can be connected to Microsoft Teams, providing a hub for chat, video meetings, and collaboration. This integration enhances real-time communication and teamwork
- Power BI: Groups can use Power BI to create and share dashboards and reports, making it easier to visualize and analyze data
- Viva Engage (formerly Yammer): If the group was created from Viva Engage, members can engage in social networking and community discussions
- : Groups can share and manage video content using Microsoft Stream, making it easy to distribute training videos, presentations, and other multimedia content
- Project for the Web: If you have Project for the web, groups can use Roadmap to plan and track project progress
These features collectively provide a comprehensive suite of tools to support collaboration, communication, and project management within your organization.
]]>Objective: Enable resource monitoring for AWS EC2 instances using the Dynatrace monitoring tool (OneAgent) to gain real-time insights into system performance, detect anomalies, and optimize resource utilization.
What is Dynatrace?
Dynatrace is a platform for observability and application performance monitoring (APM) that delivers real-time insights into application performance, infrastructure oversight, and analytics powered by AI. It assists teams in detecting, diagnosing, and resolving problems more quickly by providing comprehensive monitoring across logs, metrics, traces, and insights into user experience.
Dynatrace OneAgent
Dynatrace OneAgent is primarily a single binary file that comprises a collection of specialized services tailored to your monitoring setup. These services collect metrics related to various components of your hosts, including hardware specifications, operating systems, and application processes. The agent also has the capability to closely monitor specific technologies (such as Java, Node.js, and .NET) by embedding itself within these processes and analyzing them from the inside. This enables you to obtain code-level visibility into the services that your application depends on.
Key Features of Dynatrace OneAgent
- Automatic Deployment – OneAgent installs automatically and starts collecting data without manual configuration.
- Full-Stack Monitoring – It monitors everything from application code to databases, servers, containers, and networks.
- AI-Powered Insights – Works with Dynatrace’s Davis AI engine to detect anomalies and provide root cause analysis.
- Auto-Discovery – Automatically detects services, processes, and dependencies.
- Low Overhead – Designed to have minimal impact on system performance.
- Multi-Platform Support – Works with Windows, Linux, Kubernetes, AWS, Azure, GCP, and more.
Prerequisites to Implement OneAgent
- Dynatrace account
- AWS EC2 instance with Linux as the operating system and enable the SSH port (22).
How to Implement Dynatrace OneAgent
Step 1. Dynatrace OneAgent configuration
Log in to the Dynatrace portal and search for Deploy OneAgent.
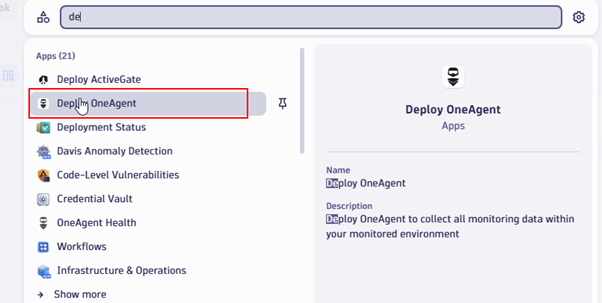
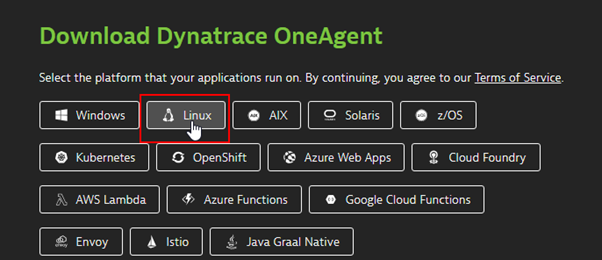
Select the platform on which your application is running. In our case, it is Linux.
Create a token that is required for authentication.
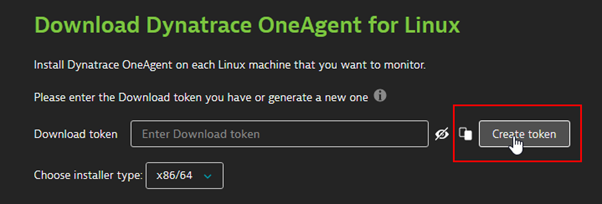
After generating a token, you will receive a command to download and execute the installer on the EC2 instance.
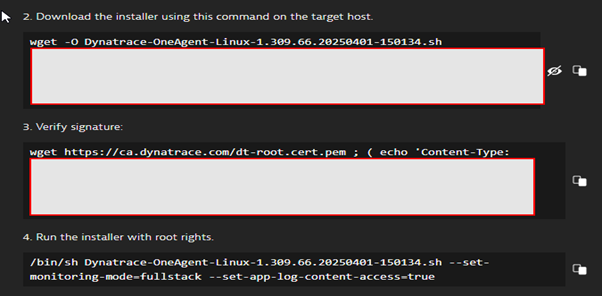
Step 2: Log in to the EC2 instance using SSH and run the command to download the installer.
After this, run the command to run the installer.


The Dynatrace one agent has now been installed on the EC2 instance.
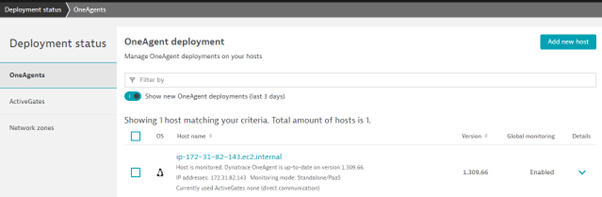
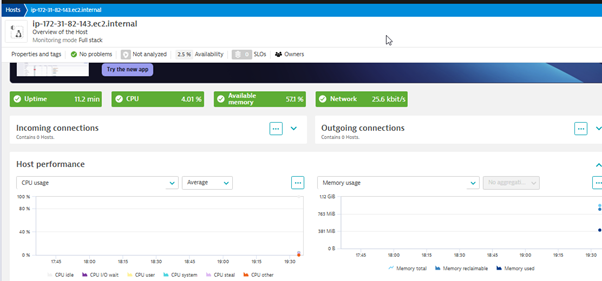
Output
Now we can monitor various resource usage based on application and infrastructure level on the Dynatrace dashboard.
Conclusion
Enabling resource monitoring for AWS EC2 instances using Dynatrace provides comprehensive observability, allowing teams to detect performance issues, optimize resource utilization, and ensure application reliability. By leveraging Dynatrace OneAgent, organizations can automate monitoring, gain AI-driven insights, and enhance cloud efficiency. Implementing this solution not only improves operational visibility but also facilitates proactive troubleshooting, reduces downtime, and optimizes cloud costs.
]]>
In the first blog post of this three-part Solution Highlight series featuring a proven leader in defense-grade, high assurance cyber security solutions, I will cover Oracle Revenue Management. My colleague, Mehmet Erisen will share his views on Global Supply Chain Management including Manufacturing with OSP and intercompany order fulfillment across business units featuring Oracle Supply Chain Management. We’ll round out the series with the third and final blog post focused on Salesforce to Order Cloud integration.
About Our Client: a trailblazer in the cyber security space, our client needed the ability to automate its complex and manual revenue allocation processes.
Challenge
- Manual revenue recognition processes leading to errors and delays
- Difficulty in complying with ASC 606 / IFRS 15 standards
- Lack of real-time visibility into revenue reporting
Solution
Implemented Oracle Revenue Management – Managing Bundles and Stand-alone Selling Price (SSP)
Oracle Fusion ERP provides robust functionality for managing and automating the implementation of product bundles and determining the SSP for revenue recognition under ASC 606 and IFRS 15 standards. Key highlights include:
- Revenue Management: Automates revenue processing tasks, minimizing manual interventions, allowing organizations to comply efficiently and consistently with the ASC 606 and IFRS 15 core principles
- Bundling Capabilities: Allows seamless configuration and management of product/service bundles with clear pricing structures
- Automation and Scalability: Automates complex revenue allocation processes, improving efficiency and scalability
- Real-time Analytics: Provides insights into sales trends and SSP analysis, enabling data-driven pricing strategies
Benefits
- Reduced Manual Effort – Eliminated spreadsheet-based tracking
- Improved Accuracy – Minimized revenue leakage and misreporting
- Faster Close Cycles – Automated recognition speeds up month-end close
- Regulatory Compliance – Ensured adherence to ASC 606 / IFRS 15
- Enhanced Visibility – Real-time insights into revenue performance
Oracle Revenue Management Cloud enables organizations to automate revenue recognition, reduce compliance risks, and gain real-time financial insights. This solution delivers value for companies with complex revenue streams, such as SaaS, manufacturing, and professional services.
This solution is particularly effective for companies looking to streamline revenue recognition while maintaining compliance and operational efficiency.
Let me know if you’d like a deeper dive into any of these features!
]]>As technology continues to advance, patients and care teams expect to seamlessly engage with tools that support better health and accelerate progress. These developments demand the rapid, secure, scalable, and compliant sharing of data.
By aligning enterprise and business goals with digital technology, healthcare organizations (HCOs) can activate strategies for transformative outcomes and improve experiences and efficiencies across the health journey.
IDC Market Glance: Healthcare Provider Operational IT Solutions, 1Q25
Perficient is proud to be included in the categories of IT Services and SI services in the IDC Market Glance: Healthcare Provider Operational IT Solutions, 1Q25 report (doc #US52221325, March 2025). We believe our inclusion in this report’s newly introduced “Services” segmentation underscores our expertise to leverage AI-driven automation and advanced analytics, optimize technology investments, and navigate evolving industry challenges.
IDC states, “This expansion reflects the industry’s shift toward outsourced expertise, scalable service models, and strategic partnerships to manage complex operational IT and infrastructure efficiently.”
IDC defines IT Services as, “managed IT services, ensuring system reliability, cybersecurity, and infrastructure optimization. These solutions support healthcare provider transformation initiatives, helpdesk management, network monitoring, and compliance with healthcare IT regulations.” The SI Services category is defined by IDC as, “system integration services that help deploy technologies and connect disparate systems, including EHRs, RCM platforms, ERP solutions, and third-party applications to enhance interoperability, efficiency, automation, and compliance with industry standards.”
Advanced Solutions for Data-Driven Success
We imagine, engineer, and optimize scalable, reliable technologies and data, partnering with healthcare leaders to better understand consumer expectations and strategically align digital investments with business priorities.
Our end-to-end professional services include:
- Digital transformation strategy: The healthcare industry’s rapid evolution requires attention in several areas – adopting new care models, capitalizing on disruptive technologies, and affecting regulatory, operational, financial, and organizational change. We equip HCOs to recognize and speed past potential hurdles in order to maximize ROI by making the most of technology, operational, and financial resources.
- Cloud-native environments: Cloud technology is the primary enabler of business transformation and outcomes-focused value. Investing in cloud allows HCOs to overcome limitations of legacy systems, improve stability, and reduce costs. It also leads to better solution quality, faster feature delivery, and encourages a culture of innovation. Our expert consultants tailor cloud solutions to unique business needs, empowering teams and fueling growth, intelligence, and long-term profitability.
- Hyper-scalable data infrastructures: We equip HCOs to maximize the value of information across the care ecosystem by uncovering the most meaningful, trustworthy data and enriching it with critical context so you can use it to answer difficult questions, power meaningful experiences, and automate smart decisions. Trusting data begins with having trust in the people, processes, and systems that source, move, transform, and manage that data. We partner to build data into a powerful, differentiating asset that can accelerate clinical, marketing, and operational excellence as information is exchanged across organizations, systems, devices, and applications.
- AI ecosystems: HCO’s face mounting competition, financial pressures, and macro uncertainties. Enhance operations with innovative and intelligent AI and automation solutions that help you overcome complex challenges, streamline processes, and unlock new levels of productivity. Holistic business transformation and advanced analytics are front and center in this industry evolution, and generative AI (GenAI) and agentic AI have fundamentally shifted how organizations approach intelligence within digital systems. According to IDC, “GenAI will continue to redefine workflows, while agentic AI shows promise to drive real-time, responsive, and interpretive orchestration across operations.” Position yourself for success now and in the future with enhanced customer interactions, reduced operational costs, and data-driven decision-making powered by our AI expertise.
- Digital experiences: Digital-first care options are changing the face of healthcare experiences, bringing commerce-like solutions to consumers who search for and choose care that best fits their personal priorities and needs. We build high-impact experience strategies and put them in motion, so your marketing investments drive results that grow lasting relationships and support healthy communities. As the healthcare landscape continues to evolve – with organizational consolidations and new disruptors reshaping the marketplace – we help you proactively and efficiently attract and nurture prospective patients and caregivers as they make health decisions.
We don’t just implement solutions; we create intelligent strategies that align technology with your key business priorities and organizational capabilities. Our approach goes beyond traditional data services. We create AI-ready intelligent ecosystems that breathe life into your data strategy and accelerate transformation. By combining technical excellence, global reach, and a client-centric approach, we’re able to drive business transformation, boost operational resilience, and enhance health outcomes.
Success in Action: Illuminating a Clear Path to Care With AI-Enabled Search
Empower Healthcare Experiences Through Innovative Technology
Whether you want to redefine workflows, personalize care pathways, or revolutionize proactive health management, Perficient can help you boost efficiencies and a competitive edge.
We combine strategy, industry best practices, and technology expertise to deliver award-winning results for leading health systems:
- Business Transformation: Transform strategy into action: improve operations, lower costs, build operational resilience, and optimize care.
- Modernization: Provide quality, cost-effective tools and platforms that enable exceptional care.
- Data Analytics: Enable trusted data access and insight to clinical, operational, and financial teams across the healthcare ecosystem.
- Consumer Experience: Harness data and technology to drive optimal healthcare outcomes and experiences.
Discover why we have been trusted by the 10 largest health systems and the 10 largest health insurers in the U.S. Explore our healthcare expertise and contact us to learn more.
]]>Over the past three years working with Marketing Cloud Personalization (formerly Interaction Studio), I’ve always been intrigued by the Mobile icon and its capabilities. A few months ago, I decided to take a hands-on approach by developing my own application to explore this functionality firsthand, testing its implementation and understanding its real-world impact. And that is what this blog is about.
The Overall Process
The overall steps of the Marketing Cloud Personalization Mobile integration goes as follows:
- Have an Application (Understatement)
- Have access to the app project and code.
- Integrate the Evergage SDK library to the app.
- Create a Mobile App inside Personalization UI
- Create a connection between the app and the Personalization Dataset
- Track views and actions of the user in the app (code implementation).
- Publish and track campaign actions and push notifications.
That’s all… easy right?. Within this blog we will review how to do the connection between MCP and the mobile app and how to create a first interaction (steps 1 and part of step 6).
For this demo, I developed an iOS application using the Swift programming language. While I’m not yet an expert, I’ve been steadily learning how to navigate Xcode and implement functionality using Swift. This project has been a great opportunity to expand my skills in iOS development and better understand the tools and frameworks available within Apple’s ecosystem.
Integrate the Evergage SDK in the App
The iOS app I create is very simple (for now), it just a label, a button and an input field. The user types something in the input field, then clicks the button and the data is sent to the label to be shown.

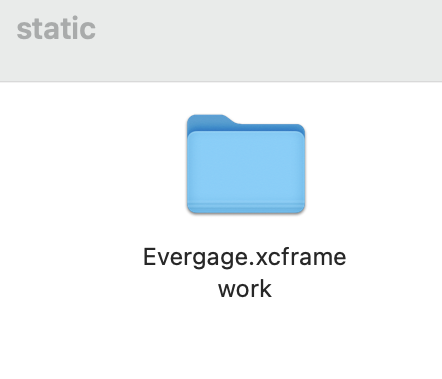
So, we need to add the Evergage SDK inside the app project. Download the Evergage iOS SDK (v1.4.1), unzip it and open the static folder. There, the Evergage.xcframework is the one we are about to use. When you have the folder ready, you need to copy the folder into your app. You should have something like this:
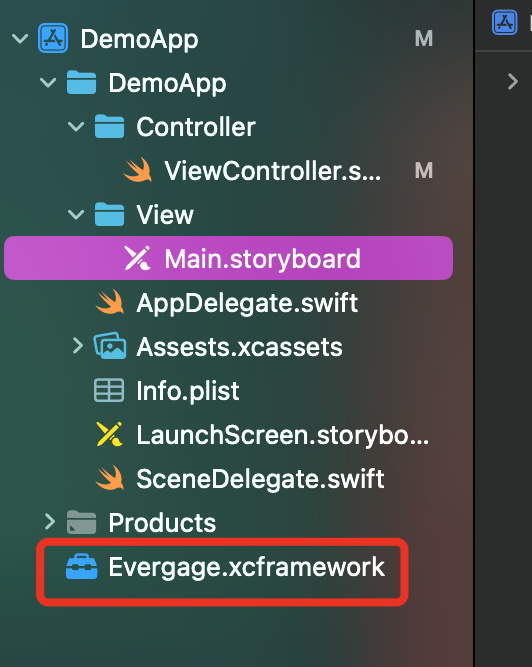
After you added your folder, you need to Build your app again with Command + B.
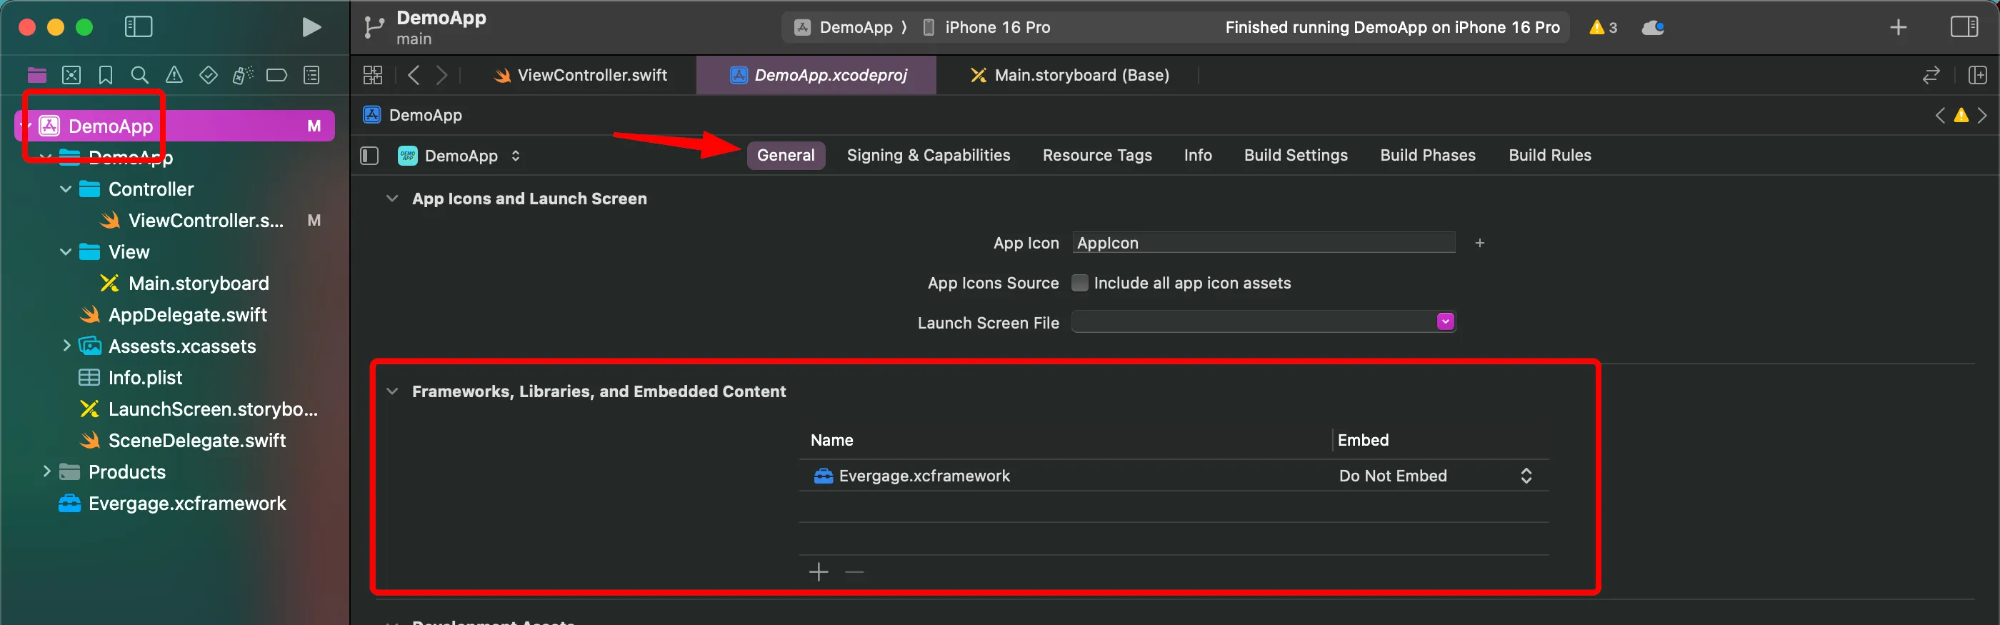
Now we need to validate the framework is there, so go to Target -> General -> Frameworks, Libraries and Embedded Content. You should see something like this, and since I’m using the static folder, the Do Not Embed is ok.
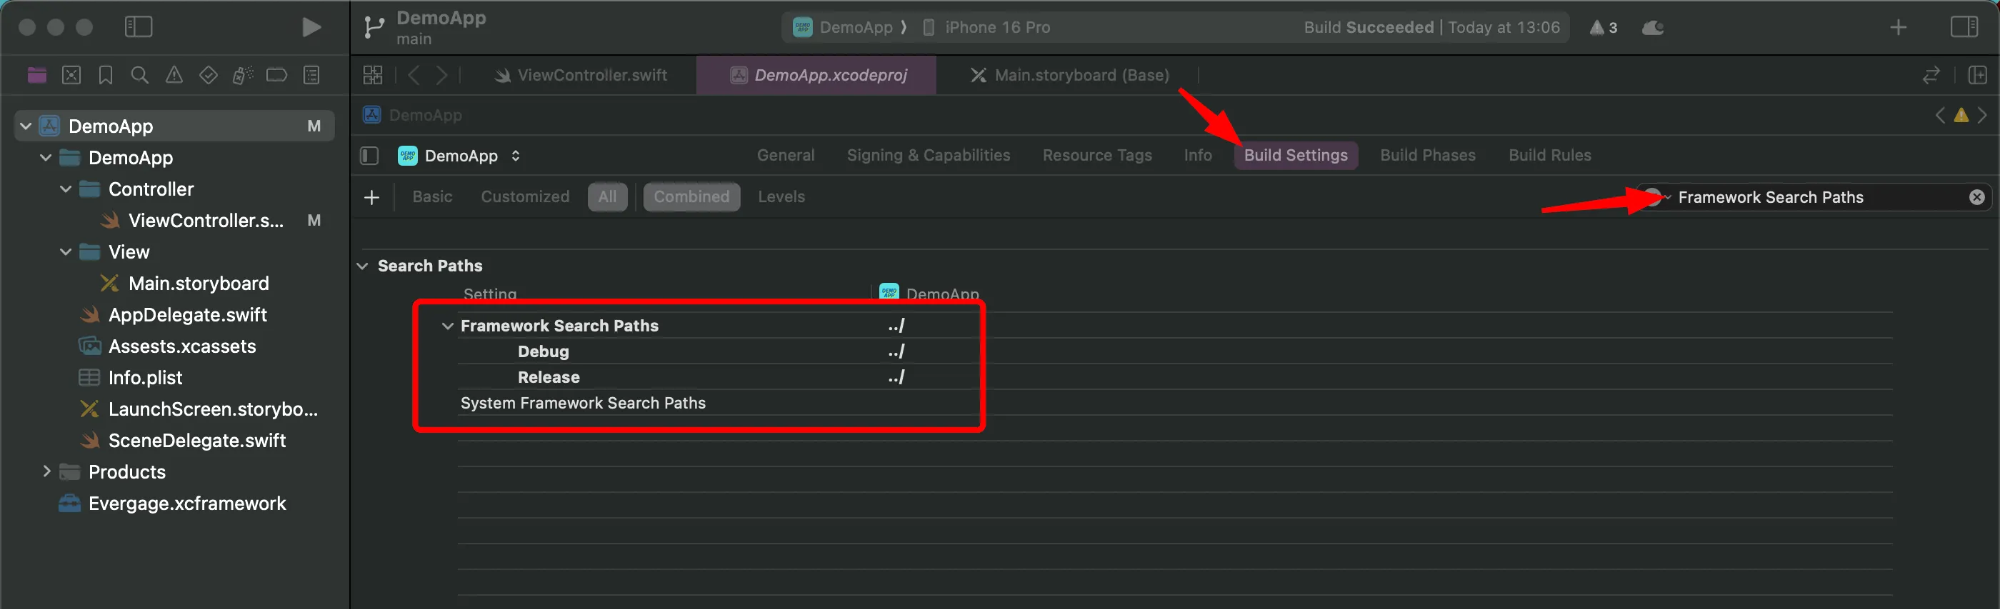
Validate the Framework Search Path contains a path where the framework was copied/installed. This step would probably be done manually since sometimes the path doesn’t appear. Build the app again to validate if no errors appears.
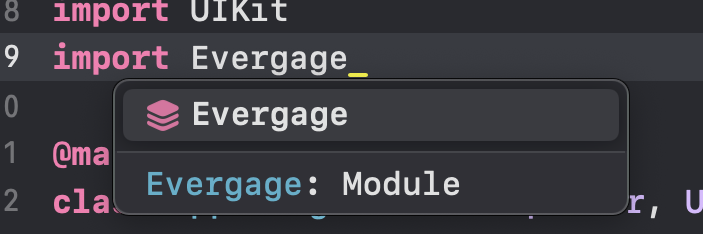
To validate this works, go to the AppDelegate.swift and type Import Evergage, if no errors appear, you are good to go 
Create a Mobile App Inside Personalization
Next, we have to create the Native App inside the Personalization dataset of your choice.
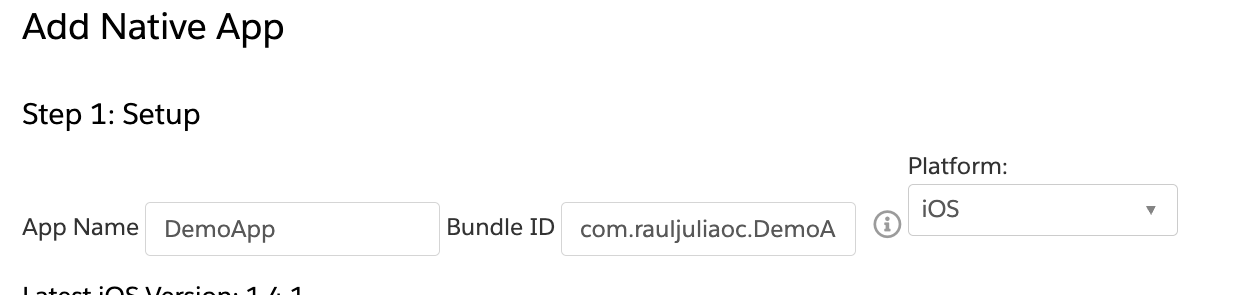
Hoover over Mobile and click Add Native App

Fill the information of the App Name and Bundle ID. For the Bundle ID, go to Target > General > Identity
You will with something like this:
Create the Connection to the Dataset
In the AppDelegate.swift , we will do the equivalent to add the JavaScript beacon on the page.
- First, we need to import the
Evergageclass reference. This allow the start of the Marketing Cloud Personalization iOS SDK. Our tracking interactions now should be done inside aUIViewControllerinherited classes. - Change the
didFinishLaunchingWithOptionstowillFinishLaounchingWithOptions - Inside the
applicationfunction we do the following:- Create a singleton instance of Evergage. A Singleton is a creational design pattern that lets you ensure that a class has only one instance, while providing a global access point to this instance. So with this, it provides a global access point to the instance, which can be used to coordinate actions across our app.
- Set the user id. For this, we set the
evergage.userIdusing theevergage.anonymousId, but if we already have the email or an id for the user, we should passed right away. - Start the Evergage configuration. Here we pass the Personalization’s account id and dataset id. Other values set are the
usePushNotificationsand theuseDesignMode. The last one help us to connect the Personalization web console for action mapping screen.
//Other imports
Import Evergage

@main
class AppDelegate: UIResponder, UIApplicationDelegate {


    func application(_ application: UIApplication, willFinishLaunchingWithOptions launchOptions: [UIApplication.LaunchOptionsKey: Any]?) -> Bool{

        //Create an singleton instance of Evergage
        let evergage = Evergage.sharedInstance()

        //Set User ID as anonymous
        evergage.userId = evergage.anonymousId

        //Start the Evergage Configuration with our Dataset information
        evergage.start { (clientConfigurationBuilder)   in
            clientConfigurationBuilder.account = "ACCOUNT_ID"
            clientConfigurationBuilder.dataset = "DATASET_ID"
            // if we want to user push notification campaings
            clientConfigurationBuilder.usePushNotifications = true
            //Allow user-initiated gesture to connect to the Personalization web console for action mapping screens.
            clientConfigurationBuilder.useDesignMode = true
        }


        // Override point for customization after application launch.
        return true
    }
}
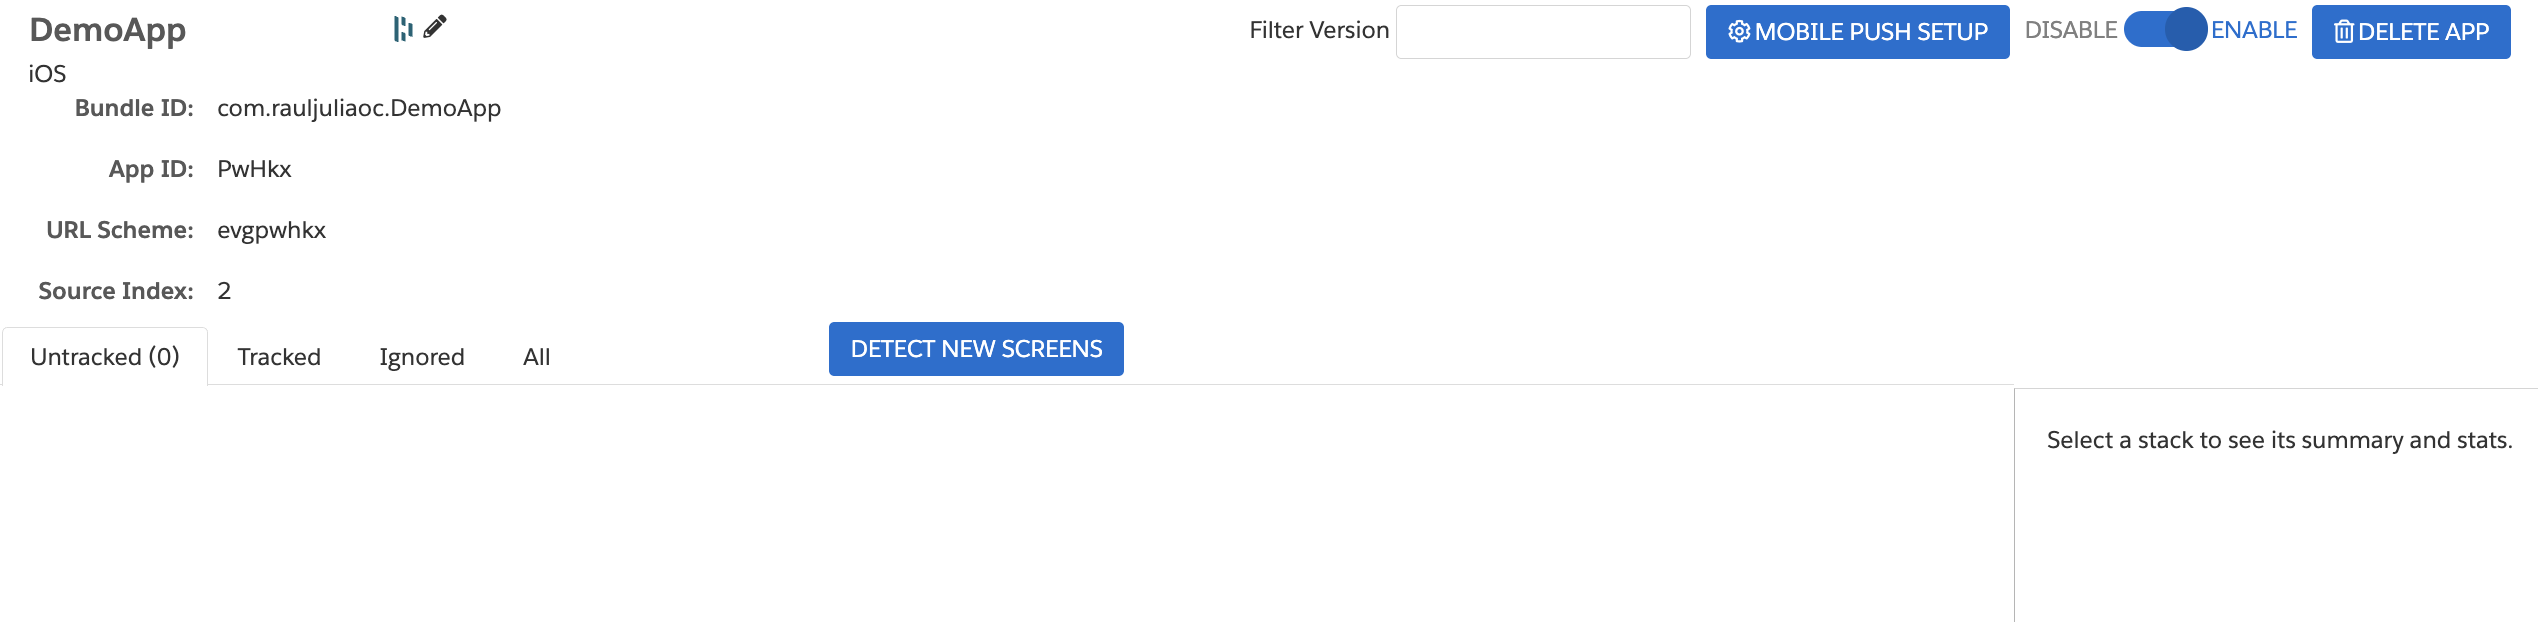
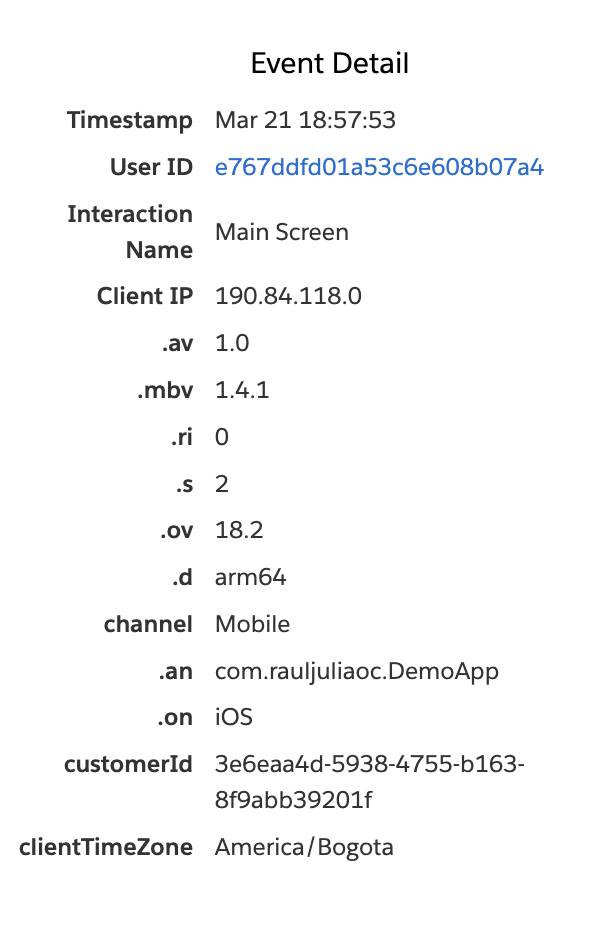
If we launch the app at this very moment, we will get the following inside Marketing Cloud personalization

This is very good and with that we are certain its working and sending the information to Marketing Cloud Personalization.
Track Actions
So, in order to track a screen we can use the evergageScreen . We use this property as part of the EVGScreen and EVGContext classes for tracking and personalization. This is possible when the app is using UIViewController for each of the screens or pages we have.
class ViewController: UIViewController {

        override func viewDidLoad() {
            super.viewDidLoad()
            // Do any additional setup after loading the view.
            trackScreen()
        }

        func trackScreen(){

            evergageScreen?.trackAction("Main Screen")

        }
}
If we would want to track the action of click a button, we can do something similar, for example this:
@IBAction func handleClick(_ sender: UIButton) {

        labelText.text = inputField.text
        evergageScreen?.trackAction("Button clicked")

    }
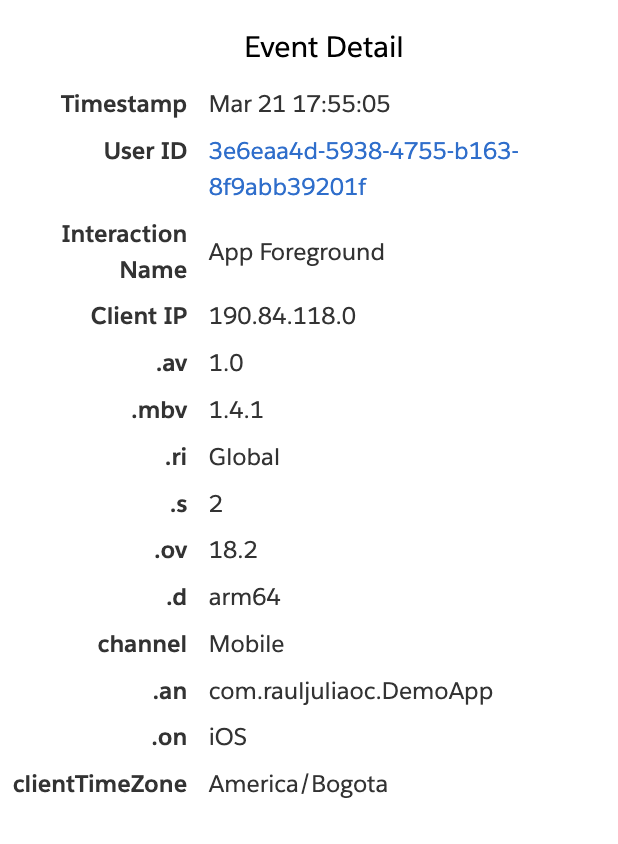
In this code, each time the user clicks a button, the handleClick function will trigger the action. the inputField.text will be assign to the labelText.text and the trackAction function will be triggered and the action will sent to our dataset.
Wrapping Up Part 1: What’s next?
That wraps up the first part of this tutorial! We’ve covered the basic about how to add the Personalization SDK inside a mobile iOS application, how to create a Mobile App within Personalization and do a very basic action tracking in a view. In Part 2, we’ll dive into tracking more complex actions like view item and view item detail which are part of the catalog object action’s for tracking items.
]]>Before mastering JavaScript, it’s crucial to understand how it thinks behind the scenes. Concepts like scope, hoisting, and the temporal dead zone might sound tricky at first, but they form the backbone of how your code behaves.
In this blog, we’ll break down these key ideas in the simplest way possible—so you can write cleaner code, avoid unexpected bugs, and truly understand what’s happening when your script runs.
What is Scope in JavaScript?
Think of scope like a boundary or container that controls where you can use a variable in your code.
In JavaScript, a variable is only available in the part of the code where it was created. If you try to use it outside that area, it won’t work—that’s because of scope.
This helps in two big ways:
- Keeps your code safe – Only the right parts of the code can access the variable.
- Avoids name clashes – You can use the same variable name in different places without them interfering with each other.
JavaScript mainly uses two types of scope:
1.Global Scope – Available everywhere in your code.
2.Local Scope – Available only inside a specific function or block.
Global Scope
When you start writing JavaScript code, you’re already in the global scope—this is like the outermost area of your code where variables can live.
If you create a variable outside of any function or block, it’s considered global, which means it can be used anywhere in your code.
var a = 5; // Global variable
function add() {
  return a + 10; // Using the global variable inside a function
}
console.log(window.a); // 5
In this example, a is declared outside of any function, so it’s globally available—even inside add().
A quick note:
- If you declare a variable with var, it becomes a property of the window object in browsers.
- But if you use let or const, the variable is still global, but not attached to window.
let name = "xyz";
function changeName() {
  name = "abc";  // Changing the value of the global variable
}
changeName();
console.log(name); // abc
In this example, we didn’t create a new variable—we just changed the value of the existing one.
 Important:
If you redeclare a global variable inside a function (using let, const, or var again), JavaScript treats it as a new variable in a new scope—not the same one. We’ll cover that in more detail later.
Local Scope
In JavaScript, local scope means a variable is only accessible in a certain part of the code—usually inside a function or a block.
There are two types of local scope:
1.Functional Scope
Whenever you create a function, it creates its own private area for variables. If you declare a variable inside a function, it only exists inside that function.
let firstName = "Shilpa"; // Global
function changeName() {
  let lastName = "Syal"; // Local to this function
console.log (`${firstName} ${lastName}`);
}
changeName();
console.log (lastName); //  Error! Not available outside the function
You can even use the same variable name in different functions without any issue:
function mathMarks() {
  let marks = 80;
  console.log (marks);
}
function englishMarks() {
  let marks = 85;
  console.log (marks);
}
Here, both marks variables are separate because they live in different function scopes.
2.Block Scope
Thanks to let and const, you can now create variables that only exist inside a block (like an if, for, or {}).
function getMarks() {
  let marks = 60;
  if (marks > 50) {
    const points = 10;
    console.log (marks + points); //  Works here
  }
  console.log (points); //  Uncaught Reference Error: points is not defined
}
Works here
}
console.log (points); // Uncaught Reference Error: points is not defined
}
As points variable is declared in if block using the let keyword, it will not be only accessible outside as shown above. Now try the above example using var keyword i.e declare “points” variable with var and spot the difference.
LEXICAL SCOPING & NESTED SCOPE:
When you create a function (outer function) that contains another function (inner function), then the inner function has access to the outer function’s variables and methods. This is known as Lexical Scoping.
function outerFunction() {
  let outerVar = "I’m outside";
  function innerFunction() {
      console.log (outerVar); //  Can access outerVar
  }
  innerFunction();
}
In other terms, variables & methods defined in parent function are automatically available to its child functions. But it doesn’t work the other way around—the outer function can’t access the inner function’s variables.
VARIABLE SCOPE OR VARIABLE SHADOWING:
You can declare variables with the same name at different scopes. If there’s a variable in the global scope and you create variable with the same name in a function, then you will not get any error. In this case, local variables take priority over global variables. This is known as Variable shadowing, as inner scope variables temporary shadows the outer scope variable with the same name.
If the local variable and global variable have the same name then changing the value of one variable does not affect the value of another variable.
let name = "xyz"
function getName() {
  let name = "abc"            // Redeclaring the name variable
      console.log (name)  ;        //abc
}
getName();
console.log (name) ;          //xyz
To access a variable, JS Engine first going to look in the scope that is currently in execution, and if it doesn’t find there, it will look to its closest parent scope to see if a variable exist there and that lookup process will continue the way up, until JS Engine reaches the global scope. In that case, if the global scope doesn’t have the variable, then it will throw a reference error, as the variable doesn’t exist anywhere up the scope chain.
let bonus = 500;
function getSalary() {
 if(true) {
     return 10000 + bonus;  // Looks up and finds bonus in the outer scope
  }
}
   console.log (getSalary()); // 10500
Key Takeaways: Scoping Made Simple
Global Scope: Variables declared outside any function are global and can be used anywhere in your code.
Local Scope: Variables declared inside a function exist only inside that function and disappear once the function finishes.
Global Variables Last Longer: They stay alive as long as your program is running.
Local Variables Are Temporary: They’re created when the function runs and removed once it ends.
Lexical Scope: Inner functions can access variables from outer functions, but not the other way around.
Block Scope with let and const: You can create variables that exist only inside {} blocks like if, for, etc.
Same Name, No Clash: Variables with the same name in different scopes won’t affect each other—they live in separate “worlds.”
Hoisting
To understand Hoisting in JS, it’s essential to know how execution context works. Execution context is an environment where JavaScript code is executed.
It has two main phases:
1.Creation Phase: During this phase JS allocated memory or hoist variables, functions and objects. Basically, hoisting happens here.
2.Execution Phase: During this phase, code is executed line by line.
-When js code runs, JavaScript hoists all the variables and functions i.e. assigns a memory space for those variables with special value undefined.
Key Takeaways from Hoisting and let’s explore some examples to illustrate how hoisting works in different scenarios:
- functions– Functions are fully hoisted. They can invoke before their declaration in code.
foo (); // Output: "Hello, world!"
 function foo () {
     console.log ("Hello, world!");
 }
- var – Variables declared with var are hoisted in global scope but initialized with undefined. Accessible before the declaration with undefined.
console.log (x); // Output: undefined
 var x = 5;
This code seems straightforward, but it’s interpreted as:
var x;
console.log (x); // Output: undefined
 x = 5;
3.Let, Const – Variables declared with Let and const are hoisted in local scope or script scope but stay in TDZ. These variables enter the Temporal Dead Zone (TDZ) until their declaration is encountered. Accessing in TDZ, results is reference Error
console.log (x); // Throws Reference Error: Cannot access 'x' before initialization
 let x = 5;
What is Temporal Dead Zone (TDZ)?
In JavaScript, all variable declarations—whether made using var, let, or const—are hoisted, meaning the memory for them is set aside during the compilation phase, before the code actually runs. However, the behaviour of hoisting differs based on how the variable is declared.
For variables declared with let and const, although they are hoisted, they are not initialized immediately like var variables. Instead, they remain in an uninitialized state and are placed in a separate memory space. During this phase, any attempt to access them will result in a Reference Error.
This period—from the start of the block until the variable is initialized—is known as the Temporal Dead Zone (TDZ). It’s called a “dead zone” because the variable exists in memory but cannot be accessed until it has been explicitly declared and assigned a value in the code.
console.log (x); //x is not defined -- Reference Error.
let a=10; //b is undefined.
var b= 100; // you cannot access a before initialization Reference Error.
Important: The Temporal Dead Zone helps prevent the use of variables before they are properly declared and initialized, making code more predictable and reducing bugs.
 Conclusion
JavaScript hoisting and scoping are foundational concepts that can feel tricky at first, but once you understand them, they make your code more structured and predictable. Hoisting helps explain why some variables and functions work even before they’re declared, while scoping defines where your variables live and how accessible they are. By keeping these concepts in mind and practicing regularly, you’ll be able to write cleaner, more reliable JavaScript. The more you experiment with them, the more confident you’ll become as a developer. Keep learning, keep building, and everything will start to click. Happy coding! 
]]>
AI transforms how businesses create, maintain, and provide engaging content in Sitecore. Embedding AI, Sitecore allows developers, marketers, and IT professionals to improve workflows, enhance customer interaction, and fine-tune digital strategies. Let’s explore how AI is shaping Sitecore and what it means for businesses.
Key AI Features in Sitecore
From Content Hub to XM Cloud, products in Sitecore’s portfolio have embedded AI that provides speed and scalability to personalization. Noteworthy features include:
- AI-powered content creation: Marketers can utilize AI to write articles, rephrase language, or write content for a certain audience. This minimizes manual effort and allows teams to focus on their strategy projects.
- Personalization at Scale: AI leverages user behavior to provide scaled personalized engagement, like personalized product recommendations, or personalizing dynamic page layouts. This improves customer engagement and conversion rates remain on the rise.
- Smart Search: Based on user intents and behaviors, Sitecore delivers relevant results through AI-enabled smart search capabilities for visitors, so that they can find the information they are looking for in the blink of an eye, enriching their overall experience.
- A/B Testing: Real-time multi-armed bandit machine learning algorithms will continuously optimize the variations of content that an end user sees, showing the most efficient version of a web page or campaign.
- Augmented Analytics: AI improves the analysis of consumer data by detecting trends and patterns that support improved decision-making.
Advantages of Integrating AI with Sitecore
There are several important benefits for organizations with embedded AI in Sitecore:
- Improved Efficiency: Automating repetitive tasks such as content tagging, approval procedures, and translations allows focusing on more valuable activities.
- Enhanced Creativity: New product offerings like Sitecore Stream, brand-aware assistant, give marketers agility to work with brand assets in new ways that align creativity across brand campaigns.
- Predictive Modeling: With advanced machine learning algorithms, patterns are identified in client behaviors, which enable organizations to make data-informed predictions and improve decision-making, leading to better business outcomes.
- Improved Security: AI can identify patterns in data that suggest unexpected behavior, which could mean a security breach or fraudulent activity, enhancing website safety.
Sector-Wise Applications
Sitecore AI deployment is also being used widely across multiple verticals:
- Retail: Tailored product recommendations are based on browsing history, which helps boosting sales, and enhance the user experience.
- Media and Entertainment: Automated video content tagging simplifies media management workflows.
- Global Businesses: Businesses use AI translation programs to adapt content more quickly for a larger audience.
Challenges and Considerations
However, despite the clear benefits, integrating Sitecore with AI is not without its challenges. Organizations are forced to navigate additional challenges such as data security, implementation costs, and making sure the AI outputs maintain their brand identity. Skilled personnel are needed to manage these advanced tools effectively.
Conclusion
Sitecore is evolving into a high-performance, AI-infused platform that powers personalized digital experiences at scale. Sitecore provides businesses with the tools they need to automate tasks, encourage creativity, and derive actions from data analytics, allowing businesses to stay relevant in an ever-changing environment. In a time where upstanding customer relationships are just as important as an online approach, leveraging AI with their Sitecore development strategy can do wonders.
]]>AI is revolutionizing our daily lives, reshaping how we work, communicate, and make decisions. From diagnostic tools in healthcare to algorithmic decision-making in finance and law enforcement, AI’s potential is undeniable. Yet, the speed of adoption often outpaces ethical foresight. Unchecked, these systems can reinforce inequality, propagate surveillance, and erode trust. Building ethical AI isn’t just a philosophical debate, it’s an engineering and governance imperative.
Imagine an AI system denying a qualified candidate a job interview because of hidden biases in its training data. As AI becomes integral to decision-making processes, ensuring ethical implementation is no longer optional, it’s imperative.
What is AI Ethics?
AI ethics refers to a multidisciplinary framework of principles, models, and protocols aimed at minimizing harm and ensuring human-centric outcomes across the AI lifecycle: data sourcing, model training, deployment, and monitoring.
Core ethical pillars include:
Fairness: AI should not reinforce social biases. This means actively reviewing data for gender, racial, or socioeconomic patterns before it’s used in training, and making adjustments where needed to ensure fair outcomes across all groups.
Transparency: Ensuring AI decision-making processes are understandable. Using interpretable ML tools like SHAP, LIME, or counterfactual explanations can illuminate how models arrive at conclusions.
Accountability: Implementing traceability in model pipelines (using tools like MLflow or Model Cards) and establishing responsible ownership structures.
Privacy: Protecting user privacy by implementing techniques like differential privacy, federated learning, and homomorphic encryption.
Sustainability: Reducing AI’s carbon footprint through greener technologies. Optimizing model architectures for energy efficiency (e.g., distillation, pruning, and low-rank approximations) and utilizing green datacenter solutions. The role of Green AI is growing, as organizations explore energy-efficient algorithms, low-power models for edge computing, and the potential for quantum computing to provide sustainable solutions without compromising model performance.
Fairness: Understanding the Nuances
Fairness in AI is not as straightforward as it may initially appear. It involves navigating complex trade-offs between different fairness metrics, which can sometimes cause conflict. For example, one metric might focus on achieving equal outcomes across different demographic groups, while another might prioritize minimizing the gap between groups’ chances of success. These differing goals can lead to tensions, and deciding which metric to prioritize often depends on the context and values of the organization.
In some cases, achieving fairness in one area may inadvertently reduce fairness in another. For instance, optimizing for equalized odds (ensuring the same true positive and false positive rates across groups) might be at odds with predictive parity (ensuring similar predictive accuracy for each group). Understanding these trade-offs is essential for decision-makers who must align their AI systems with ethical standards while also achieving the desired outcomes.
It’s crucial for AI developers to evaluate the fairness metrics that best match their use case, and regularly revisit these decisions as data evolves. Balancing fairness with other objectives, such as model accuracy, cost efficiency, or speed, requires careful consideration and transparent decision-making.
Why Ethics in AI Matter
AI is being integrated into high-stakes areas like healthcare, finance, law enforcement, and hiring. If ethics are left out of the equation, these systems can quietly reinforce real-world inequalities, without anyone noticing until it’s too late.
Some real-world examples:
- Amazon eliminated an internal recruiting AI when it was found to favor male candidates over female ones.
- The Netherlands’ childcare benefits scandal exposed how algorithmic bias led to thousands of wrongful fraud accusations.
- In 2024, a major financial institution came under fire after its AI loan approval system disproportionately rejected applicants from minority communities.
These examples illustrate the potential for harm when ethical frameworks are neglected.
Key Ethical Challenges in AI
Bias: When Machines Reflect Our Flaws
Algorithms reflect the data they’re trained on, flaws included. If not carefully reviewed, they can amplify harmful stereotypes or exclude entire groups.
Why Transparency Isn’t Optional Anymore
Many AI models are “black boxes,” and it’s hard to tell how or why they make a decision. Lack of transparency undermines trust, especially when decisions are based on unclear or unreliable data.
Accountability Gaps
Determining responsibility for an AI system’s actions, especially in high-stakes scenarios like healthcare or criminal justice, remains a complex issue. Tools and frameworks that track model decisions, such as audit trails, data versioning, and model cards, can provide critical insights and foster accountability.
Privacy Concerns
AI systems are collecting and using personal data very quickly and on a large scale, that raises serious privacy concerns. Especially given that there is limited accountability and transparency around data usage. Users have little to no understanding of how their data is being handled.
Environmental Impact
Training large-scale machine learning models has an energy cost that is substantially high and degrades the environment. Sustainable practices and greener tech are needed.
Strategies for Implementing Ethical and Efficient AI
Organizations should proactively implement ethical practices at all levels of their AI framework:
1. Create Ethical Guidelines for Internal Use
- Develop a comprehensive ethics policy that outlines acceptable AI use cases, decision-making protocols, and review processes.
- Create an AI Ethics Committee to monitor compliance with these guidelines.
2. Diversity in Data and Teams
- Ensure datasets are representative and inclusive.
-
Assemble diverse teams to bring varied perspectives to AI development. Having teams that are diverse in background will help to see ethical blind spots.
3. Embed Ethics into Development
- Considering ethical implications at each stage of AI development.
- Use tools like IBM’s AI Fairness 360 or Google’s What-If Tool to regularly test for bias in models.
4. Lifecycle Governance Models
- Using ModelOps and continuous integration pipelines that support versioning, rollback, and ethical red teaming. Ethics isn’t static, it evolves as data and models do.
5. Stakeholder Education and Engagement
- Build cross-functional literacy about how models impact stakeholders, both inside and outside the organization. Embed these insights into model documentation and UX. Engaging stakeholders in an open-source ethical AI model for feedback can create a more inclusive development process.
6. Engage in Standards and Compliance Frameworks
- Align with IEEE’s Ethically Aligned Design, the OECD AI Principles, and regulatory bodies like NIST and the EU AI Act. Ethics must be interoperable and audit ready.
Forging the Future
Indeed, an ethically responsible approach to AI is both a technical challenge and a societal imperative. By emphasizing fairness, transparency, accountability, and privacy protection, organizations can develop systems that are both trustworthy and aligned with human values. As the forces shaping the future continue to evolve, our responsibility to ensure inclusive and ethical innovation must grow alongside them.
By taking deliberate steps toward responsible implementation today, we can shape a future where AI enhances lives without compromising fundamental rights or values. As AI continues to evolve, it’s our collective responsibility to steer its development ethically.
]]>Ethical AI is a shared responsibility. Developers, businesses, policymakers, and society all play a part. Let’s build AI that prioritizes human values over mere efficiency, ensuring it uplifts and empowers everyone it touches.
The Microsoft 365 Admin Center is the centralized web-based portal administrators use to manage Microsoft 365 services for their organization. It provides a single access point for managing users, licenses, apps, and services like Exchange Online, Outlook, SharePoint, Teams, and more.
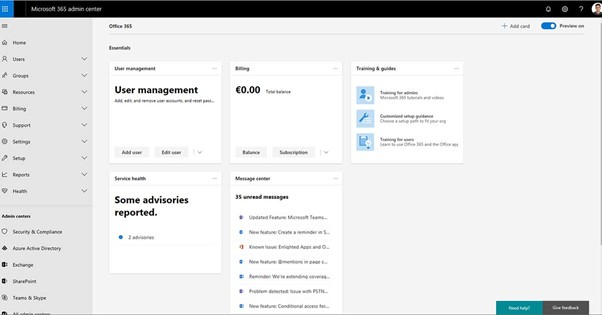
Key Functions of the Admin Center
- User Management: Add, remove, or edit user accounts and assign licenses.
- License Management: Purchase, assign, and monitor licenses across the organization.
- Service Health Monitoring: View the status of Microsoft services and receive incident reports.
- Billing and Subscriptions: Manage subscriptions, payment methods, and invoices.
- Security & Compliance: Access tools to enforce data protection, compliance policies, and user security.
- Reports & Insights: Generate usage, adoption, and security trends reports.
- Role-Based Access Control (RBAC): For better governance, assign different admin roles, such as Global Admin, User Admin, Billing Admin, etc.
- Settings Configuration: Configure settings for Microsoft Teams, Exchange, and SharePoint services.
10 Best Practices for User and Group Management in Microsoft 365
Effectively managing users and groups is key to maintaining security, compliance, and operational efficiency within Microsoft 365. Below are 10 best practices to follow:

1. Follow the Principle of Least Privilege
- Assign only the permissions a user needs to perform their job.
- Use role-based access control (RBAC) instead of giving everyone Global Admin rights.
- Delegated roles like User Admin, Groups Admin, Helpdesk Admin, etc., as needed.
2. Standardize User Creation
- Use a user creation template or naming convention (e.g., firstname.lastname@company.com).
- Automate user provisioning through tools like Azure AD Connect or Microsoft Entra ID.
- Set password policies and MFA (Multi-Factor Authentication), and assign licenses upon creation.
3. Organize Users with Security and Microsoft 365 Groups
- Use:
- Microsoft 365 Groups for collaboration in Teams, Outlook, and SharePoint.
- Security Group for resource access control (e.g., OneDrive, SharePoint).
- -Mail-Enabled Security Groups are available when email is needed with access control.
- Avoid group sprawl by regularly reviewing unused or duplicate groups.
4. Use Dynamic Groups Where Possible
- Dynamic groups automatically add or remove users based on attributes such as department or job title.
- Helps keep access rights consistent and minimizes manual errors.
5. Review and Audit Access Regularly
- Perform periodic access reviews using Azure AD Access Reviews.
- Audit group memberships, admin roles, and license assignments.
6. Implement Group Naming Policies
- Create consistent and clear group names, e.g., ‘HR-Team-M365’, ‘IT-Admins.’
- Use Entra ID (Azure AD) naming policies to enforce this automatically.
7. Monitor and Log User Activity
- Use Microsoft 365 audit logs and Microsoft Purview to track user and admin actions.
- Enable logging for sign-ins, password resets, file access, etc.
8. Secure Admin Accounts
- Use Privileged Identity Management (PIM) to elevate roles only when needed.
- Require MFA for all admin accounts.
- Consider dedicated admin accounts separate from users’ day-to-day login accounts.
9. Use Expiration Policies for Guest Users and Groups
- Set expiration policies to automatically clean up old groups or guest accounts.
- Helps reduce risk and clutter in your directory.
10. Document Changes and Procedures
- Maintain internal documentation for user/group management procedures.
- Helps onboard new IT staff and ensures consistency across the team.
Managing Licenses and Subscriptions in the Microsoft 365 Admin Center
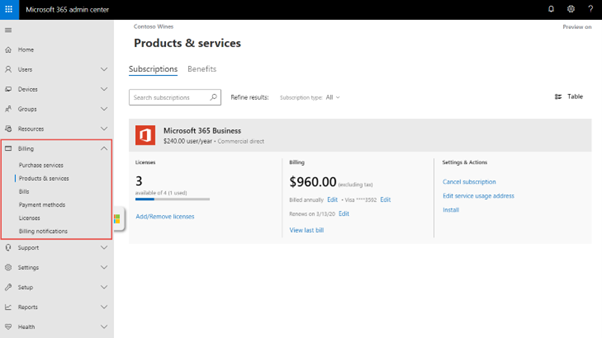
1. Accessing License and Subscription Information
- Sign in at [admin.microsoft.com] with admin credentials.
- Navigate to:
- Billing > Your Products – to view active subscriptions.
- Billing > Licenses – to view how many licenses are available, assigned, or unused.
- Users > Active Users – to manage user license assignments directly.
2. Assigning Licenses to Users
- Go to Users > Active Users.
- Select a user and click Licenses and Apps.
- You can choose the subscription (e.g., Microsoft 365 E3) and turn on/off specific apps like Teams, SharePoint, etc.
- Click Save changes.
3. Assigning Licenses to Groups (Recommended for Automation)
- Use Group-based licensing (requires Azure AD P1 or P2).
- Go to Groups > Active Groups.
- Select a security or Microsoft 365 group, then choose Licenses.
- Assign the desired license(s) and click Save.
Note: When users join the group, licenses are auto-assigned. When they leave, licenses are removed.
4. Managing Subscriptions
- Go to Billing > Your Products to:
- View subscription names (e.g., Microsoft 365 Business Premium).
- Check the number of licenses purchased and in use.
- Renew or cancel subscriptions.
- Add or reduce license count.
- Assign add-ons like Audio Conferencing, Defender for Office 365, etc.
5. Monitoring License Usage
- Navigate to Billing > Licenses to:
- View total vs. assigned vs. available licenses.
- Download usage reports.
- Go to Reports > Usage for more insights into how services (like Teams or OneDrive) are used.
6. Removing/Reassigning Licenses
- When a user leaves:
- Go to Users > Active Users> select the user.
- Remove the license and optionally delete the account.
Best practice tip: Transfer any data (email, OneDrive) before deletion or license removal.
7. Setting License Expiration Alerts
- Enable billing notifications under Billing > Billing Notifications.
- Set up alerts in Microsoft Purview or Defender for unused or about-to-expire licenses.
Role-Based Access Control (RBAC) in Microsoft 365
What is RBAC?
Role-based access Control in Microsoft 365 allows you to assign specific permissions to users based on their job roles without giving them full administrative access. This is a best practice for security, compliance, and operational efficiency.

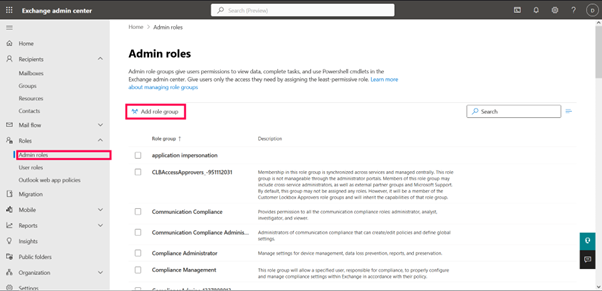
Where is RBAC Configured?
RBAC is configured in:
- Microsoft 365 Admin Center
- Microsoft Entra ID (formerly Azure AD)
- Exchange Admin Center (EAC)
- Security & Compliance Center
Key Admin Roles in Microsoft 365
- Global Administrator: Has full access to all M365 services and settings. Use sparingly.
- User Administrator: Manage user accounts, groups, and licenses.
- Group Administrator: Manage Microsoft 365 groups and distribution lists.
- Helpdesk Administrator: Reset passwords and manage support tickets.
- Billing Administrator: Manage subscriptions, billing, and payments.
- Compliance Administrator: Access Microsoft Purview and Data Loss Prevention (DLP) settings.
- Security Administrator: Manage security settings and Microsoft Defender.
- Exchange Administrator: Configures mailboxes, transport rules, and Exchange settings.
- SharePoint Administrator: Manage SharePoint sites and settings.
- Teams Administrator: Configure Microsoft Teams policies, voice, and settings.
How to Assign Roles in the Microsoft 365 Admin Center
- Go to [admin.microsoft.com
- Navigate to Users > Active Users
- Click on the user → go to Roles
- Choose either:
- Global Admin
- Privileged Role
- Or search for a specific role
- Click Save changes
Advanced RBAC with Microsoft Entra (Azure AD)
For finer control, use:
- PIM (Privileged Identity Management): Grant “just-in-time” access to roles
- Custom roles: Create your own roles with specific permissions
- Administrative units (AUs): Delegate control based on geography, department, etc.
Best Practices for RBAC in Microsoft 365
- Use the least privilege model: Minimize attack surface.
- Assign roles to groups: Easier to manage at scale.
- Monitor role assignments regularly: Catch role creep and misconfigurations.
- Use PIM for elevated roles: Limit exposure of critical permissions.
- Document who has what role: For transparency and audits.
Understanding Security & Compliance in Microsoft 365
Microsoft 365 provides robust tools under the Microsoft Purview (formerly Security & Compliance Center) and Microsoft Defender platforms to help organizations secure data, detect threats, and ensure compliance.
1. Core Security Features
Microsoft Defender for Office 365
- Protects against phishing, malware, and ransomware
- Features: Safe Attachments, Safe Links, Threat Investigation & Response
Multi-Factor Authentication (MFA)
- Requires users to verify identity via a second factor (e.g., phone, app)
Conditional Access
- Control resource access based on user location, device compliance, risk level, etc.
Identity Protection
- Detects risky sign-ins and users using machine learning
Microsoft Defender for Endpoint
- Advanced threat protection for devices
- Includes endpoint detection and response (EDR)
Secure Score
- Microsoft’s security health check for your environment
- Recommend actions to improve your security posture
2. Compliance Features via Microsoft Purview
Data Loss Prevention (DLP)
- Monitors and restricts sharing of sensitive data (e.g., credit card numbers, SSNs)
- Works across Exchange, SharePoint, OneDrive, Teams
Information Protection & Sensitivity Labels
- Classify and protect content based on its sensitivity
- Applies encryption, watermarks, or access controls automatically
Retention Policies
- Keeps or deletes data based on business or legal requirements
- Applies to email, Teams, OneDrive, SharePoint
eDiscovery
- Allows legal teams to search and preserve data for investigations or litigation
Audit Logging
- Tracks user and admin activity (e.g., file access, sign-in attempts)
- Essential for forensic analysis and incident response
Insider Risk Management
- Detects potential insider threats like data leaks or policy violations
Compliance Score
- Tracks your compliance with standards like GDPR, HIPAA, ISO 27001
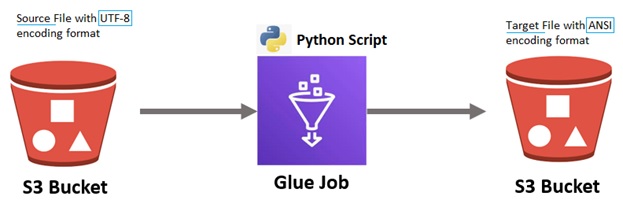
To convert a text file from UTF-8 encoded data to ANSI using AWS Glue, you will typically work with Python or PySpark. However, it’s important to understand that ANSI is not a specific encoding but often refers to Windows-1252 (or similar 8-bit encodings) in a Windows context.
AWS Glue, running on Apache Spark, uses UTF-8 as the default encoding. Converting to ANSI requires handling the character encoding during the writing phase, because Spark itself doesn’t support writing files in encodings other than UTF-8 natively. But there are a few workarounds.
Here’s a step-by-step guide to converting a text file from UTF-8 to ANSI using Python in AWS Glue. Assume you’re working with a plain text file and want to output a similarly formatted file in ANSI encoding.
General Process Flow
Technical Approach Step-By-Step Guide
Step 1: Add the import statements to the code
import boto3
import codecs
Step 2: Specify the source/target file paths & S3 bucket details
# Initialize S3 client
s3_client = boto3.client('s3')
s3_key_utf8 = ‘utf8_file_path/filename.txt’
s3_key_ansi = 'ansi_file_path/filename.txt'

# Specify S3 bucket and file paths
bucket_name = outgoing_bucket #'your-s3-bucket-name'
input_key = s3_key_utf8   #S3Path/name of input UTF-8 encoded file in S3
output_key = s3_key_ansi  #S3 Path/name to save the ANSI encoded file
Step 3: Write a function to convert the text file from UTF-8 to ANSI, based on the parameters supplied (S3 bucket name, source-file, target-file)
# Function to convert UTF-8 file to ANSI (Windows-1252) and upload back to S3
def convert_utf8_to_ansi(bucket_name, input_key, output_key):
    # Download the UTF-8 encoded file from S3
    response = s3_client.get_object(Bucket=bucket_name, Key=input_key)
    # Read the file content from the response body (UTF-8 encoded)
    utf8_content = response['Body'].read().decode('utf-8')
    # Convert the content to ANSI encoding (Windows-1252)
    ansi_content = utf8_content.encode('windows-1252', 'ignore')  # 'ignore' to handle invalid characters
    # Upload the converted file to S3 (in ANSI encoding)
    s3_client.put_object(Bucket=bucket_name, Key=output_key, Body=ansi_content)
Step 4: Call the function that converts the text file from UTF-8 to ANSI
# Call the function to convert the file
convert_utf8_to_ansi(bucket_name, input_key, output_key)
]]>
Why Do We Need to Add and Verify a Domain in Microsoft 365 (M365)?
- Establishing Professional Identity
- By adding your custom domain, you can create email addresses (e.g., you@yourcompany.com) that align with your business name. This adds professionalism and credibility to your communications.
- Personalizing Services
- Verifying your domain allows you to customize services like Teams, SharePoint, and OneDrive to reflect your organization’s identity, making collaboration more consistent and branded.
- Email Delivery and Routing
- To ensure emails sent to your custom domain are routed correctly to Microsoft 365, adding and verifying your domain is critical. This involves setting up DNS records like MX, SPF, and CNAME.
- Securing Your Domain
- Verifying your domain protects it from unauthorized use. Only verified owners can manage the domain within Microsoft 365.
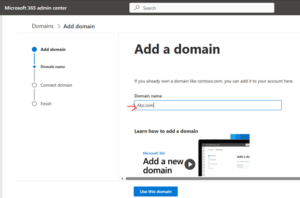
Add a Domain
- Go to the Microsoft 365 admin center.
- Go to the Settings > Domains page.
- Select Add domain.
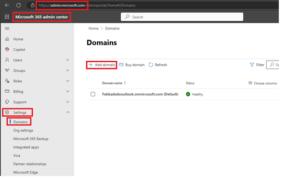
- Enter the name of the domain you want to add, then select Next.
- Choose how you want to verify that you own the domain.
- If your domain registrar uses Domain Connect, Microsoft will set up your records automatically by having you sign in to your registrar and confirm the connection to Microsoft 365.
- We can use a TXT record to verify your domain.
- Once domain is verified, we can go ahead and add other Exchange online record like TXT, MX and CNAME record.
-
Please find the below recording for above mentioned steps.
Refer: Add a domain to Microsoft 365 – Microsoft 365 admin | Microsoft Learn
Add and Verify the Exchange Online Record
1. TXT Record Verification
- Sign in to the Microsoft 365 Admin Center.
- Navigate to Settings > Domains and select your domain.
- Add a TXT record to your DNS hosting provider with the following details:
- Host/Name: @
- TXT Value: MS=msXXXXXXXX (unique ID provided in the admin center)
- TTL: 3600 seconds (or default value)
- Save the record and return to the Admin Center to click Verify.
2. MX Record Verification
- If TXT verification isn’t supported, use an MX record instead.
- Add an MX record to your DNS hosting provider:
- Host/Name: @
- Points to Address: Domain-com.mail.protection.outlook.com
- Priority: 0
- TTL: 3600 seconds
- Save the record and verify it in the Admin Center.
3. CNAME Record Verification
- Add a CNAME record for services like Autodiscover:
- Alias/Name: Autodiscover
- Target: Autodiscover.outlook.com
- TTL: 3600 seconds
- Save the record and ensure it’s correctly configured.
Refer: Add DNS records to connect your domain – Microsoft 365 admin | Microsoft Learn
Why Are TXT, MX, and CNAME Records Important for Exchange Online?
TXT, MX, and CNAME records play crucial roles in ensuring that your domain is correctly configured for Exchange Online and that your email and services work smoothly. Here’s why they matter:
TXT Records
TXT records are used to verify domain ownership and secure email systems.
- Domain Verification: When adding your custom domain to Microsoft 365, a TXT record proves that you own the domain.
- Email Security: TXT records support SPF (Sender Policy Framework), DKIM (DomainKeys Identified Mail), and DMARC (Domain-based Message Authentication, Reporting, and Conformance), which prevent email spoofing and improve deliverability by ensuring only authorized servers can send emails on behalf of your domain.
MX (Mail Exchange) Records
MX records are critical for routing emails to the correct servers.
- They direct incoming emails for your domain to the Microsoft 365/Exchange Online mail servers.
- A misconfigured MX record can cause email delivery issues, so having it set up correctly is essential.
CNAME Records
CNAME records are used for service configuration.
- For Exchange Online, CNAME records like Autodiscover ensure that users can seamlessly connect their email clients (like Outlook) to Exchange Online without manually entering settings.
- They simplify and automate the connection process for end-users.
Together, these DNS records form the backbone of your domain’s email configuration, ensuring that everything from verification to email delivery and client connectivity operates effectively. Without these properly configured records, you might encounter issues like failed email delivery or difficulties in connecting to Exchange Online.
]]>