A well-known fact about data is that it is a crucial Asset in an organization when managed appropriately. Data governance helps organizations manage data appropriately. Some customers say data governance is an optional best practice but not a mandatory implementation strategy.
Then, ask your customer a few questions:
- Is your data reliable or trustworthy?
- Is your data compliant?
- Is your business protected?
- Is your data holding you back from making business decisions?
- Why are You Taking a Risk?
Let’s explore why data governance is no longer optional in today’s data-driven world.
Common Challenges with Organizational Data
The world creates millions of terabytes of data every single day. However, 80% of enterprise data remains poor quality, unstructured, inaccurate, or inaccessible, leading to poor decision-making, compliance risks, and inefficiencies.
Poor data quality impacts businesses and costs millions of dollars annually due to lost productivity, missed opportunities, and regulatory fines.
Learn How Data Governance Impacts Organizations
1. Improved Data Quality & Decision-Making
50% of data scientists’ time is wasted cleaning and organizing messy data instead of deriving insights. Without governance, businesses rely on outdated, inconsistent, or redundant data, leading to poor decisions.
A data governance program ensures:
- Data accuracy, consistency, and reliability across all departments
- Standardized data entry, storage, and usage policies
- Reduction in data duplication, errors, and conflicting information
2. Regulatory Compliance & Risk Mitigation
Companies face significant penalties for violating data regulations like GDPR, CCPA, and HIPAA, including substantial fines, potential criminal charges, and reputational damage. They are paying over billions of $ in fines for data breaches and non-compliance.
Data governance programs ensure:
- Proper data classification and retention policies
- Compliance with industry regulations and security standards
- Clear data ownership and accountability
3. Enhanced Data Security & Protection Against Breaches
Most small businesses shut down within six months of a data breach, and the average cost of a data breach is now $4.45 million.
A data governance framework can help:
- Define who has access to what data and when
- Encrypt and protect sensitive customer and financial data
- Establish incident response protocols for breaches
4. Increased Operational Efficiency & Cost Savings
Bad data costs enterprises 30% of their revenue annually. Inefficient data management leads to:
- Wasted employee hours searching for or fixing data
- Siloed departments working with conflicting data
- Delays in automation, AI, and analytics
Data governance programs ensure:
- A single, authoritative source of truth for all teams
- Elimination of redundant and duplicate data entries
- Streamlined AI and analytics workflows
5. Breaking Down Data Silos Across Departments
Most executives say their teams make decisions based on siloed data, which creates inefficiencies, misaligned strategies, and lost revenue opportunities.
A data governance program can ensure:
- A common data language across business units
- Seamless integration between data platforms (ERP, CRM, Cloud)
- Cross-functional collaboration for AI and automation projects
6. Better Risk Management & Disaster Recovery
93% of companies that experience significant data loss without backup shut down within one year. Without governance, businesses struggle to recover critical data after a breach or system failure.
A governance program helps:
- Track data lineage for accountability
- Ensure data backups and disaster recovery protocols
- Identify high-risk data and apply extra security layers
7. AI & Digital Transformation Readiness
85% of AI projects fail due to poor data quality. AI models require structured, accurate, and unbiased data, which is impossible without governance.
A strong governance program:
- Optimizes data for AI, ML, and predictive analytics
- Prevents bias, inaccuracies, and redundancies in AI models
- Ensures data is FAIR (Findable, Accessible, Interoperable, and Reusable)
Conclusion
Without Data Governance
- Data turns from an asset into a liability
- Inaccurate analytics leads to Poor decision-making
- Security risks lead to Compliance violations & data breaches
- Operational inefficiencies lead to Wasted resources & duplicated efforts
With Data Governance
- Trustworthy, accurate data for better decisions
- Compliance with GDPR, CCPA, HIPAA, and more
- Seamless collaboration across teams
- Scalability as your business grows
A structured data governance approach turns enterprise data into a competitive advantage. In today’s dynamic business environment, data governance is not just a regulatory requirement—it’s a strategic advantage.
]]> Python Optimization: Improve Code Performance
 Introduction
Python is an incredibly powerful and easy-to-use programming language. However, it can be slow if not optimized properly!  This guide will teach you how to turbocharge your code, making it faster, leaner, and more efficient. Buckle up, and let’s dive into some epic optimization hacks!

For more on Python basics, check out our Beginner’s Guide to Python Programming.
 1. Choosing the Right Data Structures for Better Performance
Picking the right data structure is like choosing the right tool for a job—do it wrong, and you’ll be banging a nail with a screwdriver! 
 1.1 Lists vs. Tuples: Optimize Your Data Storage
- Use tuples instead of lists when elements do not change (immutable data). Tuples have lower overhead and are lightning fast!

# List (mutable)
my_list = [1, 2, 3]
# Tuple (immutable, faster)
my_tuple = (1, 2, 3)
 1.2 Use Sets and Dictionaries for Fast Lookups
- Searching in a list is like searching for a lost sock in a messy room
 . On the other hand, searching in a set or dictionary is like Googling something!
# Slow list lookup (O(n))
numbers = [1, 2, 3, 4, 5]
print(3 in numbers)  # Yawn... Slow!

# Fast set lookup (O(1))
numbers_set = {1, 2, 3, 4, 5}
print(3 in numbers_set)  # Blink and you'll miss it! ⚡
1.3 Use Generators Instead of Lists for Memory Efficiency
- Why store millions of values in memory when you can generate them on the fly?

# Generator (better memory usage)
def squared_numbers(n):
    for i in range(n):
        yield i * i
squares = squared_numbers(1000000)  # No memory explosion! 💥
 2. Loop Optimizations for Faster Python Code
 2.1 Avoid Repeated Computation in Loops to Enhance Performance
# Inefficient
for i in range(10000):
    result = expensive_function()  # Ugh! Repeating this is a performance killer 😩
    process(result)

# Optimized
cached_result = expensive_function()  # Call it once and chill 😎
for i in range(10000):
    process(cached_result)
2.2 Use List Comprehensions Instead of Traditional Loops for Pythonic Code
- Why write boring loops when you can be Pythonic?

# Traditional loop (meh...)
squares = []
for i in range(10):
    squares.append(i * i)

# Optimized list comprehension (so sleek! 😍)
squares = [i * i for i in range(10)]
 3. String Optimization Techniques
3.1 Use join() Instead of String Concatenation for Better Performance
# Inefficient (Creates too many temporary strings 🤯)
words = ["Hello", "world", "Python"]
sentence = ""
for word in words:
    sentence += word + " "

# Optimized (Effortless and FAST 💨)
sentence = " ".join(words)
 3.2 Use f-strings for String Formatting in Python (Python 3.6+)
name = "Alice"
age = 25

# Old formatting (Ew 🤢)
print("My name is {} and I am {} years old.".format(name, age))

# Optimized f-string (Sleek & stylish 😎)
print(f"My name is {name} and I am {age} years old.")
 4. Profiling & Performance Analysis Tools
 4.1 Use timeit to Measure Execution Time
import timeit
print(timeit.timeit("sum(range(1000))", number=10000))  # How fast is your code? 🚀
 4.2 Use cProfile for Detailed Performance Profiling
import cProfile
cProfile.run('my_function()')  # Find bottlenecks like a pro! 🔍
For more on profiling, see our Guide to Python Profiling Tools.
 5. Memory Optimization Techniques
5.1 Use sys.getsizeof() to Check Memory Usage
import sys
my_list = [1, 2, 3, 4, 5]
print(sys.getsizeof(my_list))  # How big is that object? 🤔
 5.2 Use del and gc.collect() to Manage Memory
import gc
large_object = [i for i in range(1000000)]
del large_object  # Say bye-bye to memory hog! 👋
gc.collect()  # Cleanup crew 🧹
6. Parallel Processing & Multithreading
 6.1 Use multiprocessing for CPU-Bound Tasks
from multiprocessing import Pool

def square(n):
    return n * n

with Pool(4) as p:  # Use 4 CPU cores 🏎
    results = p.map(square, range(100))
 6.2 Use Threading for I/O-Bound Tasks
import threading

def print_numbers():
    for i in range(10):
        print(i)

thread = threading.Thread(target=print_numbers)
thread.start()
thread.join()
For more on parallel processing, check out our Introduction to Python Multithreading.
 Conclusion
Congratulations!  You’ve unlocked Python’s full potential by learning these killer optimization tricks. Now go forth and write blazing-fast, memory-efficient, and clean Python code.
Got any favorite optimization hacks? Drop them in the comments! 
For more in-depth information on Python optimization, check out these resources:
It’s truly an exciting and proud moment for our QA India Practice, as we have achieved an incredible milestone: a 50/50 gender ratio by the end of 2024. While we continue to stand out with many QA achievements, we mark gender parity as our long-term goal. This progress in gender ratio sets a benchmark for the entire workforce by integrating committed, talented women into all areas, from entry-level to leadership roles.
As we reflect on 2024 journey, two things are true:
- Proactive Measures: QA India Practice took actions that led to this important progress.
- Challenging Change: Change is challenging, but we’re in the midst of the shifts needed to make the work culture more equitable.
We identify one secret to building this great culture: rooting for each other. Getting a seat at the table is not enough, so we identify potential women leaders early and welcome them into the core Leadership team. This has not only contributed to this overall result but also led to our core QA India Leadership comprising 50% women colleagues, which we expect to grow to 60% by Q1 2025.
Our heavy focus on DEI (Diversity, Equity, Inclusion) mindset has resulted in a low attrition rate of 6.5% in 2024 at our QA India Practice. Historically, even during even during greater resignation period (2021 to 2023), we maintained single-digit attrition, positively affecting our business unit bottom line.
To combat career impediments, we extend support for maternity leave accompanied by sabbaticals, helping retain great talent and enabling them to achieve their career aspirations. QA India Practice taps into a broader talent pool by predominantly hiring women Automation Engineers with strong software engineering backgrounds. This vitally helps in terms of technological advancements and closing the digital skills gap in the QA workforce.
We consistently observe that projects led by women exhibit high delivery quality, commitment, customer and team retention, organizational dedication, and effective mentoring. This proud moment gives us more momentum to work on this endless journey and structure our QA Growth Triangle with empowered women leaders.
]]>Debugging and Error Handling in VBA
After setting up VBA in Excel, you can start automating tasks and creating your macros. This blog will guide you through what comes next after the setup process—writing, running, and debugging VBA code in Excel.
Debugging and error handling are crucial for writing effective and reliable VBA (Visual Basic for Applications) code. It helps you identify issues and ensure your macros run smoothly. These practices ensure your code runs as intended and gracefully handles unexpected scenarios. In this blog, we’ll explore tools for debugging VBA code effectively and techniques for robust error handling, providing practical examples to make the concepts relatable and actionable.
Tools for Debugging VBA Code Effectively
1. Breakpoints: The First Line of Defense
Breakpoints allow you to pause code execution at specific lines, enabling you to inspect variable values and program flow. To set a breakpoint, click in the margin next to the code line or press F9. When the code execution stops, you can analyze what’s happening.
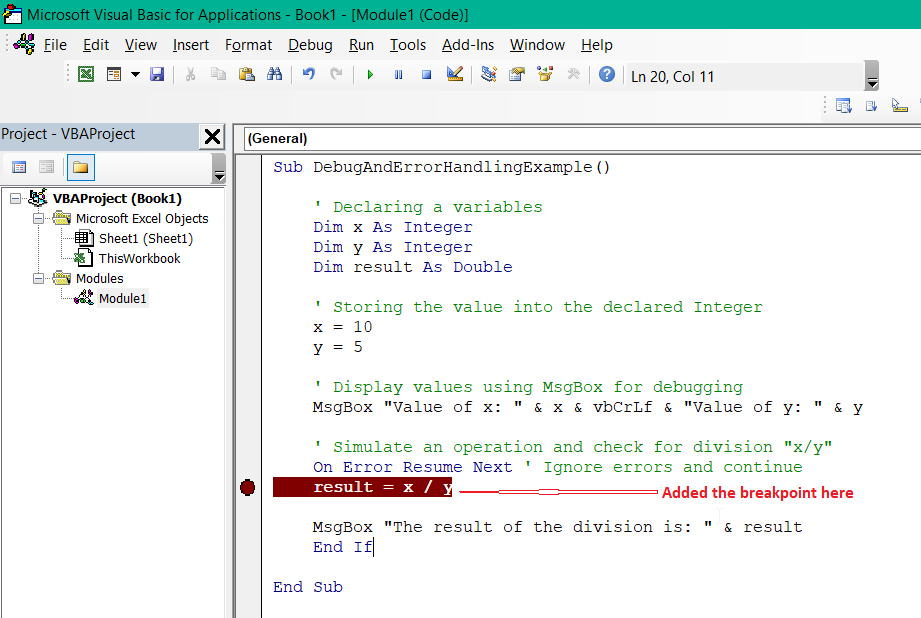
Breakpoint
Tip: Combine breakpoints with the Step-Into (F8) feature to execute the code line by line.
2. Immediate Window: Real-Time Debugging
The Immediate Window is a versatile tool where you can print variable values and test code snippets without running the entire program. Use Debug. Print to output values or messages to the Immediate Window.
Example:
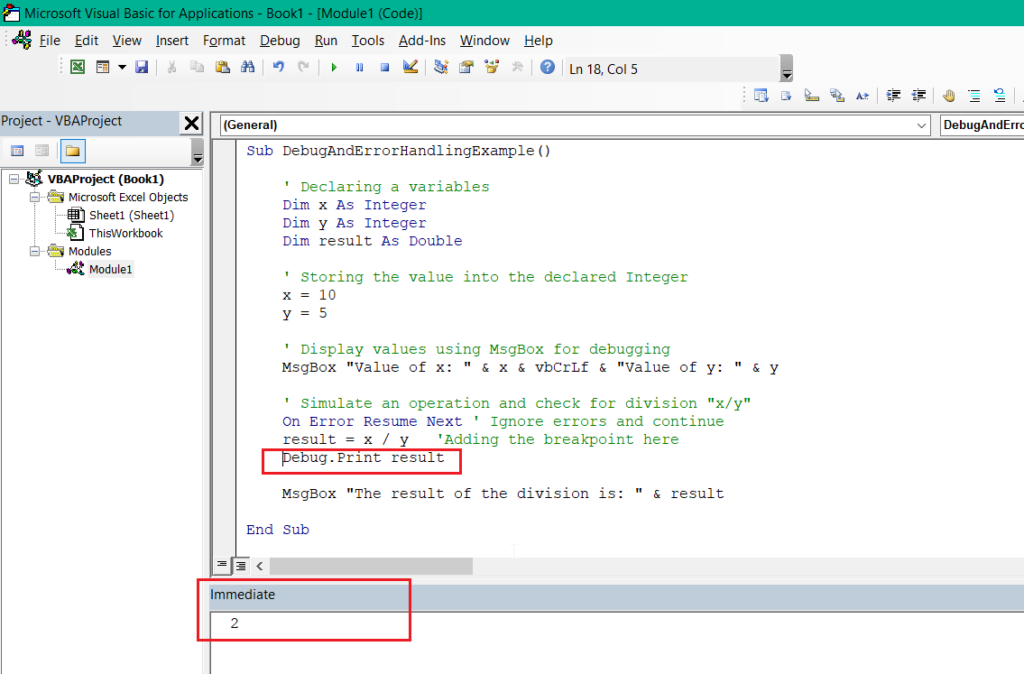
Immediate window in VBA Editor
3. Locals Window and Watch Window: Inspect Variables
- Locals Window: Displays all variables in the current scope and their values.
- Watch Window: Allows you to monitor specific variables or expressions.
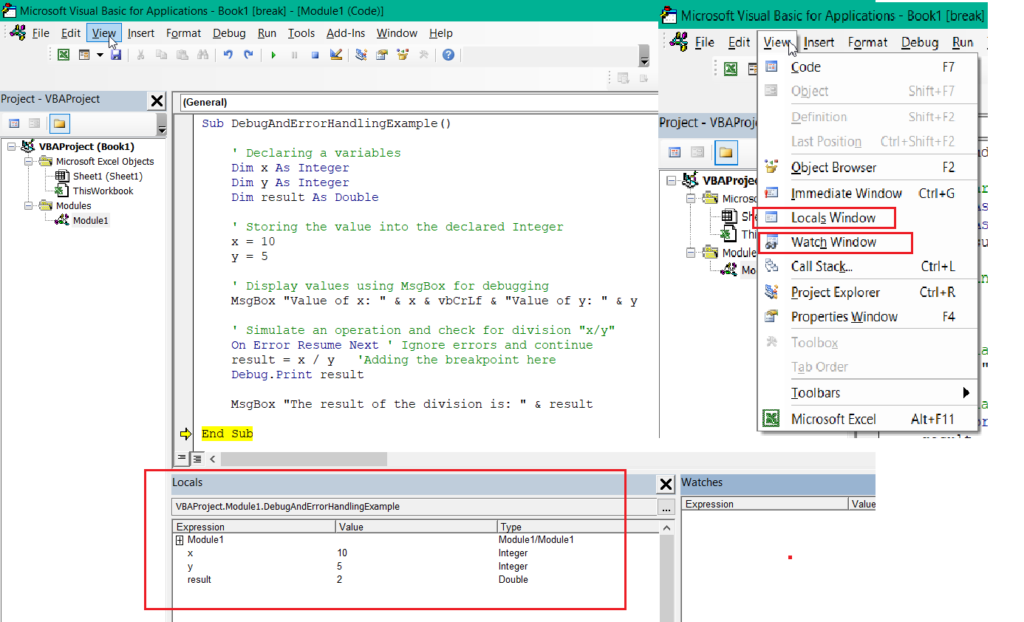
Local Window Watch Window in VBA editor
4. Error Highlighting and Debugging Features
VBA highlights syntax errors in red and runtime errors with a debug prompt. Clicking “Debug” during runtime errors highlights the problematic line for further inspection.
Example Error: Dividing by zero triggers a runtime error.
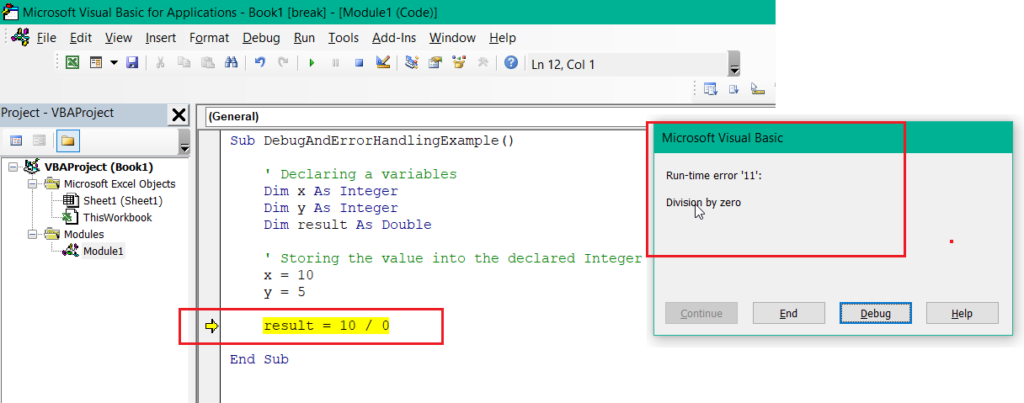
The highlighted error line of the code
Writing Robust Code with Error Handling Techniques
1. ‘On Error Resume Next’: Ignore and Proceed
This statement instructs VBA to ignore the error and move to the next line of code. Use it sparingly for non-critical errors.
Example:
Sub IgnoreError()
On Error Resume Next
Dim num As Integer
num = 10 / 0    'Error ignored
MsgBox "Code continues despite the error."
End Sub
You can explore more on error handling in VBA by reviewing the Microsoft VBA API Overview, which provides a comprehensive guide to error handling and other VBA concepts.
Conclusion
Once you’ve set up Excel VBA, you can start writing, debugging, and optimizing your macros. The next steps after setup are crucial for mastering VBA and making your Excel workflows more efficient. Keep practicing, and as you gain more experience, you’ll unlock the full potential of Excel automation.
]]>In Visual Basic for Applications (VBA), variables, data types, and constants are fundamental building blocks that allow you to create dynamic and efficient macros. Let’s explore these concepts in detail.
Variables in VBA
A variable is a named storage location in your computer’s memory that contains data. Variables make your code more flexible by allowing you to store and manipulate data dynamically.
Declaring Variables
In VBA, you declare variables using the Dim keyword, followed by the variable name and, optionally, its data type. For example:
Dim employeeName As String
Dim employeeID As Integer
Dim salary As Double
Benefits of Declaring Variables
- Clarity: Makes code easier to read and understand.
- Performance: Improves execution speed by specifying data types.
- Debugging: Helps catch errors during code execution.
Scope of Variables
Variables in VBA can have different scopes:
- Procedure-Level Scope: Declared within a subroutine or function and accessible only within that procedure.
- Module-Level Scope: Declared at the top of a module and accessible to all procedures within that module.
- Global Scope: Declared using the
Publickeyword, making them accessible across all modules.
Data Types in VBA
The type of data that a variable can store is determined by its data type. Choosing the right data type is crucial for optimizing memory usage and ensuring accuracy.
Common VBA Data Types
String: Stores text.
Dim productName As String
productName = "Laptop"
Integer: Stores whole numbers.
Dim quantity As Integer
quantity = 10
Double: Stores decimal numbers.
Dim price As Double
price = 999.99
Boolean: Stores True or False values.
Dim isActive As Boolean
isActive = True
Constants in VBA
Constants are similar to variables, but their values do not change once assigned. A constant can be declared using the keywordConst.
Const TaxRate As Double = 0.05
Constants make code easier to read and lower the possibility of unintentional changes to crucial values.
Working with Loops, Conditions, and Functions in VBA
Loop conditions and functions are essential programming constructs that make your VBA macros dynamic and intelligent.
Loops in VBA
You can run a block of code repeatedly with loops. VBA supports several types of loops:
For Loop
AForloop can be used to run a block of code a predetermined number of times.
Dim i As Integer
For i = 1 To 10
    Debug.Print i
Next i
While Loop
AWhile loop continues as long as a condition is True.
Dim x As Integer
x = 1
While x <= 5
    Debug.Print x
    x = x + 1
Wend
Do Until Loop
The Do Until loop executes code until a condition becomes True.
Dim y As Integer
y = 1
Do Until y > 5
    Debug.Print y
    y = y + 1
Loop
Conditions in VBA
Conditions enable decision-making in your code. Use If...Then...Else statements to execute different blocks of code based on conditions.
Dim score As Integer
score = 85

If score >= 90 Then
    Debug.Print "Grade: A"
ElseIf score >= 75 Then
    Debug.Print "Grade: B"
Else
    Debug.Print "Grade: C"
End If
Functions in VBA
Functions in VBA allow you to encapsulate reusable blocks of code. They can accept parameters and return a result.
Function CalculateArea(length As Double, width As Double) As Double
    CalculateArea = length * width
End Function

Sub TestFunction()
    Dim area As Double
    area = CalculateArea(5, 10)
    Debug.Print "Area: " & area
End Sub
Conclusion
Understanding variables, data types, constants, loops, conditions, and functions is essential for creating powerful VBA macros. By mastering these concepts, you can write efficient code that automates repetitive tasks and enhances productivity.
Ensure you’ve set up your environment correctly to get the most out of VBA. Check out my blog, which has a comprehensive guide on how to set up VBA in Excel.
]]>Guide to Setting Up VBA in Excel
VBA (Visual Basic for Applications) is an essential tool for automating repetitive tasks and creating custom solutions in Microsoft Excel. This Blog will walk you through the steps to set up VBA and get started with your first macro.
Step 1: Enable the Developer Tab for VBA in Excel
To use VBA in Excel, you must first enable the Developer tab. Here’s how:
- Open Excel and click on the “File” menu in the top-left corner.
- Select “Options” from the menu.
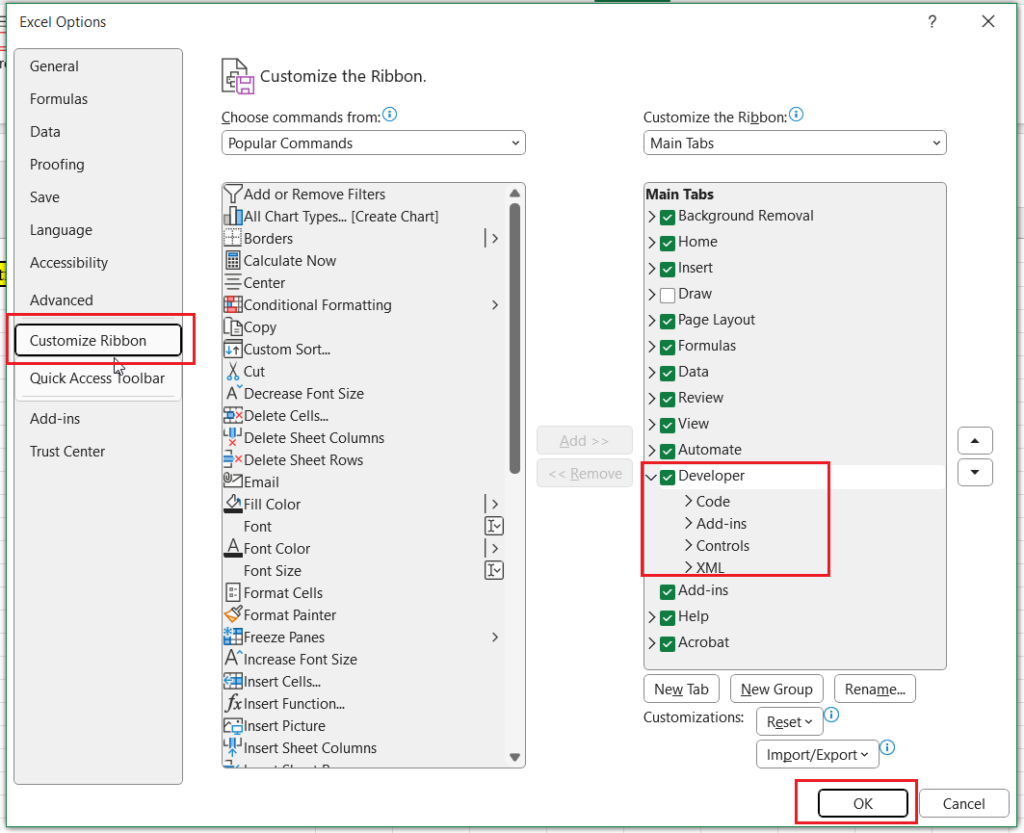
- In the Excel Options dialogue, choose “Customize Ribbon.“
- Under the “Main Tab” section on the right, check the box for “Developer” and click “OK.”.
Step 2: Open the VBA Editor and Start Writing Code
Once the Developer tab is visible, you can access the VBA editor:
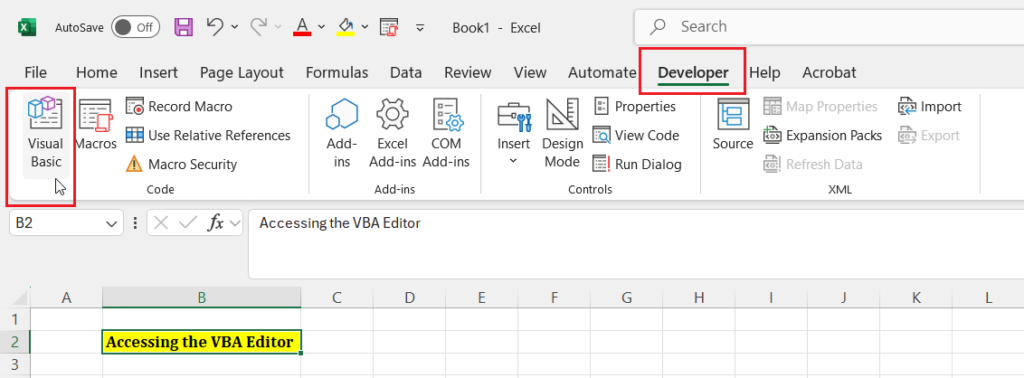
- Go to the “Developer” tab on the Excel ribbon.
- Click on “Visual Basic” in the **Code** group. Alternatively, press “ALT + F11” to open the VBA editor directly.
Step 3: Add a New Module for VBA Macros
Before you can start writing VBA code, you need to add a module:
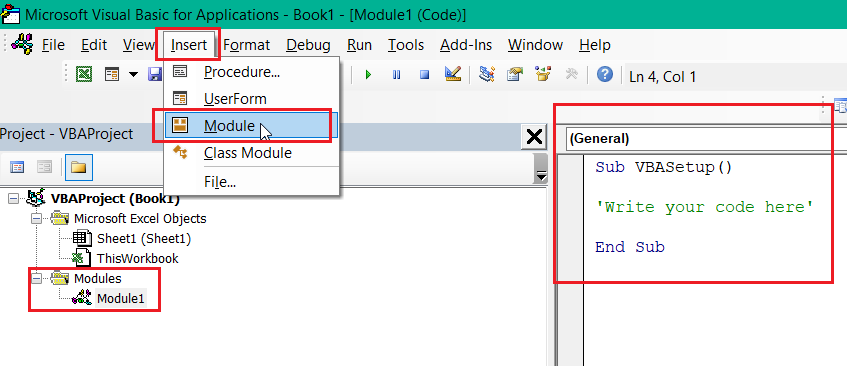
- In the VBA editor, click on the “Insert” menu.
- Select “Module” from the dropdown. A new module will appear in the Project Explorer.
Step 4: Create Your First Macro in Excel with VBA
With the module ready, you can begin coding. Here’s an example of a simple macro that displays a message box:
Sub ShowMessage()
MsgBox "Welcome to VBA!"
End Sub
When executed, this macro will show a message box with the text “Welcome to VBA!”.
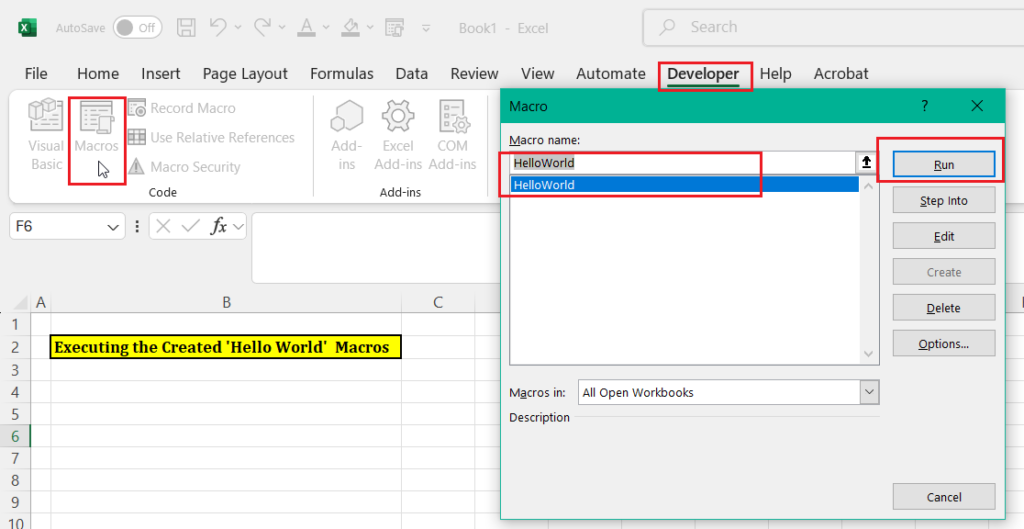
Step 5: Running Macros in Excel: Execute VBA Code
To execute your macro, follow these steps:
- Close the VBA editor to return to the Excel window.
- On the “Developer tab,” click Macros in the Code group.
- Select the macro you wrote (e.g., `ShowMessage`) from the list and click “Run.”.
Conclusion
You’ve now successfully enabled VBA, written your first macro, and executed it in Excel! VBA is a powerful tool that can save time by automating repetitive tasks and enhancing your spreadsheets. As you continue to explore VBA, you’ll discover advanced capabilities that can transform your workflow and boost productivity.
To further ensure the security of your macros, it’s essential to know how to enable or disable them in Microsoft 365 files. You can refer to the below post:
Enable or disable macros in Microsoft 365 files
Happy reading and automating!
]]>What is VBA?
Visual Basic for Applications (VBA) is a programming language developed by Microsoft. Microsoft Office applications like Excel, Word, and Access primarily use VBA to automate repetitive tasks. VBA is a programming language that automates tasks in Microsoft Office applications, especially Excel.
Types of VBA Macros
VBA macros are custom scripts created to automate tasks and improve efficiency within Microsoft Office applications. The types of VBA macros vary in functionality, ranging from simple recorded macros to complex event-driven scripts. Here’s a breakdown of the most commonly used types of VBA macros:

1. Recorded Macros
- Description: A sequence of actions carried out within an Office application is recorded to create these macros. VBA translates these actions into code automatically.
- Use Case: Great for automating repetitive tasks without manually writing code.
- Example: Automatically applying consistent formatting to a set of worksheets in Excel.
Learn more about how to record macros in Excel.
2. Custom-Coded Macros
- Description: These are manually written scripts that perform specific tasks. They offer more flexibility and functionality than recorded macros.
- Use Case: Useful for complex tasks that require conditional logic, loops, or interaction between multiple Office applications.
- Example: Generating customized reports and automating email notifications from Outlook based on Excel data.
3. Event-Driven Macros
- Description: These macros run automatically in response to specific events, such as opening a document, saving a file, or clicking a button.
- Use Case: Used for automating tasks that should happen automatically when a certain event occurs.
- Example: Automatically updating a timestamp in a cell every time a worksheet is modified.
4. User-Defined Functions (UDFs)
- Description: These are custom functions created using VBA that can be used just like built-in functions in Excel formulas.
- Use Case: Ideal for creating reusable calculations or functions unavailable in Excel by default.
- Example: Creating a custom function to calculate a specific financial metric.
5. Macro Modules
- Description: A module is a container for VBA code, which can include multiple macros, functions, and subroutines. Related macros can be grouped together and organized using these.
- Use Case: Useful for keeping code organized, especially in large projects.
- Example: Group all macros related to data processing in one module and all macros associated with reporting in another.
Each type of macro serves a distinct function and suits specific tasks, depending on the requirements. Use these macros actively based on your needs to achieve the best results.
Conclusion
VBA allows you to automate operations and increase productivity in Microsoft Office programs. Understanding the various sorts of macros helps you select the best strategy for your requirements. Whether you are recording activities, building custom scripts, or creating event-driven automated processes, knowing the options can guide your decision. Moreover, this knowledge ensures you choose the most efficient approach for your tasks. Additionally, using the right type of macro can significantly improve your productivity and streamline your workflow. Begin learning VBA to achieve new levels of efficiency in your workflows.
Happy reading and automating!
]]>In today’s world, testing web applications across multiple browsers and devices is essential. One of the best tools for this is BrowserStack, a cloud-based platform that allows you to run Selenium tests on various real browsers and devices. In this blog, we will walk you through the process of integrating BrowserStack with Python Selenium and running tests using Pytest.
What is BrowserStack?
BrowserStack is a cloud-based testing platform that allows you to run automated tests on real browsers and devices, without needing to set up the infrastructure yourself. It supports various browsers like Chrome, Firefox, Safari, Edge, and even mobile devices like iPhones and Android phones.

Why Use BrowserStack with Selenium?
Selenium is a widely used tool for automating browsers, and with BrowserStack, you can run your Selenium tests on a wide range of browsers and operating systems. This ensures your application works seamlessly across different environments without needing to maintain your own testing infrastructure.
In this guide, we will use Pytest—a popular testing framework for Python—to run tests. This combination provides an efficient and flexible way to conduct cross-browser testing.
Prerequisites
Before you begin, ensure you have the following installed:
- Python (Version 3 or above)
- Selenium: Install it via pip
pip install selenium - Pytest: Install it via pip
pip install pytest - BrowserStack Account: Sign up at BrowserStack and get your username and access key.
Step 1: Set Up BrowserStack
Once you have an account on BrowserStack, you can find your username and access key from the BrowserStack dashboard.
You’ll use these credentials to authenticate your Selenium tests on BrowserStack.
Step 2: Configure Selenium to Use BrowserStack
To configure your Selenium WebDriver to run on BrowserStack, you need to specify BrowserStack’s remote URL, your credentials, and the desired capabilities of the browser or device you wish to test on.
Here is how to set it up:
from selenium import webdriver
from selenium.webdriver.common.by import By
import pytest
from selenium.webdriver.common.keys import Keys
from selenium.webdriver.common.desired_capabilities import DesiredCapabilities

# BrowserStack credentials
username = "your_browserstack_username"
access_key = "your_browserstack_access_key"

# Desired capabilities to run the test
desired_cap = {
    'browser': 'Chrome',
    'browser_version': 'latest',
    'os': 'Windows',
    'os_version': '10',
    'name': 'Python Selenium BrowserStack Test'  # Test name
}

# BrowserStack URL
url = f"https://{username}:{access_key}@hub-cloud.browserstack.com/wd/hub"

# Pytest Fixture to initialize the driver
@pytest.fixture(scope="function")
def driver():
    driver = webdriver.Remote(
        command_executor=url,
        desired_capabilities=desired_cap
    )
    yield driver
    driver.quit()

# Sample Test Case using Pytest
def test_browserstack(driver):
    driver.get("https://www.browserstack.com")
    assert "BrowserStack" in driver.title

    # Example of interaction
    search_box = driver.find_element(By.NAME, "q")
    search_box.send_keys("Selenium Python")
    search_box.send_keys(Keys.RETURN)

    # Assert something to validate test
    assert "Selenium" in driver.page_source
Key Points:
- username and access_key: These values authenticate your test on BrowserStack.
- desired_cap: This dictionary defines the configuration for the browser and OS you want to test on.
- browser: The browser you want to test (Chrome, Firefox, etc.).
- browser_version: Version of the browser (e.g., ‘latest’ or ’90’).
- os: Operating system you want to run the tests on (Windows, macOS, Linux).
- os_version: Version of the OS.
- name: A custom name for the test.
Step 3: Running the Test with Pytest
To run the tests with Pytest, simply use the following command in your terminal:
pytest test_browserstack.py
This will trigger the test on BrowserStack, and you can view the results directly on the BrowserStack dashboard.
Step 4: Viewing Test Results on BrowserStack
Once your tests complete, you can visit the BrowserStack Dashboard to view detailed logs, screenshots, and videos of the tests. This can help in debugging any issues with your application.
Conclusion
Integrating BrowserStack with Python Selenium and Pytest is a powerful way to ensure your web application works across different browsers and devices. By using the cloud-based BrowserStack platform, you can avoid the hassle of setting up multiple testing environments and focus on writing effective tests. With Pytest’s simple yet effective testing capabilities, you can execute your cross-browser tests smoothly and efficiently.
If you run into any issues during the setup or execution, make sure to check the BrowserStack documentation for troubleshooting and advanced configuration options.
Happy testing!
]]>When automating browser tests with Selenium and Pytest, it’s common to run into challenges. Selenium is a powerful tool, but it can be tricky to troubleshoot and debug. Whether you’re encountering timeouts, stale elements, or incorrect results, understanding how to identify and resolve common issues is essential.

In this blog, we’ll walk through some common pitfalls when using Selenium with Pytest and share practical solutions to help you debug your tests effectively.
- Element Not Found / NoSuchElementException:
One of the most frequent errors when using Selenium is the NoSuchElementException, which occurs when Selenium cannot locate an element on the page. This usually happens if:-
- The element is not present yet (e.g., it loads dynamically).
- The selector is incorrect or out-of-date.
-
- The element is in a different frame or window.
-
Solution:
To resolve this, you can use Explicit Waits to ensure the element is present before interacting with it. Selenium provides the WebDriverWait method, which waits for a specific condition to be met (e.g., an element to become visible or clickable).
- Example:
from selenium.webdriver.common.by import By
from selenium.webdriver.support.ui import WebDriverWait
from selenium.webdriver.support import expected_conditions as EC

# Wait for the element to be visible
wait = WebDriverWait(driver, 10)  # Wait for up to 10 seconds
element = wait.until(EC.visibility_of_element_located((By.ID, "myElement")))
element.click()
This will wait for the element to appear within 10 seconds before trying to interact with it.
- StaleElementReferenceException: The StaleElementReferenceException occurs when you try to interact with an element that is no longer part of the DOM. This can happen if the page is reloaded, or the element gets removed and recreated.
Solution: To solve this issue, simply re-locate the element before interacting with it again. Using an explicit wait before interacting with the element is also a good practice.
- Example:
# First locate the element
element = driver.find_element(By.ID, "myElement")

# Perform an action
element.click()

# If the page is updated, re-locate the element
element = driver.find_element(By.ID, "myElement")
element.click()
- Timeouts (Element Not Interactable): Timeout errors often occur when Selenium takes longer than expected to find or interact with an element. For example, trying to click an element before it’s fully loaded, or interacting with an element that’s hidden
Solution: Using explicit waits as shown in the first example will help here. But you should also ensure that the element is interactable (visible and enabled) before performing any action on it- .
- Example:
wait = WebDriverWait(driver, 10)
element = wait.until(EC.element_to_be_clickable((By.ID, "submitButton")))
element.click()
In this case, element_to_be_clickable ensures that the button is not only present but also interactable (i.e., visible and enabled).
- Wrong Browser Version or Compatibility Issues: Sometimes tests may pass on one browser but fail on another. This is especially common with cross-browser testing.
Solution: Make sure you’re using the correct browser drivers (e.g., ChromeDriver for Chrome, GeckoDriver for Firefox) that are compatible with the version of the browser you are testing. Also, check if the issue is specific to the browser’s rendering engine.If you’re running tests across multiple browsers, using a cloud testing service like BrowserStack or Sauce Labs is a good way to avoid browser setup issues and test on real environments.
- Logging and Capturing Errors Another issue is tracking and logging errors effectively during the test execution. If you don’t capture logs, it can be hard to identify what went wrong in case of test failure.
Solution: Incorporating logging within your test can help you keep track of actions and errors, making it easier to identify issues.
- Example:
-
import logging

# Set up logging
logging.basicConfig(level=logging.INFO)

def test_login(driver):
    logging.info("Opening login page")
    driver.get("https://example.com/login")

    logging.info("Filling in login credentials")
    driver.find_element(By.ID, "username").send_keys("user")
    driver.find_element(By.ID, "password").send_keys("pass")

    logging.info("Submitting the form")
    driver.find_element(By.ID, "submit").click()

    logging.info("Verifying login success")
    assert "Welcome" in driver.page_source
You can view the log output to trace the sequence of events in case a failure occurs.
- Pytest Assertion Errors: Another common issue is assertion errors when the expected value does not match the actual value returned by the test.
Solution: When you’re running tests with Pytest, ensure that your assertions are meaningful and validate what you really care about. Sometimes, comparing strings or numbers directly may lead to errors if the values have different formats.
- Example:
-
def test_title(driver):
    driver.get("https://example.com")
    assert driver.title == "Expected Title", f"Expected 'Expected Title' but got {driver.title}"
This assertion helps ensure that the test fails gracefully, providing helpful error messages to debug.
- Pytest Markers and Test CategorizationWhen you have a large test suite, running all tests every time can slow down development. Using Pytest markers to categorize tests (e.g., @pytest.mark.smoke) can help you run only relevant tests, making debugging easier..
Solution: Use markers to tag tests for different categories, such as smoke tests, regression tests, etc.
- Example:
import pytest

@pytest.mark.smoke
def test_login(driver):
    driver.get("https://example.com/login")
    assert "Login" in driver.title

@pytest.mark.regression
def test_logout(driver):
    driver.get("https://example.com/logout")
    assert "Logout Successful" in driver.page_source
Then run only smoke tests or regression tests by specifying the marker:
pytest -m smoke
Conclusion
Debugging Selenium tests with Pytest can be tricky, but by understanding common pitfalls and applying simple solutions, you can save time and improve test reliability. Here’s a quick recap of what we covered:
- Use explicit waits to handle dynamic elements and timeouts.
- Re-locate elements if you run into StaleElementReferenceException.
- Ensure elements are interactable before clicking.
- Use logging to track the flow and errors in your tests.
- Leverage Pytest markers to run relevant tests and make debugging easier.
By following these best practices, you’ll become more effective at identifying and resolving issues in your Selenium tests. Happy debugging!
]]>
In today’s fast-paced software development environment, Continuous Integration (CI) and Continuous Deployment (CD) have become essential practices. They help development teams to integrate code changes frequently, automate tests, and release software faster. In this blog, we’ll explore how Pytest and Selenium can simplify the CI/CD pipeline for web automation testing.
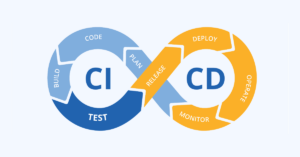
What is CI/CD?
Before diving into Pytest and Selenium, let’s first understand CI/CD:
- Continuous Integration (CI) is the practice of merging all developers’ working copies to a shared repository frequently, ideally several times a day. This ensures that the codebase is always in a deployable state and allows for faster bug detection.
- Continuous Deployment (CD) refers to the automatic release of code changes to production once they pass all tests and checks. This reduces manual intervention and speeds up the delivery of new features and bug fixes.
By automating the testing and deployment processes, CI/CD not only enhances collaboration but also improves software quality by catching bugs early in the development cycle.
How Do Pytest and Selenium Fit Into CI/CD?
Pytest is a popular Python testing framework that simplifies the process of writing tests. It’s known for its simplicity, scalability, and ease of integration with other tools. Selenium, on the other hand, is a powerful tool for automating web browsers, making it an ideal choice for testing web applications.
Together, Pytest and Selenium can be used to automate web testing, ensuring that every change made to the codebase is verified through browser-based tests before deployment.
Setting Up a Simple CI/CD Pipeline with Pytest and Selenium
To understand how Pytest and Selenium work together in CI/CD, let’s walk through the process.
- Writing Selenium Tests with Pytest:
First, we need to write automated tests for our web application using Selenium. Here’s a simple example where we automate the process of checking the title of a webpage:import pytest from selenium import webdriver # Test case to check the title of a webpage def test_page_title(): driver = webdriver.Chrome() driver.get("https://www.example.com") assert "Example Domain" in driver.title driver.quit()In this example, we’re using Selenium’s webdriver to launch a browser and navigate to a URL. Then, we assert that the page title contains the string “Example Domain”.
- Integrating Pytest into a CI Pipeline:
Now that we have our Selenium tests, we need to integrate them into a CI/CD pipeline. Popular CI tools like Jenkins, GitHub Actions, or GitLab CI can be used to automate this process. For example, let’s look at how to integrate Pytest with GitHub Actions, a CI tool provided by GitHub. This will run the Selenium tests every time a code change is pushed to the repository. Here’s a simple yaml configuration for GitHub Actions:name: Selenium Tests CI on: push: branches: - main jobs: selenium-tests: runs-on: ubuntu-latest steps: - name: Checkout code uses: actions/checkout@v2 - name: Set up Python uses: actions/setup-python@v2 with: python-version: '3.x' - name: Install dependencies run: | pip install -r requirements.txt sudo apt-get install -y chromium-chromedriver - name: Run Selenium tests with Pytest run: | pytest tests/test_selenium.py --maxfail=1 --disable-warnings -qIn this configuration:
-
- The on: push section specifies that this pipeline should run whenever there’s a push to the main branch.
- The jobs section defines the steps to run the tests. First, it checks out the code, sets up Python, installs dependencies, and then runs the Selenium tests with Pytest.
-
- Running the Tests Automatically:
Once the CI pipeline is set up, every time a developer pushes code to the repository, the pipeline will automatically trigger and run the Selenium tests using Pytest. If all tests pass, the process will proceed to deployment. If a test fails, the pipeline will stop, and the developer will be notified to fix the issue before continuing. This level of automation ensures that the web application remains bug-free and stable as new features or fixes are added. Additionally, it reduces the risk of introducing defects into production.
Benefits of Using Pytest and Selenium in CI/CD
- Early Bug Detection: Running automated tests after every code change helps catch bugs early, making it easier to fix them before they grow into bigger issues.
- Faster Development Cycles: Automated tests in the CI pipeline mean that developers spend less time manually testing, allowing them to focus more on feature development.
- Consistent Test Execution: Selenium allows you to simulate real-user interactions with a web browser, ensuring that the application functions correctly across different browsers and devices.
- Continuous Feedback: Developers get instant feedback if a test fails, enabling quicker fixes and smoother collaboration within the team.
Conclusion
Incorporating Pytest and Selenium into a CI/CD pipeline automates the testing of web applications, ensuring high-quality software that is ready for deployment at all times. This combination helps developers focus on writing features while the CI/CD pipeline takes care of the testing, making it an invaluable part of the modern software development lifecycle.
By automating everything from testing to deployment, teams can deliver features faster, identify bugs early, and provide a more reliable user experience. If you haven’t already, it’s time to embrace the power of Pytest and Selenium in your CI/CD workflow!
Happy Testing!
]]>
As your test automation skills grow, it’s crucial to implement advanced strategies that enhance the efficiency, reliability, and maintainability of your tests. In this post, we’ll explore several techniques that can help you optimize your test automation framework using PyTest and Selenium.

- Custom Test Suites and Tags:
Organizing tests into custom suites and using tags can help you manage your tests better, especially as the number of test cases grows. This approach allows you to group tests based on their functionality or the features they cover, making it easier to run specific sets of tests as needed.Creating Custom Test Suites:
You can create custom test suites by organizing your tests in directories and using PyTest’s built-in capabilities to run them selectively. For example, you can create a directory structure like this:
bash

/tests

    /smoke

        test_smoke.py

    /regression

        test_regression.py

    /features

        test_feature1.py

You can then run tests from a specific suite by pointing to that directory:

bash

pytest tests/smoke
Using Tags to Selectively Run Tests:
You can also use markers in PyTest to tag your tests. This allows you to run only tests with specific tags, making it easier to focus on certain areas of your application.
Example of Tagging Tests:
import pytest

@pytest.mark.smoke

def test_login():

    # Test logic here


@pytest.mark.regression

def test_data_processing():
Smoke Tests
To run only the smoke tests, you would use:
bash

pytest -m smoke
This selective execution can save time and resources, especially when working with a large test suite.
- Data-Driven Testing:
Data-driven testing allows you to run the same test with multiple sets of data. This is particularly useful for testing forms, login scenarios, or any feature that requires varying input. You can use pytest.mark.parametrize to achieve this easily.Example of Data-Driven Testing:
import pytest

from pages.login_page import LoginPage

@pytest.mark.parametrize("username, password, expected", [

    ("user1", "pass1", "Dashboard"),

    ("user2", "pass2", "Dashboard"),

    ("invalid_user", "wrong_pass", "Login Failed")

])

def test_login(setup_browser, username, password, expected):

    driver = setup_browser

    login_page = LoginPage(driver)

    login_page.enter_username(username)

    login_page.enter_password(password)

    login_page.click_login()

    if expected == "Dashboard":

        assert login_page.is_login_successful(), f"Login failed for {username}"

    else:

        assert login_page.is_login_failed(), f"Expected login failure for {username}"
This approach allows you to easily manage multiple test cases while keeping your code clean.
- Parallel Test Execution
When you have a large suite of tests, running them sequentially can take a considerable amount of time. PyTest allows you to run tests in parallel using the pytest-xdist plugin, which can significantly reduce execution time.Installing pytest-xdist:
bash

pip install pytest-xdist
Running Tests in Parallel:
You can run your tests in parallel by simply using the -n option followed by the number of CPU cores you want to utilize:
bash

pytest -n 4
This command will execute your tests across four parallel processes, speeding up your testing process.
- Implementing Page Factory Pattern:
The Page Factory pattern is an enhancement of the Page Object Model that provides a way to initialize elements more efficiently. By using the PageFactory class, you can reduce boilerplate code and improve readability.Example of Page Factory Implementation:
from selenium.webdriver.support.page_factory import PageFactory

class LoginPage:

    def __init__(self, driver):

        self.driver = driver

        self.username_field = PageFactory.init_elements(driver, "username")

        self.password_field = PageFactory.init_elements(driver, "password")

        self.login_button = PageFactory.init_elements(driver, "login")
This pattern can help manage elements more effectively, especially in larger applications.
- Custom Assertions and Helper Methods
Creating custom assertion methods can encapsulate common checks that you perform across multiple tests, promoting reusability and cleaner code. For example, you can create a base class for your tests that includes common assertions.Example of Custom Assertions:
class BaseTest:

    def assert_title_contains(self, driver, text):

        assert text in driver.title, f"Expected title to contain '{text}', but got '{driver.title}'"

class TestLogin(BaseTest):

    def test_login_success(self, setup_browser):

        driver = setup_browser

        login_page = LoginPage(driver)

        login_page.enter_username("valid_user")

        login_page.enter_password("valid_password")

        login_page.click_login()

        self.assert_title_contains(driver, "Dashboard")
This approach enhances readability and allows for more sophisticated assertions.
- Continuous Integration (CI) Integration:
Integrating your test automation suite with a CI tool (like Jenkins, Travis CI, or GitHub Actions) can automate your testing process. This ensures that tests are run automatically on every code change, providing immediate feedback to developers.
Basic CI Workflow:
- Push Code to Repository: When code is pushed to the repository, it triggers the CI pipeline.
- Run Tests: The CI tool executes your test suite using PyTest.
- Report Results: Test results are reported back to the developers, helping them identify issues quickly.
Conclusion
Implementing these advanced strategies in your PyTest and Selenium test automation framework can lead to significant improvements in efficiency, reliability, and maintainability. By utilizing custom test suites and tags, embracing data-driven testing, enabling parallel execution, applying the Page Factory pattern, creating custom assertions, and integrating with CI, you can build a robust testing framework that scales with your application.
As you refine your test automation practices, remember to keep exploring and adapting to new tools and techniques that can further enhance your workflow. Happy testing!
]]>Introduction
Flaky tests—those that fail intermittently—are a common headache for test automation teams. They can be especially frustrating in Selenium tests because of the dynamic nature of web applications. Elements might take time to load, page navigation could be slow, or JavaScript-heavy applications might delay interactions. These issues lead to false negatives in tests, where tests fail even though the application works fine.
In this blog, we’ll explore how to use Pytest retries and explicit/implicit waits to improve the stability of your Selenium tests and reduce flaky test failures.
Why Selenium Tests Are Flaky
Flaky tests typically fail due to the following issues:
- Dynamic Content: Elements that take time to load (like AJAX content) or slow-rendering pages.
- Network Issues: Delays or failures in loading resources or API calls.
- Timing Issues: Trying to interact with elements before they’re fully loaded or ready.
The key to reducing flaky tests lies in two techniques: retries and waits.
Using Pytest Retries for Flaky Tests with pytest-rerunfailures
A simple solution to mitigate flaky tests is to retry failed tests a certain number of times. The pytest-rerunfailures plugin allows you to automatically rerun tests that fail, thus reducing the impact of intermittent failures.
- Installation: Install the pytest-rerunfailures plugin:
bash
pip install pytest-rerunfailures
- Configuration: To enable retries, use the –reruns option when running your tests. For example, to retry a failed test 3 times, run:
bash
pytest --reruns 3
You can also set the number of retries in your pytest.ini configuration file:
ini

[pytest]

reruns = 3

rerunsDelay = 2  #Delay between retries in seconds
- Example of Retries: Let’s say you have a test that clicks a button to submit a form. Sometimes, due to timing issues, the button might not be clickable. By adding retries, the test will automatically retry if the failure is due to a transient issue.
def test_submit_button(mocker):
    # Simulate flaky behavior
    mocker.patch('selenium.webdriver.common.by.By.ID', return_value='submit')
    # Trigger a click action on the button
    button = driver.find_element_by_id('submit')
    button.click()
    assert button.is_enabled()  # Check button state
Using Waits to Ensure Elements Are Ready
In Selenium, waits are crucial to ensure that the elements you want to interact with are available and ready. There are two types of waits: implicit and explicit.
- Implicit Waits: Implicit waits instruct the WebDriver to wait a certain amount of time for elements to appear before throwing an exception.
driver.implicitly_wait(10) # Waits for 10 seconds for elements to load
While easy to use, implicit waits can sometimes slow down tests and make debugging more difficult because they apply globally to all elements.
- Explicit Waits: Explicit waits are more powerful and precise. They allow you to wait for specific conditions before proceeding with interactions. WebDriverWait combined with expected conditions is commonly used.Example: Wait for an element to be clickable before clicking on it:
from selenium.webdriver.support.ui import WebDriverWait
from selenium.webdriver.support import expected_conditions as EC
from selenium.webdriver.common.by import By

wait = WebDriverWait(driver, 10)
element = wait.until(EC.element_to_be_clickable((By.ID, "submit_button")))
element.click()
- Using Waits for AJAX Content: Often, web pages use AJAX to load content dynamically. Explicit waits are perfect for waiting until AJAX calls finish loading.
# Wait until the AJAX content is visible
wait.until(EC.visibility_of_element_located((By.ID, "ajax-content")))
Best Practices for Waits and Retries
- Use explicit waits for better control: Explicit waits allow you to wait for specific conditions (like visibility or clickability), improving test reliability.
- Combine retries with waits: Ensure that retries are only triggered after sufficient wait time to account for potential page load or element rendering delays.
- Optimize test timing: Use waits for specific elements rather than using global implicit waits, which can slow down tests.
Conclusion
By using Pytest retries and explicit/implicit waits, you can significantly improve the stability of your Selenium tests. Retries help handle intermittent failures, while waits ensure that elements are ready before interacting with them. Together, these strategies reduce flaky test results, making your test suite more reliable and consistent. Happy Testing!
]]>