
Integrating Salesforce, a robust CRM platform, with other systems can significantly improve business processes and streamline the flow of data. Postman, a popular tool, simplifies the integration process and empowers developers and administrators. In this comprehensive guide, we will explore the seamless integration of Salesforce with Postman, leveraging its extensive features and capabilities to effectively test and interact with Salesforce APIs.

Pic courtesy: getforce.com
The integration of Salesforce with Postman provides numerous advantages for developers and administrators. Firstly, Postman offers a user-friendly interface that simplifies API testing, allowing users to quickly design and execute requests to Salesforce APIs. This streamlines the testing process and ensures efficient development. Secondly, Postman saves valuable time by enabling users to capture and reuse API requests, eliminating the need to manually construct each request from scratch. This accelerates development cycles and enhances productivity.
Additionally, Postman supports collaboration, allowing users to easily share collections of API requests and collaborate with team members during the integration process. This facilitates teamwork, knowledge sharing, and efficient project management. Furthermore, Postman’s debugging capabilities play a vital role in troubleshooting integration issues. With advanced debugging tools and features, users can identify and resolve issues more effectively, ensuring smoother and more reliable Salesforce integrations.
By leveraging the combination of Salesforce and Postman, developers and administrators can optimize their integration workflows, streamline API testing, and enhance overall efficiency. The following sections of this guide will delve into the process of integrating Salesforce with Postman, providing step-by-step instructions and highlighting best practices to maximize the benefits of this integration.

To integrate Salesforce with Postman, follow these steps:
Sign up for a Salesforce Developer Account:
- To begin, Sign Up for a Salesforce Developer Account at https://developer.salesforce.com/. This account will provide you with the necessary credentials to access Salesforce APIs.
Install and Set Up Postman:
- Download and install Postman from the official website at https://www.postman.com/downloads/. Once installed, open Postman and create an account if you haven’t already. This will allow you to sync your collections and environments across devices. You can also refer the blog to know more about Postman and APIs.
Obtain Salesforce API Credentials:
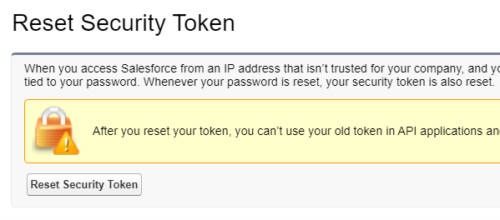
- In your Salesforce Developer Account, navigate to Setup > Users > Users and click on your username. On the user detail page, click on the “Reset Password” button. Follow the instructions to set a new password. After resetting the password, click on “Reset My Security Token” to receive an email with your security token.
Set Up Salesforce Connected App:
- In Salesforce, navigate to Setup > App Manager and click on “New Connected App.” Fill in the required details, such as the app name, API name, and contact email, and select the necessary OAuth scopes.
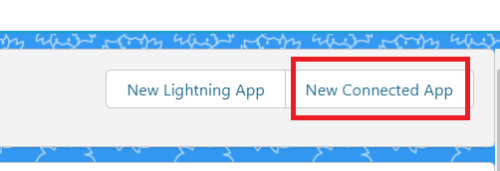
fig: App Manager Page.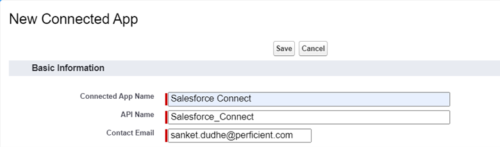
fig: Basic Information for New Connected App.
fig: OAuth setting. - Save the changes, and on the next page, note down the “Consumer Key” and “Consumer Secret.” Ensure that the selected OAuth scopes align with the permissions you need for your integration.
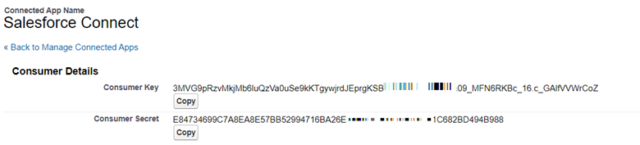
fig: Consumer Details.Configure Postman Environment:
In Postman, click on the “Manage Environments” icon (gear icon in the top right corner) and select “Add.” Provide a name for the environment (e.g., Salesforce), and add the following variables:
-
- Grant_type: Set it equals to ‘password’.
- client_id: Set it to the Consumer Key obtained from the Connected App setup.
- client_secret: Set it to the Consumer Secret obtained from the Connected App setup.
- username: Set it to your Salesforce username.
- password: Set it to your Salesforce password concatenated with the security token.
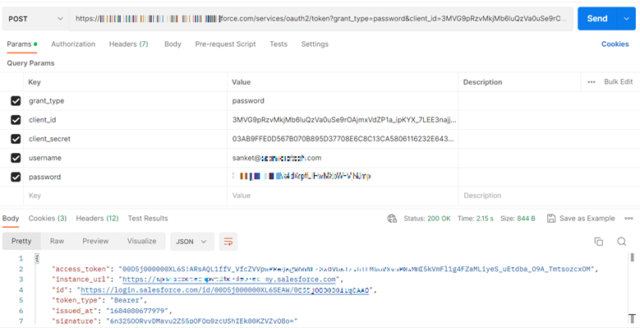
Storing the Access Token:
- After successfully receiving the request from the postman we will get access token in return. Store the access token as we will need it in further steps.
Testing Salesforce APIs with Postman:
- Select GET method and input your classic URL concatenated with services/apexrest/{method from your rest service}
- Under the Header tab put the following data:
-
-
- content-type: application/json
- authorization: authorization: Bearer {access token from response}
-
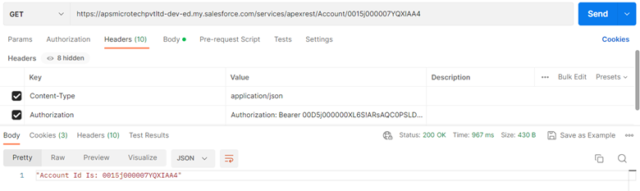
Verifying the response:
As we are returning the Account Id from the doGet method, we are getting the response as expected.
Let’s break down the code and understand its functionality:
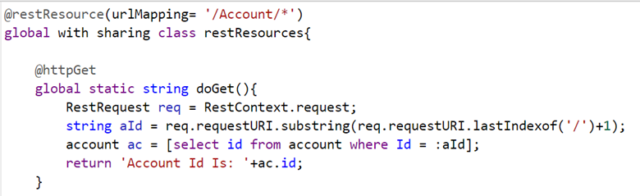
-
@RestResource(urlMapping= '/Account/*')- This line specifies the URL mapping for the RESTful resource. In this case, the resource is mapped to URLs that start with “/Account/” followed by any additional path segments.
- This line specifies the URL mapping for the RESTful resource. In this case, the resource is mapped to URLs that start with “/Account/” followed by any additional path segments.
@HttpGet- This line is an annotation specifying that the
doGet()method should handle HTTP GET requests.
- This line is an annotation specifying that the
RestRequest req = RestContext.request;- This line retrieves the current REST request using the
RestContext.requestvariable. It provides access to the request information such as headers, parameters, and request URI.
- This line retrieves the current REST request using the
String aId = req.requestURI.substring(req.requestURI.lastIndexOf('/')+1);- This line extracts the last segment of the request URI, which represents the Account Id. It uses the
requestURIproperty of theRestRequestobject and thesubstring()method to get the desired part of the URI.
- This line extracts the last segment of the request URI, which represents the Account Id. It uses the
Account ac = [SELECT Id FROM Account WHERE Id = :aId];- This line performs a SOQL query to retrieve the Account record based on the extracted Account Id. It uses the
:aIdsyntax to bind the value of theaIdvariable in the query.
- This line performs a SOQL query to retrieve the Account record based on the extracted Account Id. It uses the
return 'Account Id Is: ' + ac.Id;- This line constructs a response string that includes the Account Id retrieved from the query. It concatenates the “Account Id Is: ” text with the
Idfield of the queried Account record.
- This line constructs a response string that includes the Account Id retrieved from the query. It concatenates the “Account Id Is: ” text with the
It’s important to note that this is a simplified example, and in a real-world scenario, you would typically handle error handling, authentication, and other necessary considerations.
Conclusion:
Integrating Salesforce with Postman opens up a world of possibilities for developers and administrators seeking to streamline their processes and enhance productivity.
We covered the initial steps to get started, including signing up for a Salesforce Developer Account, installing and setting up Postman, obtaining Salesforce API credentials, and configuring the Salesforce Connected App. Additionally, we delved into exploring Salesforce APIs, authentication methods, and how to utilize Postman to test Salesforce APIs effectively.
By following the steps outlined in this guide and leveraging the features and capabilities of Postman, you can seamlessly integrate Salesforce with other systems, improve workflows, and optimize data flow. The integration of Salesforce with Postman empowers you to build robust integrations, enhance collaboration, and ensure the reliability and efficiency of your Salesforce integrations.
Very well explained.