
Introduction
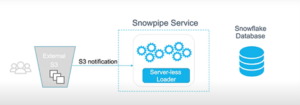
In this blog, we will discuss Snowpipe, a very important feature of Snowflake. SnowPipe allows you to automatically load data as soon as files appear in a particular bucket. When new files are added to the bucket, they are automatically loaded into the specified table. This is especially important when it comes to transactional or event data that you want to be readily available for analysis. So, using SnowPipe here to automatically fetch this new data as soon as it appears in a particular bucket is a typical use case. SnowPipe is also called as serverless function. This means that instead of using a virtual warehouse, computing resources are managed by Snowflake itself. In this case, you don’t have to worry about virtual warehouses. Suppose you have a specific bucket, and you can manually copy data from that bucket to your table. However, SnowPipe automatically detects as soon as a file is loaded or placed into that bucket. Just get that notification and you can set up an event notification to trigger that SnowPipe.
Setting up Snowpipe
1) Create Stage
First step is to create a stage object. This includes the connection and location to the external stage to copy the data. After that, we need to create a copy command. We recommend that you also test this copy command after creation. You can then create a pipe containing this copy command definition. Before using the COPY command in a Snowpipe definition, you should ensure that the COPY command runs successfully and correctly. A stage can be an S3 bucket or an Azure Blob where streaming data arrives continuously.
// Create table first
CREATE OR REPLACE TABLE SNOW_DB.PUBLIC.employees (
  id INT,
  first_name STRING,
  last_name STRING,
  email STRING,
  location STRING,
  department STRING
  );

// Create file format object
CREATE OR REPLACE file format DATABASE.file_formats.csv_fileformat
    type = csv
    field_delimiter = ','
    skip_header = 1
    null_if = ('NULL','null')
    empty_field_as_null = TRUE;

// Create stage object with integration object & file format object
CREATE OR REPLACE stage DATABASE.external_stages.csv_folder
    URL = 's3://snowflakebucket/csv/snowpipe'
    STORAGE_INTEGRATION = s3_int
    FILE_FORMAT = DATABASE.file_formats.csv_fileformat;

// Create stage object with integration object & file format object
LIST @DATABASE.external_stages.csv_folder;

// Create schema to keep things organized
CREATE OR REPLACE SCHEMA DATABASE.pipes;
2) Create Pipe
We need to create a pipe and the name the pipe as Employee. Once we create a pipe it’s not actually working yet. Because we need to be able to set up notifications and receive files to start this copy.
// Define pipe
CREATE OR REPLACE pipe DATABASE.pipes.employee_pipe
auto_ingest = TRUE
AS
COPY INTO SNOW_DB.PUBLIC.employees
FROM @DATABASE.external_stages.csv_folder  ;

// Describe pipe
DESC pipe employee_pipe;

SELECT * FROM SNOW_DB.PUBLIC.employees ;
3) Configure Notifications
There are couple of ways to trigger a pipe to continuously load data.
- Configure events via cloud platform: This will trigger the pipe when new files arrive. When the event occurs, the associated pipe is also fired to load the data into the target table. This is the preferred option as it is less hassle and more robust than the alternative method.
- Trigger Snowpipe using the REST API: Write a custom program that you can run whenever you want Snowpipe to load.

4) Manage Pipes
Once pipe is created, we need to handle it like pause, resume, refresh, list files in step, check if channel is paused and have PendingFileCount 0, recreate channel to modify sentence the COPY command in the definition, checks whether the channels are running or not.
// Preparation table first
CREATE OR REPLACE TABLE SNOW_DB.PUBLIC.employees2 (
  id INT,
  first_name STRING,
  last_name STRING,
  email STRING,
  location STRING,
  department STRING
  );

// Pause pipe
ALTER PIPE DATABASE.pipes.employee_pipe SET PIPE_EXECUTION_PAUSED = true;

// Verify pipe is paused and has pendingFileCount 0
SELECT SYSTEM$PIPE_STATUS('DATABASE.pipes.employee_pipe') ;

 // Recreate the pipe to change the COPY statement in the definition
CREATE OR REPLACE pipe DATABASE.pipes.employee_pipe
auto_ingest = TRUE
AS
COPY INTO SNOW_DB.PUBLIC.employees2
FROM @DATABASE.external_stages.csv_folder ;

ALTER PIPE  DATABASE.pipes.employee_pipe refresh;

// List files in stage
LIST @DATABASE.external_stages.csv_folder ;

SELECT * FROM SNOW_DB.PUBLIC.employees2;

 // Reload files manually that where aleady in the bucket
COPY INTO SNOW_DB.PUBLIC.employees2
FROM @DATABASE.external_stages.csv_folder;

// Resume pipe
ALTER PIPE DATABASE.pipes.employee_pipe SET PIPE_EXECUTION_PAUSED = false;

// Verify pipe is running again
SELECT SYSTEM$PIPE_STATUS('DATABASE.pipes.employee_pipe') ;
Conclusion
Snowpipe can load data from files as soon as the data is available in the stage. This means that instead of manually running scheduled COPY statements to load larger batches, you can load data from files in micro-batches, making data available to users in minutes.
Hope this blog helps!
informative blog
Good work